This reference manual provides detailed documentation for MetaSynth’s functions, features, behaviors and user interface. It is available in multiple languages via DeepL AI translation. To change languages, click on the list at the bottom of the browser. Each section can be reviewed as-needed to assist in increasing your mastery. However, there are a few things that are worth understanding when reading any of these sections.
To jump ahead in this manual, use Command F in your browser, type the keyword(s), and click enter to search. Or click on these common topics links: Project Folder, Sample Editor, Effects Room, Image Synth Room, Image Filter Room, Spectrum Synth Room, Image Sequencer Room, MetaSynth Instruments (Synths and Samplers), Montage Room (aka MetaTrack), or Xx (MIDI) Sequencer.
MetaSynth’s Overall Organization
MetaSynth’s user interface is made up of two main areas, the Sample Editor at the top and the XEditor below it.
The Sample Editor is an audio editing utility that provides one location to record, edit, and render audio. It is available at all times. The current sample can be edited, used as an input for rooms like the Effects Room, Image Filter or Spectrum Synth, as the Output render location of most rooms, and a sample editor in the Montage Room.
The XEditor displays the room tools Effects Room, Image Synth, Image Filter, Spectrum Synth, Sequencer, or Montage. Each Room’s specific editor can be accessed by clicking on its name at the top of the application window in a manner similar to tabbed views found in other applications.
Additional popup windows allow creating and editing synths and samplers. They are launched via the Instruments selection and editing buttons in the Image Synth and Sequencer rooms.
Additionally, there is the optional Xx which can play MetaSynth Instruments via MIDI, import/export MetaSynth Sequence files, and export IS Presets and Montage Room files, or Generate compositions then create a MetaSynth Project out of it!

This graphic shows some potential workflows between MetaSynth’s various tools leading to a final stereo mix. Another way to visualize the app suite is to arrange it into three categories: Sequencers (purple), Sound Makers (green), and Sound Modifiers (blue), plus their associated libraries, files, folders, and folder locations.

The MetaSynth CTX Project
A MetaSynth CTX project is basically a directory/folder containing several subfolders and files of various content, all collaborating to provide elements in the goal of making a complete music piece within the montage room. There are required folders like IS Sounds, Sounds, and Effects & Resources, but any number of folders can be freely added to suit the creator’s needs. For example, instruments specific to a project could be added to an Instruments subfolder. This flexibility allows MetaSynth to seamlessly manage presets and other files on a per-project basis, making it easier to work on multiple projects.
Note: New projects start in mono, to work in stereo (full color), you’ll need to click on this grey “mono” icon in each of the rooms to change it to the red+green icon. In the Image Synth, this needs to be done BEFORE opening a Picture file. Also, do this in the Sample Editor, and other rooms/tools. Otherwise, audio will load yellow (panned center).


Also, to increase the image to audio fidelity, set the Depth in the Image Synth and Image Filter to 16bit images before you begin drawing.

Renaming the Project
By convention, the project folder name should match the main IS preset file as well as the montage file. For example, if MySong is the name of the project folder, the MySong.presets file will hold Image Synth elements, and MySong.mont will store the final montage. If there are multiple .mont and .presets files, the one matching the folder name will be used. Therefore, if you rename the project folder, be sure to rename the files and folders within for best results. Alternative montage files (i.e. for different versions of a song) can be used and opened manually, but the only name-matched montage will be opened automatically when loading a project.
Additional .presets bundles can be placed in the project for experimentation or storage or to provide other sounds. However, they cannot be used directly as images in the montage as the montage room only loads the name-matched preset bank. To use them as rendered sound files, render the alternate IS preset into the Sounds folder and use them as you would with Sounds coming from anywhere.
Note: Sample rate is a property of a project Montage file that is set once. MetaSynth will automatically use that rate when opening a project folder. It is displayed and can be changed in Preferences. Changing the sample rate will require re-rendering of all presets and sequences, and sound files used in Montages and Instruments must match the new sample rate. Therefore, it is advisable to set it at the beginning of a project and avoid changing it later.
When launching MetaSynth, the last project used is opened by default.
Project folder structure
The following folders are created when a project is created:
- <project name>.presets – default preset bundle file for the project. You can use other preset libraries as well
- IS Sounds – MetaSynth will automatically put Image Synth rendered sounds here.
- Sequences – Put Sequencer Room sequences here. Sequencer room files must be put in this folder to be available to the montage. MetaSynth will automatically render sequences and place their audio files in this folder also.
- Sounds – Put other audio files of the same sample rate as the project here.
- Spectrums – Put Spectrum Synth sequences here. Spectrum Synth files must be put in this folder to be available to the montage. MetaSynth will automatically render them and place their audio files in this folder.
- Effects & Resources – stores default effect settings, your own particular effects variations and any miscellaneous files here. When creating a new project, all current effects settings are saved in this folder.

Integration with Xx
Xx can now create MetaSynth a project folder to contribute assets.

MetaSynth CTX ‘s Special UI Features
U&I Software has developed special user interface controls which have additional unique features.
Numerical fields
Numerical fields in MetaSynth have a few special properties. You can click on a numerical field and enter a new value by typing. To complete the text entry, you must press the Return or Enter key.
You can also drag vertically to increase or decrease the value. Option-drag will multiply the resolution of increments by an order of magnitude. For even higher precision you can use Option+Shift. This increase in resolution also works with sliders and numeric sliders.
Tool Tips
There is a tooltips display region at the bottom center of the MetaSynth window (and also the Instruments Editor) that displays the helpful information when the cursor is placed over an area or control. This can include the names of buttons and other controls, keyboard shortcuts, numeric values, etc.
Level Indicator
The Level Indicator at the bottom right shows the audio level when previewing sounds, and when rendering them to the Sample Editor.
When the Preferences > Overflow Handler is set to MIN Ceil, dynamic range compression is OFF. Therefore, red in the level meters indicates that audio is clipping.
When the Preferences > Overflow Handler is set to Continuous Ceil, dynamic range compression is ON. Therefore, red in the level meters indicates that compression is being applied to avoid clipping. In most cases, the built-in compression should be transparent, but if it proves undesirable, open the Preferences dialog and set the Overflow Handler to MIN Ciel.
Note: Due to the nature of this type of synthesis, there are cases where the audio could become clipped or distorted during intermediate processing stages without pushing the output Level Indicator into the red.
Control Key
In MetaSynth CTX, holding the Control key + Clicking in a work area usually brings up a MetaSynth pop-up menu. For example: In most rooms, the Control key alone will display the Edit Menu. The following details show how the Control key can be used in various contexts.
General
Control Displays Edit Menu
Control+Option+Command Displays File menu
Image Synth
Control Displays Tools set pop up
Control+Command Displays Edit menu pop up
Control+Option Plays note
Sample Editor
Control+Option Sample area: Displays Filter menu shortcut
Sequencer and Spectrum Synth
Control+Option Plays note/plays single event
Montage room
Control-click On an event: Provides a source change popup picker. This picker can change the source only within the event category.
Elsewhere: Displays the Edit Menu, as usual.
Time Units
Tempo-Based: Measures, Beats and Ticks
Several features rely on time units that are relative to the tempo of the loaded audio. This can ease selection and allow time-based effects like delays to stay musically synchronized. It is therefore useful to define the tempo of the loaded sample, and its beats per measure. This setting defines the length of MetaSynth’s finest tempo-based unit of measurement, the tick. One tick is a 240th of a beat, regardless of the audio sample rate.
Time-Based: Minutes, Seconds and Samples
Sample editing operations often require a finer level of precision than the tempo-based units described above. In these cases, controls will operate in terms of minutes, seconds and samples. Naturally, an audio sample’s values will be dependent on the sample rate of the loaded audio sample, which is usually determined by the setting in general Preferences (documented below).
Grids
Each editor (the Sample Editor and each individual XEditor) features grid functions that allow selecting regions along musically useful boundaries that depend on the tempo established for the audio you’re editing.
Render Menu 
The Render menu button appears in most of the Rooms’ XEditor windows. The contents of the menu vary from room to room. In general, this menu allows you to commit the current state of the processing to “memory”, which is to say to the Sample Editor, or to “disk” as an audio file.
Three commands in this Menu are common to most rooms:
Render to memory (@)
Renders to the Sample Editor. The resulting sample is immediately visible and ready for further modifications.
Render to disk as (“Mix sequence as” in Montage room) (^)
Renders directly to disk at a chosen location under a specified name. Commonly used to export sound to another location than the current project.
Render to disk and Save ($)
This command renders the various Rooms’ sound to the corresponding project location, and saves the source preset/sequence where the sound is originating from. The sound is named automatically and is always immediately available in the montage room. This should be the preferred method when creating a MetaSynth piece; it greatly improves the creative workflow by automatically handling all file housekeeping details.
Best Practices
To ensure the best experience using MetaSynth, there are some procedures we can recommend.
Creating a New project
The New project command is available in the main menu as well as the Montage File menu button. These are documented more thoroughly elsewhere, but it’s best to bear the following in mind.
- When creating a new Project, the canvas that is currently in the Image Synth XEditor will be the first item in the project’s default Image Synth preset library.
- Make sure that the Sample Rate that you would like to use has been set in Preferences before adding sound files to your project. This will ensure that all imported sound elements will be converted to the project’s sample rate, as mixed sample rates are not supported. (This is not an issue with mixed bit-depths.)
Sample Rate Matching
When creating a project, ensure that the sample rate in the Preferences dialog matches that of your audio interface and of any other audio applications that may be running in the background. This can avoid many undesirable or unexpected behaviors.
As noted above, changing the sample rate of a project can cause problems if sound files already imported into Instruments or the Montage are not also resampled to match. So for best results, make sure the sample rate is set correctly at the beginning of a project.
Backing Up
Backing up a project mainly involves backing up its project folder in its entirety. However, Instruments stored in the MetaSynth application folder can be used in any project, so be sure to back up the application folder as well, particularly if you have used any custom-installed items in your Montage or Instruments.
Rendering
When rendering effects to the Sample Editor or to disk.
The Sample Editor

The Sample Editor is the upper pane of the MetaSynth window. For the best understanding of MetaSynth’s connections and workflow, it is recommended that you perform the tutorials provided in the documentation before venturing too far in the reference section. The tutorials cover the connections between the Sample Editor and the individual Rooms as well as some of the Sample Editor’s unique quirks and features.
Sample Editor Basics
All of MetaSynth’s rooms connect, in some way, to the Sample Editor which is a lightweight, easy to use sample editing environment. All of the rooms except for the Montage Room send their rendered output to the Sample Editor when rendering to memory while others (such as the Effects Room and Image Filter) also take their input from the Sample Editor. Most of the main menu bar’s commands apply to the Sample Editor. Most of the Sample Editor tools apply to the sample’s selected area. If there is no selection, the commands apply to the entire sample.
The Waveform Display
The Sample Editor’s content area is the waveform display. When a sound is opened from disk, or rendered from a room, it is loaded into the Sample Editor’s memory and shown in the waveform display. Until you save the sound as a file, the sound exists only in memory. To save the loaded sound, you must use the Save, Save As, or Render & Save commands.
To make the most of the Sample editor’s unique user interface, note the following.
Selection
Selecting a segment of a waveform is managed by holding down the Command (⌘) key. Adding the Shift key modifies it. Selection in and out points are displayed in the UI in minutes/secondes/millisec
- Command-dragging creates or replaces the selection.
- Command-clicking or pressing the ‘d’ key deselects (drops) the selection.
- Command-Shift-click in an unselected area to extend the selection to that point.
Zooming
To zoom in or out, hold down the Option key (the cursor will change) and then drag left or right (to zoom in or out) from the point of the waveform at which you want to see more detail (the “origin”).
As you zoom in, the origin will move toward the center of the Sample editor’s waveform display. As you zoom out, the origin will move toward the center until the zoom level requires that sample data from the far end of the sample be displayed. You can also zoom to a selected part directly using the “Fit to screen” icon.

Scrolling
To scroll a zoomed waveform, click on the waveform and drag left or right. It will scroll the waveform until the end is reached. If the waveform is fully zoomed out, dragging will have no effect.
Supported File Types
MetaSynth’s natively-supported sound file types are AIFF (also called aif), .wav and .caf. MetaSynth can also open many other formats like mp3 through CoreAudio, but it cannot save in other formats than the natively supported ones.
Most image file formats are supported through CoreGraphics with png being the most widely used. File types png and tiff support 16 bit per component images.
Apple events are supported for native sounds and common image formats, as well as specific MetaSynth formats like sequence file .mseq or spectrum synth file .spct. Thus you can drag a sound file, a png file or a MetaSynth sequence file onto the MetaSynth Application icon in the Dock to open the element into the corresponding room.
Double click on a file in finder is also managed by Apple Events but MetaSynth is not necessarily the first target of common types like png, thus a direct drag to the icon is a more reliable method for common types.
To align with the hard drive format changes in MacOS X 10.14 and above, file extensions are mandatory in CTX products.
Playback
To play the sample editor sound, press the play button or press the spacebar (when the upper-pane has the keyboard focus). Type option-Space (hold down Option and tap the space bar) to play the selection only. Alternatively, you can use ⌘-Space as well if you disable conflicting system shortcuts.
The Grid
Vertical grid lines can be overlaid onto the sample editor indicating bars and beats for reference. Additionally the grid provides musically useful snapping of selection boundaries to the grid’s beat markers and its invisible subdivisions. The number of subdivisions can be controlled as well by defining them in units of ticks, which are subdivisions of a quarter-note beat, and are therefore dependent on the audio data’s tempo setting. For example, setting the selection grid size to 360 ticks would snap the selection to 1½ beats.
Crossfades: Clickless editing
When performing most edits in the Sample Editor, MetaSynth auto-crossfades on either side of the edit point to ensure that there are no pops or clicks when playing back the edit points. The default setting is 20ms, which is usually sufficient. To disable this, set the Auto-Crossfade time to 0 samples.
Upper Left-Hand Toolbar
In the upper tool area of the Sample Editor is a set of popup menu buttons at the left-hand end:
File popup
Open Sound (o)
Open a sound file. If the selected file’s sample rate is different from the current project sample rate, MetaSynth will ask about converting the sample rate. If you choose to convert the sample rate the file will be overwritten so you may need to manually make a copy if you want to keep the original.
MetaSynth can natively open aif, wav, caf, SoundDesigner II, mp3 and any file format supported by CoreAudio. MetaSynth cannot, however, save in a non linear PCM format or any exotic compressed format like mp3. MetaSynth goal being to achieve the best quality possible compressed formats are not advised anyway. Even more, intermediary sound files should be saved in float 32 bits ‘caf’ to avoid accumulating errors in roundings.
Note: The internal MetaSynth format is 32 float for memory storage and in computing MetaSynth uses 64 bits float.
Save Sound (s)
Save the sound in the sample editor over the original file. Use ‘Save Sound as’ if you are unsure as Save overwrites without warnings.
Save Sound as…(S or shift S)
Save the sound in the sample editor under a new name and location with the standard Mac OS save file dialog.
Loop points (if any) are saved with the file but be aware that all transforms that changes time, waveform or sample order will render existing loop points meaningless. So when it is mandatory to keep loops intact use only transforms that don’t affect the loops like normalize or compression.
Tech note: loop points are saved using kAudioFilePropertyMarkerList meta tags. It is unclear if this is uniquely Mac OS or can apply to PC wave file as well. The old Sound designer loop points were stored in the Resource fork which is no longer available on recent MAC OS. It may be needed to use older MetaSynth versions instruments saving to convert these old sd2f files to AIFF to successfully recover the loop points.
Save selection Sound as…
Propose to save only the selected area shown in blue. This is handy to split a sample into various parts. The standard Mac OS save file dialog will be invoked to name and choose the location (by default the source sample location )
Edit popup menu
This popup allows easy and quick access to editing functions. Shortcut keys, if available, appear in parentheses and do not require a modifier key.

- Undo (z) Alternately undo or redo the last change made in the sampler editor. Use this command to perform “before/after” comparisons of edits. It is available even after choosing Save or Save As. This behavior makes it easy to restore/re-open a sound after having applied an effect and saving the modified sound. Or, it can be used to reopen a sound file after having computed a sound with the Image Synth.
- Cut (x) Moves the selected range out of the sample editor and into the sound clipboard for subsequent paste operations. MetaSynth does not permit an empty sample editor, so this menu item will be dimmed if the entire sample is selected.
- Copy (c) Copies the selected range into the sound clipboard for subsequent Paste operations. If no selection has been made, it copies the entire sample.
- Paste Into (v) Replaces the selected range with the data from the sound clipboard without changing the overall sample duration. If the clipboard data exceeds the duration of the selection, the pasted data will be truncated from the end of the selection forward. If the clipboard data is shorter than the current selection, the selection range will be automatically shortened to exactly match the sound clipboard’s sample duration. If there is no selection, the entire sample is replaced by the clipboard data.
- Paste Merge (m) Mixes the data in the sound clipboard with the selected range without changing the overall sample duration. If the clipboard data exceeds the duration of the selection, the pasted data will be truncated. If the clipboard data is shorter than the current selection, the selection range will be automatically shortened to exactly match the sound clipboard’s sample duration.
- Paste Insert (b) Sound clipboard data is inserted at the insertion point, extending the overall sample duration. If there is a selection, the selection start point is used as the insertion point. To completely replace the selection, use the Clear menu item, then Paste Merge (or the key sequence ⌫b).
- Clear (⌫) Deletes the selected sample data, shortening the sample. MetaSynth does not permit an empty sample editor, so this menu item will be dimmed if the entire sample is selected. To zero the selection samples use Silence (;) in generate pop up menu.
- Select All (a) Selects the entire waveform, including any portions not visible due to zooming. MetaSynth does not permit an empty sample editor, so the Cut and Clear menu items will be dimmed if the entire sample is selected.
- Deselect All (d) Drops the selection (regardless of selection length) without altering the sample.

- Select By… Invokes the Select By dialog so that selections can be made numerically or by using the time coordinates of the XEditor selection. This command performs the same action as clicking on the Select By icon in the lower left of the Sample Editor.
- Snap to Zero Crossing Adjusts the selection boundaries to be at the nearest zero crossings. This is useful when copying, pasting or otherwise editing to avoid introducing pops or clicks.
- Quantize Selection Adjust the selection boundaries to line up with the grid. This command works even if the grid has been turned off.
- Crop to Selection (g) Trims the audio to the selected range only by deleting the audio data outside of the selected region.
- Invert Phases (p) Flips the waveform selection vertically, causing positive sample data to become negative and vice versa.
- Swap Left & Right (i) Swap the left and the right channels.

- Offset Samples By… Invokes a dialog allowing the selected data to be shifted later in the sample by a numeric amount.
This overwrites whatever sound was previously located at the destination location. Use this to correct timing errors of notes or syllables. To move the selection earlier, enter a negative number in the samples field.
Generate popup
This popup provides various waveform and noise function generators. Basic waveform are often a good starting material for filters and waves gaping processes.

Selecting these menu items replaces the selected range (or the entire sample, if there is no selection) with the following waveform signals:
- Sine waves at 55, 220 and 440Hz
- Square waves at 55 and 110Hz
- Sawtooth waves at 55 and 110Hz
Various noise generator functions:
- White Noise Random broadband noise.
- Pink Noise Noise with equal energy in all octaves. (Most of the energy of this particular noise function is in the frequency range 100Hz to 3000Hz.)
- Fractal Noise Similar to white noise, but the amplitude of the partials varies inversely with frequency (higher frequencies have increasingly lower amplitudes). It is a great starting point for room tone and other low rumbles.
- Impulse trains, which are waveforms that consist of digital silence interrupted by a digital spike at specific periodic intervals. The default impulse train has a period of 4096 samples. The “balanced” impulse trains have 55, 110 or 220 spikes per second, and one stereo channel is 180˚ out of phase with respect to the other. Balanced impulses give a single peak in positive alternating with a negative peak. Most of the signal is zero. Impulses are handy to get an accurate impulse response signal from any filters/ effects. They can also when filtered with second order filters provide interesting pitched crisp starting points for sound waves design. They also work well with convolution to pitch any unpitched signal.
- Silence (;) Replaces the selection with digital silence. The keyboard shortcut is the semicolon key. Use this to erase portions of the sample without affecting duration.
Filter popup
This popup provides general signal processing functions.

- Normalize normalizes the volume of the sample or the selection, scaling the sound’s volume upward so that the highest peak is 0dB. Use this command to maximize the sample’s volume without changing its effective dynamic range. In samples with sharp attack transients like drum sounds, this may not have a noticeable effect.
This command is the same as the Normalize icon tool found on the Sample Editor’s right-hand toolbar.
- Fade In (<) Fade in the sample or selection using a linear fade across the selection range. This is a quick way to fade in a sound. If there is no selection, the fade in effect will occur over the course of the entire sound file.
- Fade Out (>) Fade out the sample or selection using a linear fade across the selection range. This is a quick way to fade out a sound. This tool is equivalent to the Sample Editor’s Fade Out icon tool.
- Fade In & Out (j) Perform a very short-duration fade at the selection beginning and end to guarantee that a sound begins and ends at zero to avoid pops or clicks when looping.
- Smooth Removes very high frequencies from the selected region of the current sample. Smooth differs from the Remove Highs command in that it removes only the very high frequency content of the sound (over about 18kHz). Smooth is useful for attenuating clicks and for processing a sound before pitch shifting it upwards. When removing clicks, select the area immediately surrounding the click and apply Smooth. If smooth is not enough, use Remove Highs.
- Derivate Extracts the high frequency content of the selection by computing the difference between every two consecutive samples. Use this effect to make a rich sample sound as if it were coming out of a cheap radio, or create ‘tweeter burners’ for that next techno hit. You will often want to normalize the sound after applying this process as Derivate often results in low amplitude signals. Use Derivate temporarily to find clicks. Repeated application of this command will emphasize rapid transients, like clicks. Apply this process on a selection to find hard-to-find clicks then, once you have found them, Undo the derivation and remove the clicks.
- Compress Compresses the dynamic range of the sample (the softest to the loudest sounds). This increases the sample’s overall loudness without causing the loudest parts to overload, and is more useful than normalization with very dynamic material or material with sharp attack transients like drum sounds.
- Expand Expands the selection’s dynamic range (increase the difference between the low and high amplitudes).
You should Normalize after applying this effect as the overall loudness may decrease—even though the overall dynamic range (difference between high and low amplitudes) increases.
- Remove Lows Attenuate frequencies below 400Hz. This command provides a quick way of rolling off the low frequency content of a sample.
- Remove Highs Attenuate frequencies above 600Hz. The filter’s slope starts gradually at 600Hz and rolls off increasingly after about 800Hz.
- Remove DC Offset Readjust the vertical balance (surrounding the zero line) of the sample. Imbalance (DC offset) can result in clicks and pops in the sound itself OR when the sound is processed. DC offset can occur when a large number of unbalanced signals are integrated. This sometimes happens when computing sounds in the Image Synth if the input source is a sample or waveform with some degree of imbalance.
Upper Right-Hand Toolbar

 Mono-Stereo Toggle
Clicking this with a stereo sample loaded discards the right channel, destructively, making the sample mono. If you need to get only the right channel swap the L/R using Edit menu/Swap left and Right (i) command before converting to mono. This is not undoable!
Clicking this when the sample is mono duplicates the data in both channels, so it will continue to sound mono until processed as stereo.
 Normalize
Normalize the volume of the sample or the selection. Normalization scales the sound’s volume upward so that the highest peak is 0dB. Use this command to maximize the volume of the sample without changing its effective dynamic range. It is less useful on content with sharp attack transients like recorded drums.
 Smooth
Remove very high frequencies from the selected region of the current sample. Smooth differs from the Remove Highs command in that it removes only the very high frequency content of the sound (over about 18 kHz). Smooth is useful for attenuating discontinuities and for preprocessing a sound before pitch shifting it upwards.
Tip! When removing clicks, select the area immediately surrounding the click and apply Smooth several times. If not enough a more drastic filter can be used.
 Fade In (<)
Fade in the sample or selection using a linear fade across the selection range. This is a quick way to fade in a sound. This tool is equivalent to the Edit menu’s Fade In command.
 Fade Out (>)
Fade out the sample or selection using a linear fade across the selection range. This is a quick way to fade out a sound. This tool is equivalent to the Edit menu’s Fade Out command.
 Time Reverse Sound
Reverse the sound or selection. Time reverse has the effect of playing the sound backwards.
 Repeat (r)
Click here to insert a duplicate copy of the sample or selection. Repeat performs a ripple edit which inserts the data at the beginning of the selection (if there is one) or at the end of the sample if there is no selection.
 Auto Crossfade
Blend a reversed copy of the sample or selection with the original. Using this tool on “pad” type sounds ensures smooth looping.
 Small Crossfade
Perform a quick fade-in at the sound’s beginning and a quick fade-out at the end. Apply this to sounds meant to loop to prevent clicks and pops at the loop point.
Lower Right-Hand Toolbar

View Start / Play / Play Selection / Loop Play / Record Sound to File / View End
View Start/View End. Show the start and end of the sample in the Editor.
Play. Play the sample from the beginning.
Play Selection. Play the selection.
Loop Play. Loop the sample or the selection.

Record Sound to File. In a new session, it first opens a Setup window to choose the input for recording the sound (from options in your system Audio Setup), and to route audio channels from the input into MetaSynth left (mon0) and right channels. It next opens a dialog to name the file, tag with a color, and choose a folder (default is Presets).

 Grid On/Off
Turns the selection grid on and off. The Selection Grid makes it easy to make musically meaningful selections. When the grid is on, the selection is restricted to the grid, as determined by the Grid Size and Beats Per Measure settings. When the grid is on, beat lines are displayed in the waveform display area. Measure boundaries are indicated by full-height gray lines; beat boundaries are indicated by gray tick marks.
Grid Sizes Presets (in Ticks)
Subdividing the selection grid makes it easier to select musically useful durations of audio data. A beat (quarter note) consists of 240 ticks. Grid Sizes Presets (in Ticks) allows Provides a generally useful selection of preset grid sizes. For example, using the 320-tick grid size preset will constrain selections to multiples of 1½ beats.
Lower Left-Hand Toolbar
 Select By…
Select By allows you to fine-tune the Sample Editor’s selection numerically in absolute time units (minutes, seconds and milliseconds, or as absolute number of samples from the beginning).
The numeric controls add finer- or coarser-grained control depending on the modifier keys that you hold down while dragging. The Option key makes dragging a finer-grained adjustment, and adding the Shift key makes it finer still. In MetaSynth CTX the graphic display of the selection will update while changing values.
Snap to Zero Crossing adjusts the selection endpoints so that they correspond to zero crossings to avoid pops and clicks at edits.
Play plays the portion of the sound corresponding to the dialog’s selection parameters. This lets you preview and fine-tune the new selection before clicking the OK checkmark.
 Fit To Screen
Click here to zoom the selected region to fill the Sample Display Area. If there is no selection, it will fit the entire sound to fit the screen width.
 Zoom Sample View
Click and drag left to zoom out, and right to zoom in. Shortcut: Option-drag the waveform directly to zoom in and out. The visible region will be centered around the initial click location.
 Sample Vertical Scale
Cycle through different vertical magnifications of the waveform. This does not change the amplitude of the audio.
 Slide Selection Samples
Slides the adjacent samples of the Sample Editor sound into the selection by clicking on this tool and dragging left or right. This tool is handy for correcting slight rhythmic errors or moving syllables and words in voice tracks.
 Open Sound (o)
This icon is a shortcut to File>Open. You can use the ‘o’ key when the keyboard focus is in the Sample Editor as well. For more details see Sample Editor menu file section.
 Save Sound…
This icon is a shortcut to File>Save, which will save the current state of the sound in the sample editor over the original file. If the file doesn’t exist yet, it will prompt for a new file name and location with the standard Mac OS save file dialog. To invoke “Save as” instead use the option key.
 Beats Per Measure
The number of beats in a measure. Full-height lines in the waveform display indicate measure boundaries while tick marks indicate beat boundaries.
Tempo [Set Sample View Tempo]
Set Sample View Tempo sets the tempo used by the selection grid. This value is automatically set when you render a sound from the Image Synth, Sequencer or Spectrum Synth. The tempo will only affect how the tempo and selection grid is displayed, not the playback (speed) of the sample.
TIP! Double the tempo by typing ‘*’ in the field, or halve it by typing ‘/’
 Auto Crossfade Size in Samples
By default, MetaSynth crossfades around the selected area when performing most editing operations in order to avoid the clicks that can occur when editing audio. Set the value to 0 if you prefer no crossfading be done.
 Time Range Display
Information about the sound’s duration or the selection start and end points is displayed to the right of the Zoom control. The selection start and end times are displayed when a portion of the waveform is selected. When there is no selection, the sound’s overall duration is displayed.
 Cursor Location Display
When the cursor is in the waveform display, the time corresponding to the cursor position is displayed to the right of the Time range Display. To use the Sample Editor cursor hold down the Command key while clicking on the waveform, the cursor will leave a blue, vertical line. If you want to select a part of the waveform, you hold down the Command key while dragging the mouse. You can not use the Command or Shift key to increase or decrease the selected area.
Move to Start
Click here to scroll the selection start to the left edge of the Sample Display Area. This tool is useful for regaining your bearings if the selection start has been scrolled out of view.
 Play (spacebar)
Play the sound. Shortcut: spacebar (note: when the upper-pane has the keyboard focus).
 Play Selection (Option-spacebar or Option-Spacebar)
Play the selection. Shortcut: Hold down Option or Command (⌘) and tap the spacebar (when the upper-pane has the focus). If both of these alternatives conflict with other system-level functions such as Spotlight searches, see the Keyboard Shortcuts section for instructions to customize your system.
 Loop Play
Loop the sound in the Sample Editor, or the selection if there is one.
 Record Sound to File
Click on this button to record audio into the Sample Editor. The first time you record in a session, MetaSynth will display the Record Input Setup dialog. To terminate recording, press the spacebar. To record in mono, deselect the Record in Stereo if Applicable checkbox.
Note that some audio-input drivers (such as the built-in driver on some MacBook Pros) do not support mono recording. If that is the case, MetaSynth will record in stereo even if Record in Stereo if Applicable is turned off. If you need to change the record options later, click the File Menu button (“Floppy Disk” Icon) in the upper-left corner of the Sample Editor or Montage room, and select Record Input Setup .
 Move to End
Click here to scroll the view of the Sample Display Area so that the end of the sample is visible.
 Level Indicator
The Level Indicator at the bottom right shows the audio level when previewing sounds, and when rendering them to the Sample Editor.
When the Preferences > Overflow Handler is set to MIN Ceil, dynamic range compression is OFF. Therefore, red in the level meters indicates that audio is clipping.
When the Preferences > Overflow Handler is set to Continuous Ceil, dynamic range compression is ON. Therefore, red in the level meters indicates that compression is being applied to avoid clipping. In most cases, the built-in compression should be transparent, but if it proves undesirable, open the Preferences dialog and set the Overflow Handler to MIN Ciel.Effects Room
Effects Room
About This Chapter
This chapter describes the tools and functions of the Effects Room.
Effects Room Basics
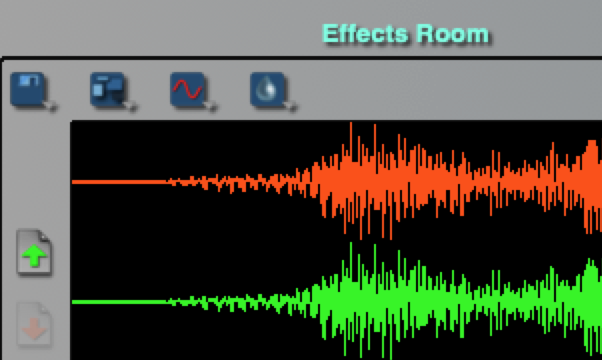
The Effects Room provides envelope-controlled DSP effects that include both familiar effects (such as echo, reverb and EQ) as well as unique effects such as Grain and Shuffler. The XEditor (the window’s lower pane) applies sound effects to the sound loaded into the Sample Editor (the upper pane). You can render processed sounds back to the Sample Editor or to a file on disk.
Each effect has a number of controllable parameters. Many parameters can be controlled by either a slider or a curve resembling a timbral envelope, graphing a series of values that change over time. In many cases, a parameter can be controlled by a pair of curves – one controlling the left channel and the other controlling the right channel. For example, the Pitch & Time effect allows you to transpose the sound by a constant value or with an curve that allows the transposition to vary over the course of the sound; the pitch can even be controlled with a pair of curves that provide independent dynamic transposition of the left and right channels.
Default settings and effects presets
The Effects & Resources folder contains the effect presets available in a given Metasynth project. Their settings are automatically saved in this folder when working on a project. Unlike earlier versions of MetaSynyth in CTX each project has its own default settings for all effects. Additional effects variations may be saved manually as well in this folder, in particular when using multiple variations of the same effect, as the auto saving will just keep the last current version of it. Use different names in that case to not overwrite the default. For example you may use two or three different reverbs in one project. So you will save one as ‘reverb cathedral’ for example, another as ‘reverb short’, and keep ‘reverb’ for the default one.
They will appear in Effects Room’s File popup for easy retrieval. Each effect has a default factory setting that you can restore by clicking on the Reset to Factory button.
PowerUserTip: Inside the MetaSynth application’s bundle resources is a folder called effects (factory) that contains the default settings used when you click the reset button. If you prefer different default settings, edit the settings files in this folder. Access this folder by control-clicking the MetaSynth CTX 1.x application and selecting Show Package Contents. The effects (factory) folder is in the Resources folder.
Real-time Operation And Batch Processing
Effect editing can be done during real-time previewing. You can even save performances as they are created by using the Preview to Disk command (found in the Render popup menu in the lower right corner of the application window). The Batch Process folder command (also found in the Render popup menu) makes it possible to apply an effect to all of the files in a specified folder or to all of the samples in a sample series.
Auxiliary Sound
Effects such as Crossfade perform actions that involve the sound loaded into the Sample Editor and a sound file on disk that MetaSynth calls the “Auxiliary Sound”. Choose the Auxiliary Sound with the Open Aux Sound File… command found in the File popup menu in the upper left of the XEditor. If you choose an effect that makes use of the auxiliary sound and you have not already chosen one, MetaSynth will prompt you for a file to use.
Stereo Processing Of Mono Sources
When applying stereo effects to mono sources, the result is a mono file. You must convert the mono sound to stereo (by clicking on the Mono-Stereo Toggle) in order to have a stereo result.
Granular Synthesis
Many of the effects are based on granular synthesis. Granular synthesis involves breaking up samples into time slices known as grains. By repeating, stretching, interpolating and shuffling these grains, a number of interesting effects can be achieved. With these effects, the results are somewhat less predictable than familiar effects like Echo and Reverb and are highly dependent on the source material. We recommend that users interested in sound design spend time becoming familiar with the granular-based effects. Almost any sound can be transformed into something strange and beautiful with these effects.
The Grain and Shuffler effects may be of special interest to composers of loop-based music.
Effects Room User Interface
Envelope Canvas
The content area of the Effects Room is an envelope editor where up to four envelopes can be edited. The number of envelopes that are active depend on the particular effect and the effect settings. Some effects require at least one envelope while other effects can use a static slider or an envelope for its parameters. Generally, envelopes are interpreted as dynamically changing. A few effect parameters use static discrete envelopes which are described later in this chapter (and demonstrated in the tutorial chapter).
Most envelopes are continuous curves. There are some parameters (usually a red envelope) that use discrete envelopes that are made up of a discrete number of steps. The number of steps that make up the envelope is usually adjustable. For example, the Inertia effect is made up of a number of resonators, and a discrete envelope is used to define the resonator bank’s pitches since each resonator can have only a single frequency.
Upper Tools
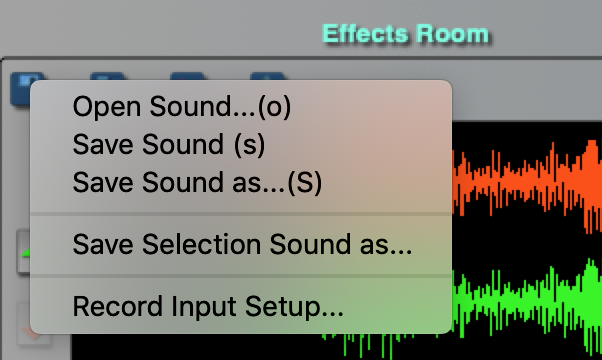
 File popup
Open Filter/Effect (o)
Open a filter/effect preset file and load the effect. Real-time preview stops when an effect is opened.
Save Filter/Effect (s)
Save the current effect settings to its corresponding file in the current project.
Save Filter/Effect As…(S)
Save the current effect settings to a new name or location on disk.
Open Aux Sound File…
This is used to specify a file on disk that will be used for certain features such as Crossfade.
Read Envelope…
Load an envelope from an envelope file exported to disk.
Write Envelope…
Write the current envelope to disk.
Effects Presets
At the bottom of the File popup is the name of effects stored in the project Effects & Resources folder.
 Envelope Edit/Filter popup
Some Edit actions apply to the entire envelope regardless of the selection while others apply to the selected portions of the envelope.
Undo (z)
Undo the last editing action. Because there is only one Undo, you may want to save your work often. If you use an effect on the sample in the Sample Editor and are pleased with the result, save the audio file before you continue editing!
Copy Envelope (c)
Copy the entire active envelope to the clipboard.
Paste Envelope (v)
Paste an envelope stored in the clipboard. Paste replaces the entire envelope, not just the selection.
Paste to All
Paste the envelope in the clipboard to all of the envelopes in use by the effect.
Select All (a)
Selects the entire time range of the Effects XEditor.
Deselect All (d)
Drops the selection in the Effects Room’s XEditor.
Invert (i)
Invert the envelope. Applies to the selected portion of the envelope.
Reverse Time (t)
Reverse the envelope or selection.
Repeat Twice (r)
Repeat the first part of the envelope (or the selection) twice (discarding the second half of the envelope).
Twice Faster (<)
Scale the envelope by 50% along the horizontal axis and repeat it. This command effectively doubles the
“envelope tempo”.
Twice Slower (>)
The width of the first half of the envelope (or selection) is doubled effectively slowing the tempo by a factor
of two.
Symmetry (x)
Create a mirror symmetry by taking the first half of the envelope (or the selection) and pasting it backwards
over the second half.
Normalize (n)
Adjust the envelope values to reach maximum bandwidth.
Unbalance
Scale/shift the envelope so that its values are all in the range of 0 to 1 (full envelope range is -1 to 1).
Balance
Scale/shift the envelope so that the envelope covers the full envelope value from -1 to 1.
Effects Bank
Click on an effect name to activate the effect and load its last settings. In MetaSynth CTX effects settings are auto-saved into the current project when switching effects or when changing projects. The individual effects are described later in this chapter.
Parameter Controls
To the right of the Effects Bank are the parameter controls. Effects have up to five editable parameters. Some parameters may be controlled by either the parameter slider or an envelope. If a parameter can be controlled by envelopes, a popup menu will be available to choose either envelope or slider control of the parameter. In some cases, the slider is active when envelope control is selected. In such cases, the slider determines a base parameter value which the envelope further modifies.
When one of the following icons appears next to a parameter control, the parameter can be controlled by the parameter slider or envelopes: (slider),
(mono envelope),
(stereo envelope). When an envelope control is selected, the popup’s icon displays the color of the envelope that controls that parameter. To edit a parameter’s envelope, click on the envelope icon of the appropriate color to the left of the envelope canvas.
Sometimes, both single and stereo envelope options will be available. In some cases, only mono envelope control is available. When stereo envelopes are selected, the parameters for the left and right channels are controlled by their own envelopes. The Sample Editor sound must have two channels for stereo envelopes to work. You can turn a single-channel mono sound into two-channel mono by clicking on the Sample Editor’s Mono-Stereo Toggle.
Envelope Editing Tools
These tools in the upper right of the Effects Room’s XEditor include a number of curve-shaping tools and a frequency parameter that determines the number of cycles of repeating curves (such as the sine wave) created by the tool.
 Frequency
The Frequency parameter determines the frequency of curves drawn with periodic (repeating) curve tools such as the sine, triangle and square wave tools. For example, when the frequency is set to 1 drawing a sine wave results in a single sine wave cycle (period) being drawn. When the frequency is set to 16, 16 cycles/iterations of are drawn. The iterations fill the selected area. So, if the frequency is 16 and the entire canvas is selected, the 16 cycles will fill the canvas. If only a portion of the envelope is selected, the 16 cycles will fill the selected area.
Curve-Shaping Tools

Click on any of these tools and drag to the right to force the envelope’s shape towards the shape indicated by the tool’s icon. If the icon is too close to the right-edge of the screen to get the full-range of motion, click on the tool and drag quickly to the left (keeping the mouse button held down) then drag to the right. The tool imposes the curve on the selected portion of the envelope. The tools on the right side of the curve tools array are periodic (as indicated by the red and gray line segments at the bottom of the icon.
| Periodic curve tools are indicated by two line segments (representing the halves of the waveform cycle) below the curve shape. |
Curve tool behavior can be altered by pressing a modifier key when using a tool.
- No modifier. Blend the envelope with the curve tool’s shape.
- Option-key. Multiply the envelope and the tool’s curve.
- Command-key. Fade in the tool’s curve.
- Command + Option -key. Modulate the envelope’s phase with the tool’s waveform. Modulation creates FM-like harmonics when applied to audio waveforms.
- Shift-key. Blend with the curve’s inverse. (NOTE: In the instrument editor, the behavior is slightly different.
- The shift key blends with doubled frequency.)
| Randomize curve has a special property you will find helpful when editing envelopes. It randomizes the values differently every time it is applied. This is very helpful for coming up with new variations in the Shuffler or when editing the Reverb effect’s Left/Right Delay envelopes. |
Curve Edit Tools
Click on an edit mode icon to select the editing mode.
 Pencil mode
The Pencil mode allows freeform envelope editing (subject to the grid setting). Turn the grid on to make it easy to draw envelopes with discrete steps and ramps. When the grid is on the shift-key constrains the pencil tool to horizontal lines.
TIP! use the Shift key to constrain lines horizontally when using the Pencil Mode.
 Segment mode
Segment mode allows you to draw line segments by clicking to start the line and dragging and releasing the button where you want the segment to end. If the grid is turned on, the line is quantized into distinct steps which is nice for working with envelopes that control pitch by allowing the pitch to change in discrete steps.
 Selection mode
Selection mode lets you drag in the envelope to create a selection. No matter what mode is active, you can always activate selection mode by holding down the command key before clicking and dragging in the envelope.
Curve Selector
Click on a curve’s icon to select the envelope for editing. A curve can also be selected by clicking on its parameter slider.
Lower Left-Hand Tools
All of the Lower Tools except for Reset to Factory and Blend with Clipboard can be applied to all envelopes by using the shift key. When only part of the envelope is selected, these tools apply to the selection.
Reset to Factory
Reset the effect to MetaSynth’s default setting. Reset sets all parameters and envelopes to the default settings.
Zero
Set the envelope to a horizontal line whose value is 0. Note that some envelopes have a range that includes negative values (balanced). When that is the case 0 will be horizontal line in the middle of the canvas rather than at the bottom of the canvas.
Reverse Time (t)
Flip the envelope horizontally to reverse it in time.
Invert (i)
Flip the envelope vertically to invert it.
Power of Two
Square (raise to the second power) the envelope’s values
Square Root
Apply the square root function to the envelope’s values.
Quantize (q)
Quantize the envelope’s values to make movement discrete (step-wise).
 Move Vertically / Move Horizontally (with option)
Click and drag to shift the envelope vertically. Use the option-key to shift the envelope horizontally. When shifting the envelope vertically, the envelope wraps around.
Scale Amplitude
Click and drag on this tool to scale the envelope’s values up or down.
 Scale Frequency from Left / Scale Frequency from Center (with option)
Click and drag on this tool to scale the envelope horizontally. By default, the scaling is done from the left edge of the envelope. Use the option-key to scale from the envelope’s center point (to spread the envelope from the center).
Rotate Envelope
Click and drag to rotate the envelope.
 Repeat Envelope / Repeat Envelope Discrete (with option)
Click and drag to the right to scale down and repeat the envelope. Hold down the option-key to scale the envelope by factors of two.
Smooth Envelope
Click and drag to smooth the envelope’s edges.
Add Octaves
Click and drag to add “octaves” to the envelope. This treats the envelope as if it were a periodic waveform and adds additional octaves.
Blend with Clipboard
If there is an envelope in the clipboard, click and drag to blend the current envelope with the clipboard’s envelope. The same modifier keys apply here as with the Curve-Shaping Tools found in the Upper Toolbar: multiply (with the option-key), modulate (with the control-key, blend with the inverted clipboard (with the shift-key).
Grid Controls
The Effects Room grid is turned on and off via the grid toggle. The grid interval field below the toggle determines the spacing (in pixels) of the grid. When the grid is on, the pencil, selection, and line segment tools are constrained by the grid. The grid interval also determines the spacing of the grid lines that are drawn on the canvas. The grid lines are spaced at twice the grid interval.
Lower Right-Hand Tools
Render Effect ( to Memory (@))
Render the effect in memory and displays the resulting sample into the sample editor. If there is a sample editor selection, the selection is replaced with the rendered sound. When applying an effect to a selection, the result is truncated to the selection boundaries if the effect creates a sound longer than the original selection.
We recommend using Render to Memory when working on an effect and use the Render to Disk & Save ($) when all settings are correctly adjusted.
When a sound is rendered, MetaSynth often renders via a temp file on disk especially when memory needed is not known in advance, or when the resulting sound is longer than the memory already allocated. Usually this file is destroyed automatically after the result is loaded into the Sampler editor.
Render Options popup. Hold down the option key when clicking on the Render Effect tool to pop up a list
of render options: Render to Memory, Render to Disk, Render to Disk As, Preview to Disk.
Note: The rendering to a portion of sound (selection) is only available when rendering to memory. All render to disk commands will process the entire sound.
 Render Menu popup
Render to Memory (@)
Menu access to Render Effect ( to Memory (@)) discussed above.
Render to Disk As… (^)
Render the effect to disk at the specified location under any name. Use this command when rendering effects that create sounds too large to be rendered in memory or when you simply want to use the file elsewhere. This is especially useful when using Stretch or Grain to create really long sounds. When using Render to Disk As, the only limit is the amount of disk space available. MetaSynth does not load the sound into memory after rendering.
Render to Disk & Save ($)
Render the effect and save the effect parameters directly to disk. Effects are saved in the Effects & Resources folder of the current project while resulting sounds are placed in project Sounds folder. Use this command when you want to process sounds that are already used in a montage. In that case turn OFF the append _flt preference to avoid having to reload the processed copy in the montage and make sure the transformed sound is used in the montage.
Batch Process Folder
Apply the current effect to all of the sound files found in a folder. This command is often used to filter instrument samples for example.In that case you better turn OFF the “append flt when processed” preferences so that the instrument loads the correct filtered samples, and not the unfiltered originals. If you want to keep an unfiltered version or are unsure, best is to duplicate the entire instrument folder with its samples before and rename the filtered version instrument name to avoid confusions than using “append flt”.
It is strongly advised to test-render to memory one or more of the samples to make sure the effect is set correctly before running the batch command.
NOTE! When “append flt” is ON and there are files created by batch filtering or batch processing already in the folder, they will be replaced. If you want files created by a batch process to be processed in further batches and keep the originals, move them to another folder before. On the contrary if the processing of the instrument samples involve several effects applied consecutively, for example an envelope shaping stage with volume, a filter stage with a Second Order low pass filter and a final normalize then turn OFF the “append flt” preferences to avoid a logistical nightmare and process & replace all samples sequentially.
After processing all samples of a MultiSampler it will be necessary to reload them if the instrument is already in memory. There are various ways to achieve that and the simplest is using the “revert to saved” button in the MultiSampler editor.
Preview to Disk
Record a real-time performance to disk. Use this command to record “performances” you create by changing the effect parameters in real-time. The recording is terminated when preview stops.
 Preview Effect (spacebar)
Perform a real-time preview. Previews are done at the full sample rate and are usually at full quality except for very CPU intensive effects (convolutions or FFT based pitch shifting) that can skip some harmonics while previewing.
Effects Reference
Below is a description of the available effects and their parameters. Some effects can cause the duration of the sound to change when there is no selection. To apply the effect without changing the duration of the current sound, ‘Edit->Select All’ (a) before applying the effect to ensure the duration will be unchanged. The effect is applied to the selection thus practically it is cropped to it. Unselect all if the effect can make the sample longer or has an important release that you don’t want truncated like with reverb or echoes.
Some effects have a mandatory envelope. When this is the case, it is always the red envelope.
Volume
Stereo gain control. The effect provides independent gain of the left and right channels as well as control of a mono mix of the left and right channels.
- Volume gain (slider/mono envelope/stereo envelope). Volume gain or reduction applied to the sound.
- Mono mix level (slider/mono envelope). The volume level of a mono mix of the left and right channels of the sound that can be mixed with the stereo sound. Set the slider to 0 if you do not want the mono mix summed with the stereo mix.
Pitch & Time
High-quality Pitch and Time shift effect that allows you to change the pitch and duration of a sound independently. This is a very CPU intensive effect. On some machines, the real-time preview of stereo sounds might stutter. If this is the case, use Amplitude Decimate (see below) during preview to reduce the CPU load.
- Transpose in semitones (slider/mono envelope/stereo envelope). Amount by which the sound will be transposed.
- Speed %. Amount (as a percent) by which the duration will be changed. Note that if there is no selection, there can be a slight duration change even when the speed is 100%. To precisely preserve the duration, select the entire sound (cmd-A) before applying the effect.
- Amplitude Decimate %. The Amplitude Decimate parameter allows you to reduce the resolution (by removing some harmonics) in order to improve the performance of real-time preview on slower machines. When rendering, this parameter should be set to 0 to achieve full fidelity no matter what speed your machine is.
- Inertia %. Add inertial resonances similar to early reflections.
Pan & Pitch
Simultaneous control of panning, volume and pitch. Simultaneous pan and pitch-shifting allows you to create doppler-like effects. The Pan control works best on mono material. To apply the effect to a mono source, load the source sound and click on the Mono/Stereo Toggle to make it stereo.
- Pan % (slider/mono envelope). Pan (left/right balance) control.
- Volume gain % (slider/mono envelope). Volume control.
- Transpose in semitones (slider/mono envelope). Transposition amount.
CrossFade (+ Convolution)
Crossfade and/or Convolve the Sample Editor sound with another sound file on disk (the Auxiliary Sound). Use the File popup’s Open Aux command to select the auxiliary file. As Crossfade only, this effect is especially useful for recombining a sound with variants created using the Shuffler or the Spectrum Synth. The main menubar’s Merge command is a macro that saves a sound in the clipboard to disk, makes it the auxiliary sound and invokes the Crossfade command. The Convolution effect performs a convolution of the main sound with the auxiliary sound to create a hybrid sound. When performing the convolution, the pitch and phase of the main sound are preserved. Generally, you will want to use a pitched sound as the main sound and an unpitched sound as the convolver. This is great for vocoding type effects and wild hybrid sounds. Try using MetaSynth.presets preset 54 (Strings 54) as the main sound and Ana MetaSynth Sound or a drum loop with a similar tempo as the auxiliary sound.
- Level Source (slider/mono envelope). Volume of the Sample Editor sound.
- Level Aux (slider/mono envelope). Volume level of the auxiliary sound.
- Convolution Level (slider/mono envelope). The balance of the convoluted sound and the crossfaded sound (which is the mix of the main sound and the auxiliary sound as determined by the Source and Aux level controls).
WaveShaper
This effect reshapes a sound file by remapping the samples by amplitude and is usually used to distort or to add a lot of new harmonics, but it can be used for more subtle effects like fine control of bandwidth and harmonic content. The Red Envelope is mandatory and defines how sample amplitude is remapped.
- Red Envelope: WaveShaping curve. The horizontal axis represents sample amplitude in the source sound. The vertical axis (height) defines what new value the amplitude will be mapped to. When the envelope is a ramp from 0 to 100, there is no change to the original sound since every amplitude is remapped to its original value. When the enveloppe is a periodic signal of period 2 (or more) you can double (or more) the harmonic content of the original sound. WaveShaper is a great tool to create harsh and crisp techno sound from simple signal sources like a saw or sine wave.
- Effect balance (slider/mono envelope/stereo envelope). The mix of the original sound and the affected sound.
Echo
Echo effect with stereo balance control but one delay across both channels. For independent stereo
echoes, use the StereoEcho effect.
- Effect Balance % (slider/mono envelope/stereo envelope). Adjusts the wet/dry mix. 100% only plays back the delayed signal. 0% plays back the unprocessed signal.
- Decay Time % (slider/mono envelope/stereo envelope). Feedback control that allows you to determine the number of echoes. Sets the percentage of the output signal fed back to the input. A setting of 100% results in full regeneration and 0% results in a single echo.
- Speed (BPM). The echo/delay time expressed in beats per minute. BPM values can be entered with
- accuracy to one hundredth of a beat.
- Brilliance %. Introduces a low-pass filter on the decay of the delayed signal. A setting of 100% passes the signal through unfiltered. Use Brilliance to emulate the decay of typical natural spaces.
StereoEcho
Stereo Echo with independent left and right delay times. Note that the source file must be stereo in order to have stereo output. If the source sound is mono, click on the stereo/mono toggle to put the sound into stereo mode.
- Effect Balance % (slider/mono envelope). Adjusts the wet/dry mix. 100% only plays back the delayed signal. 0% plays back the unprocessed signal.
- Decay time % (slider/mono envelope). Feedback control that allows you to determine the number of echoes. Sets the percentage of the output signal fed back to the input. A setting of 100% results in full regeneration and 0% results in a single repeat.
- Delay left (BPM) (slider/mono envelope). Left-channel delay time in beats-per-minute.
- Delay right (BPM) (slider/mono envelope). Right-channel delay time in beats-per-minute.
Reverb
This stereo reverb is unique and worth exploring for much more than reverb. It features up to 16 programmable delay stages with independent left and right channel contours. This effect provides very fine control and can be used to create both realistic reverb and unique resonance effects. Create interesting resonance effects by setting uniform delay spacing. Many different effects can be achieved by exploring the delay envelope settings. If you create a ramp (a stair step pattern), the result will be a strongly pitched resonance (because the delays will be multiples of each other). To smooth out such resonance, use the Randomizing tool .
Try creating closely spaced delays and move them and down together. Or try creating a reverb with a couple of long delays and a number of closely spaced short stages or vice versa.
- Number of early delays. The number of delays that comprise the reverb.
- Red and Green Envelopes: Delay envelopes. The delay envelopes are mandatory and define the delay time of each delay stage. The number of stages is determined by the Number of Early Delays parameter. You can make a reverb that has all short delays, all long delays or a mixture of the two. A lot of interesting effects can be created by exploring the envelope settings. When the Sample Editor is in mono mode, only the red envelope is active. To create a stereo reverb from a mono sound, click on the Mono/Stereo Toggle.
- Amount % (slider/mono envelope). Wet/dry effect balance.
- Room reflectance (slider/mono envelope). The room reflectance defines how live the room is.
- Room max delay in ms. The maximum delay time the delay stages. Changing this value changes the delay
- time of all delay stages since the delay stages are really defined as a percentage of this value.
- Brilliance %. The reverb brightness.
EarlyRef(lections)
Early Reflections is a simple yet effective early reflections/room simulation effect that gives a sound the impression of occurring in a physical room. Early reflections are the closely-spaced short delays that give a room its reverberance. Many reverbs are a combination of early reflections and delay.
- Amount %. The wet/dry balance.
- Room Size. The maximum delay time.
- Feedback. Feedback feeds some of the delay’s output back to the input and increases how “live” the room sounds.
Resonator
The Resonator can create exciting stereo resonance effects and can be used to pitch noisy or unpitched sounds. Use stereo envelopes to create mind-boggling effects.
- Amount % (slider/mono envelope/stereo envelope). The wet/dry balance which can be controlled by mono or stereo envelopes to provide dynamic interest not possible with a static slider setting.
- Semitones (slider/mono envelope/stereo envelope). This parameter defines the resonant pitch. The slider’s value defines the base resonance even when envelope control is used!
- Input Gain. Pre-effect gain applied to the sound source.
- Brilliance. The effect brightness.
Harmonics
Harmonics convolves the loaded sound with the waveform defined by the red envelope while also pitch- shifting the result (under option envelope control). Convolution of two sounds (in this case the sound defined by the red envelope and the Sample Editor sound) results in a sound with characteristics of both sounds. Check out the Harmonic Robot preset.
A large variety of effects can be created. Interesting subtle harmonics or depth can be added to a sound by using a low setting of the Amount, or a sound can be wildly denatured by setting the Amount to 100%. While exploring, set the amount to 100% as you define the Convolution Waveform (the red envelope) and then dial the Amount down to find the sweet spot.
- Red Envelope: Convolution Waveform. The mandatory red envelope defines a sound waveform that is used
- to convolve the Sample Editor sound.
- Amount %. The wet/dry balance.
- Semitones (slider/mono envelope). Convolution pitch.
- Filter Gain. Effect output volume.
Inertia
Inertia uses a bank of resonators to create amazing resonance and feedback-like effects. There are many applications of this effect including pitching unpitched sounds with chords. If applied when there is no selection, Inertia will cause the length of the sound to increase. To preserve the sound’s duration, use the Select All command in the Sample Editor before applying the effect.
Inertia is a bank of up to 16 individually tunable resonators. Apply it to human speech, white noise or a drum loop and tune the resonators to a resonating chord. (Use the Image Synth’s analyze sound command to find the source sound’s pitches.) Check out the “triad” effect presets for examples of tuned resonator banks. You can have a lot of fun using the Preview to Disk function to capture a performance in which you play the resonator bank (the red envelope).
- Number of resonators. The number of resonators in the resonator bank.
- Red envelope: Resonator pitches. This mandatory discrete envelope has one step for each resonator in the bank. A step’s height defines a resonator’s pitch. The resonators are active during the entire time that the sound plays. Hence, the envelope is static over time. You can of course play the resonator bank in real- time and capture the result using the Preview to Disk menu command.
- Amount % (slider/mono envelope). The wet/dry effect balance.
- Feedback. The degree to which the output signal is fed back to the input. Increasing feedback increases the resonance.
- Input Gain (slider/mono envelope). Pre-effect gain stage.
- Brilliance % (slider/mono envelope). Effect brightness control.
Stretch
Stretch changes the duration of a sound without changing its pitch using granular synthesis. Besides changing the sound’s duration, this effect can create interesting stuttering or resonances depending on how you set the parameters. Stretch uses a less CPU-intensive method of time stretching than the Pitch & Time effect.
Interesting performances can be created by changing the parameters in real-time. If you are trying to zero in on a realistic effect setting, you should periodically stop and restart the preview as feedback/delay effects can be introduced during real-time manipulation.
- Stretch ratio % (slider/mono envelope). Percentage by which the sound’s duration is changed: : 50% halves the duration, 200% doubles the duration, etc.
- Grain size in millisec. The size of the grains (or time slices) used to expand the sound. Large grain sizes may result in stuttering. echo-like effects. Small grains may emphasize particular harmonics and unnaturally colorize the sound (sometimes the effect you want but sometimes not). Very small grains will “pitch” the sound. Due to the nature of Stretch, changing the grain size while playback is in progress is likely to result in an inaccurate preview. You should stop the preview before changing the grain size.
- Randomize in samples. Stretch can introduce some randomization in the rearrangement of the grains which
- can create interesting effects or subtle richness.
Grain
Imagine being able to take a tape recording, slice it up into arbitrarily small bits then rearrange them. That’s Grain! Grain is a granular synthesis effect that displaces and reorders time slices from the source sample. This powerful effect is capable of creating mind-boggling new sounds. Some experimentation is needed to find the settings that work best for a particular source sound or effect, but the results are rewarding. The variety of effects that can be created with Grain is astounding. Grain can turn a solo violin sample into a string section, a jackhammer, or a stuttering violin. A voice sample, slowed down by several orders of magnitude with a strong overlapping turns into an other-worldly sci-fi space drone.
Grains of duration grain size are fed into the Grain effect at a rate defined by the Input Step value. The Grain effect sends the grains out at a rate defined by the Output Step value. The order of the grains is determined by the Randomization parameter. A high value for Randomization results in grains taken out of order from the input sound. The left and right channel grains of stereo sounds are randomized independently. Subtle randomization produces beautiful, chorus-like stereo effects.
- Grain Size in milliseconds The size of the time slices rearranged by Grain. Generally, this value should be at least four times the size of the input and output steps though some nasty deconstruction can be created with grain sizes less than the input and output steps. Large values will increase overlapping of grains creating a sort of chorus/smoothing effect.
- Input step in milliseconds (slider/mono envelope). The rate at which grains are fed into the Grain engine. If the input and output steps are the same length, the resulting sound will have the same length as the original sound. With an input step larger than the output step, the duration will be compressed. If the input step value is smaller than the output step, the duration will be expanded.
- Output step in milliseconds The rate at which grains are output by the Grain effect. Output steps smaller than the grain size ensure continuous output. Output steps larger than the grain size result in gaps between output grains. If the output and input steps are different sizes time modulation (stretching or expansion) occurs.
- Randomization in milliseconds (slider/mono envelope). The degree of randomization of grain order. A setting of zero plays back the grains in the original order. A setting of 500.000ms completely randomizes the grain order. The left and right channel grains are randomized independently, yielding wild, stereo effects.
Grain Tips
- A good starting point for exploring grain is with the Input and Output steps set to 1/4 of the grain size
- Explore the possibilities of Grain by changing parameter settings during preview. See how Input Step and Output Step affect the output, and explore the other parameter combinations as well. .
- Use settings that break the sound into discrete particles then use Harmonics to expand the particles.
- Use envelopes for eerie speed up/slow down effects. Check out the supplied effect presets.
- When working with drum loops, set the grain size to the length in milliseconds of a convenient beat division (such as a sixteenth note). To find the appropriate value, select a note in the Sample Editor and observe the selection length. Don’t forget to deselect any selection (type ⌘-d) so that the effect will be applied to the whole sample.
Shuffler
Shuffler rearranges a sound by slicing it into chunks (grains) which are reordered with the red envelope. It is similar to a step-sequencer where the sequence steps are taken from a pre-recorded sample. The Shuffler can create exciting rhythms and variations from almost any sound source. It is a veritable groove machine that will keep you entranced for hours. Unlike the MetaSynth 2.x shuffler, the placement, attack, volume and release of the individual grains can be controlled.
- Beats per loop. This value is the number of steps/events in the sequence created by the shuffler.
- Red Envelope: Grain position (discrete envelope). This is a mandatory discrete envelope whose steps represent the re-ordering of the source sound. The number of steps in the shuffler sequence is defined by the Beats Per Loop parameter. The vertical position of each step determines the source position. A step with height 0 plays back the first slice of the source sound. A step at 50 plays back a slice taken from half way through the sample. A step of 100 also plays back the beginning of the sample. For a step to play back from the very end of the sample, the height should be just less than 100. If you use the ramp-up Curve-Shaping Tool, you get the sound played in the correct order. Use a ramp-down to play slices played in the reverse order of the original sound. See the tutorial lesson for helpful shuffler techniques.
- Grain Volume (slider/mono envelope). The grains’ playback volume. When set to envelope, you can set the volume of each event (grain) in the sequence. The Grain Volume Envelope is a discrete envelope with one segment per event. Use this envelope to create accents.
- Attack time (slider/mono envelope). The attack time (time that it takes for the grain volume to reach its maximum) for the grains. The envelope is a discrete envelope that allows you to vary the attack times which can create dramatic effects. Vary the attack times so that short attacks seem especially percussive.
- Release time (slider/mono envelope). The duration for which the grains play. Short release times result in staccato effects. The envelope is a discrete envelope with one segment per grain/event.
- Speed (BPM). The tempo at which the grains are played back.
VFT Envelope
(Volume Filter Transpose Envelope). VFT Envelope provides simultaneous volume and pitch control along with an envelope-controllable low-pass filter. Where possible, this effect tries to preserve duration. Since this effect’s pitch-shifting also changes the playback duration, the sound may be truncated when pitch shifting the sound lower.
- Envelope Loops. When set to 1, the effect envelopes will be applied to the entire sound. When set to a higher number, the envelopes will be applied the specified number of times. For example, if Envelope Loops is set to 4. The sound will be divided into four equal parts and the envelopes will be applied to each division. If you set the envelope loops to a large number (128, for example) and the source sound is short, you can generate FM and AM synthesis-like side-bands.
- Volume gain (slider/mono envelope/stereo envelope). Output volume/gain.
- Low Pass Filter (slider/mono envelope). This slider or envelope determines the amount of filtering.
- Transpose range (slider/mono envelope). The amount by which the source is transposed. The slider value defines the center transpose amount when the envelope is used. VFT’s pitch-shifting causes the speed to change as well. Transposing an octave down, for instance, doubles the duration.
- Center Frequency (hertz). The low-pass filter’s center frequency.
Harmonize
Harmonizing effect that permits the creation of two and three-part harmonies whose pitches can be independently envelope controlled. Unlike Resonator or Inertia Harmonize use granular synthesis to pitch unpitched sounds. If you are working with a mono source, set the Sample Editor to stereo mode as the source sound must be in stereo mode for stereo envelopes to work.
- Harmonize Balance (slider/mono envelope/stereo envelope). The wet/dry effect balance.
- Transpose in semitones (slider/mono envelope/stereo envelope). The transposition amount. When the
- envelope is used, the slider’s value defines the envelope’s pitch range.
- Grain rate. Grain rate influences the quality and smoothness of the effect and can add resonances as
- well.
- Randomize. Randomize the grains. The randomization is slight and can create interesting flanging, doubling, and phasing effects. When transpose is set to 0, you can use Randomize to thicken sounds without harmonizing.
Chorus
Stereo chorus effect with vibrato option. Use the Voice Spread parameter to increase a sounds stereo
field. It can be very effective in giving stereo depth to mono sounds.
- Chorus amount (slider/mono envelope). The Chorus effect depth.
- Vibrato rate (BPM). Speed of the optional vibrato.
- Vibrato amount. Vibrato depth control.
- Voice spread. The effect’s stereo spread. Set this to the maximum value for a wide stereo spread. This effect can be effective in giving a stereo spread to a mono source. Set the Sample Editor to stereo operation for this parameter to be effective.
Phaser
A digital implementation of the familiar analog phase shifter effect. The effect is similar to Chorus and Flanger. It is created by mixing the dry signal with a copy delayed and modulated by a sweeping parametric EQ.
- Phaser amount % (slider/mono envelope). Adjusts the wet/dry mix of the processed and unprocessed signals. 100% yields only the processed signal.
- Phaser delay (milliseconds). Delay time between the original and the phased signal.
- Low Frequency Osc (BPM) (slider/mono envelope/stereo envelope). Sets the rate of the EQ sweep in beats per minute (BPM).
Flanger
A digital version of the familiar flanger effect—a variable delay run through a sweeping resonant filter and
mixed with the source signal.
- Flanger amount (slider/mono envelope). Adjusts the mix of the processed and unprocessed signal. 100% yields only the processed signal.
- Semitones. Adjusts the frequency center of the resonant filter.
- Low Frequency Osc (BPM) (slider/mono envelope). Sets the rate of the delay in beats per minute (BPM). Use low values for long sweeping effects.
Compressor / Expander
Compressor/Expander that can decrease or increase the sound’s dynamic range. Use the Compression and Expansion parameters to limit the gain of high-level signals and boost the level of low level signals.
- Compression %. Amount of compression. This is the compression amount applied to high-level signals
- Expansion %. The amount by which low-level signals are boosted
- Window size in milliseconds. This is the time over which amplitudes are averaged to trigger the compressor/ expander.
Graphic EQ
Variable-band graphic eq. The quality and precision of this filter will amaze you. Try the following experiment: load in white noise. Set the number of bands to 128. Set the Amount to 100 (using the slider). Set the Filter Gain to 50. Start the preview. Set the Red Envelope to 0 (by clicking the Zero Envelope icon). Bring bands in and out.
Number of Bands. The number of bands of eq. The bands are equally divided to cover the
Red Envelope: Filter bands. This mandatory envelope defines the eq. The envelope’s steps represent the
eq’s bands.. The step/envelope height is the gain (volume) of the frequencies in that eq band’s range.
Amount % (slider/mono envelope). Wet/dry mix of the filtered and unfiltered sound.
Filter Gain %. The maximum gain for the filter.
SO filters
This effect implements various second order filters in tandem with a possibility to crossfade from one filter to the other. Various combinations are available:
- Peak & LPF: Peak filter and low pass filter
- HPF & LPF: High pass filter and low pass filter
- BPF & BPF: 2 band pass filter
- Bandwidth filter The bandwidth, or Q, determines the width of the filter about the frequency center. 100% yields a broad band width.
- Frequencies in hertz. The center frequencies of the filter.
- Balance controls the crossfade from one filter to the other. It can be an envelope as well as a static value.
Reso Filter
Resonant sweepable bandpass filter.
Effect balance (slider/mono envelope/stereo envelope). Wet/dry effect balance. Center Frequency in hertz (slider/mono envelope). The filter’s center frequency. Bandwidth. The filter width. Small values create narrow filters.
Input Gain.
Ring Modulator
Ring Modulator effect creates Ring Modulation and FM Synthesis-type effects. The red envelope defines a waveform that modulates the Sample Editor sound. Care must be taken when creating the waveform and setting the Ring Modulation % as the effect can easily become harsh and noisy. With some experimentation, you will be able to create wondrously clangorous sounds with this effect.
Red Envelope: Modulation Waveform. The mandatory red envelope defines a sound waveform that is
multiplied against the source sound.
Effect Balance % (slider/mono envelope).
Waveform < – > Waveform * Source (slider/mono envelope). At 0, the effect’s output is just the red envelope’s waveform. At the maximum, the output is the frequency-modulated signal that results from modulating the Sample Editor sound with the red envelope.
Semitone (slider/mono envelope). Pitch of the modulating waveform.
Ring modulation %. This parameter feeds the output back into the input. A very little bit of this feedback goes a long way. Generally, you have to be careful not to set this parameter too high or the result will be very noisy.
Image Synth Room
About This Chapter
This chapter describes the individual tools and operations of the Image Synth Room.
Image Synth Basics
The Image Synth Room provides a uniquely powerful approach to sound synthesis and composition. The room can be used for designing sounds and sound effects, sound loop creation, or for full-fledged musical composition. By altering the room’s parameters (tuning space, tempo/duration, canvas size, synthesis source) a mind-boggling range of sound and music can be created with fine control over harmonic content and spatial dynamics. The room is a combination of piano-roll style sequencer and reverse sonogram that uses light and color to control amplitude and spatial placement. The room’s configurable tuning space allows composition using alternate tunings (with up to 1024 steps) and the creation of sounds with harmonic and non-harmonic spectra.
The Image Synth is a full-featured image editor whose features have been optimized for musically meaningful image manipulation. The room started as the obvious solution to Eric’s desire to simultaneously control a large number of oscillators and envelopes. Once he happened upon the visual paradigm, it became evident, as you will find, that image manipulation provides a method of sound manipulation without equal. Over time MetaSynth has developed into a powerful image processing application as well as music composition tool. Not only can the Image Synth create sound from an image, it can reverse the process. Any sound loaded in the Sample Editor can be turned into a picture using the Image Synth’s sound analysis function.
The graphic approach to synthesis and composition may take getting used to if you are used to more traditional approaches to synthesis and composition. Many people (especially children) find image synthesis to be much more intuitive than traditional approaches. Take time to explore the example libraries we have provided, and you will begin to recognize the sorts of visual patterns or ‘coherences’ that are musically meaningful. You will develop a synesthetic sense for how a picture will sound and how to paint the sounds you want.
You can think of the Image Synth as a bank of oscillators or tape players which is controlled by the image displayed on the canvas. The vertical axis determines the sound’s pitch; the horizontal axis determines when the sound is triggered. The tuning space determines the pitch mapping. The Instrument determines what kind of oscillator is triggered. The tempo/duration setting determines how long it takes MetaSynth to play the picture.
The Image Synth makes use of two special kinds of files: preset libraries and filter libraries. When MetaSynth is launched, the preset library named Metasynth.presets and filter library called Metasynth.filters are automatically opened and available with the Select Preset or and Apply Filter
tools. You can add to these libraries or create your own with the commands described in this chapter. Both libraries are collections of pictures.
Preset libraries are collections of sound pictures. A sound picture consists of an image and the parameters used to play it back. Filter libraries are collections of images that can be applied as graphic filters (more on this later) to the picture displayed on the canvas. Any image can be added to either type of library.
How MetaSynth Plays a Picture
Images are interpreted as sound using a few simple rules. The pixels (the dots that make up the picture in Canvas) trigger a selected instrument (MetaSynth’s built-in synthesizers or samplers). Pixel color determines the left/right position of the triggered sound. Pixel brightness determines volume (amplitude). The vertical position of a pixel (in conjunction with the tuning space parameter) determines the pitch.
Note: Most scales are limited to a Y height of 128 this ensures no frequencies above 20k are generated. To unlock a wider frequency range select Exponential, a custom scale, or one of the micro tunings.
MetaSynth plays the canvas from left to right at the speed determined by the tempo/duration setting. When MetaSynth encounters a non-black pixel, the instrument is triggered. As the pixel color and brightness change so does the pan and amplitude. The number of voices that can be played in real-time will be determined by the computer’s CPU speed. When sounds are rendered in non-real-time, there is no limit to the number of simultaneous voices that can play.
How you set up the Image Synth canvas (tuning space, tempo/duration, instrument) has as much of an impact on the sound as the image itself. The same image (score) can be made to sound very different by changing the Image Synth settings. An image that creates a majestic passage played by a string orchestra can become a cacophonous transient explosion by changing its settings. MetaSynth provides a variety of virtual instruments for use in both the Image Synth and Sequencer rooms: single and multi-oscillator wavetable synths, FM synths, multi-samplers and more. MetaSynth instruments are covered in detail in a later tutorial chapter.
Sound pictures can be mono or stereo. Mono sound pictures are grayscale; stereo pictures are color. MetaSynth uses an RGB (red, green, blue) color model. Green represents the right channel. Red represents the left channel. In RGB, yellow is the combination of red and green and thus is played back in the center of the stereo field.
Both mono and stereo sound pictures have a blue grid layer. Blue is ignored by the Image Synth when rendering
sound which allows you to set up silent rhythmic and harmonic grids or other templates. Special commands allow the grid layer to be applied as a filter to the image layers. Additionally, all layers of a color image have a blue “channel” which the Image Synth ignores. The blue channels can be used for the same purposes as the grid layer.
Phase Randomization
By default, MetaSynth randomizes the phases of instrument waveforms in order to avoid the phase-related anomalies that can occur when there are a number of in-phase oscillators playing at once. In the Preferences dialog, there is a popup that determines the phase randomization. The options are: None, Small Mono, Large Mono, Small Stereo and Large Stereo. When the stereo options are chosen, the left and right channels of a given note will have their phases randomized independently. This creates an expansive stereo field. Use either of the mono modes if you do not want this stereo effect. The mono modes keep the left and right channel of any given note in phase.
Note! With some images in Canvas, the first pixels may generate an unwanted higher audio level when played back if the phase randomization is set to Mono. Setting this to Small Stereo or Large Stereo, will in most cases give a more satisfactory result.
Image Synth Concepts
There are a few terms and concepts that are important to understand when discussing the Image Synth.
Color Channels. In a sound picture, color represents stereo placement. Color pictures (and the layers of a color picture) are actually made up of three color layers (red, green and blue). The red and green layers are mapped to the left and right audio channels. The blue channel is ignored and is used for comments. Mono sound pictures have a single grayscale channel. The brightness of the pixels on the color channels is scaled from 0 to 1 and controls AMPLITUDE of a particular frequency. Where you see red in an image, the red pixel has a value > 0 and ≤ 1 and the pixels of the green and blue layers have values of 0. Where you see a shade of yellow, the red and green pixels have approximately the same brightness. Where you see white the red, green and blue pixels have the same brightness. It is possible to edit the pixels of the individual color channels using the Channel Edit Mode Selector. When two images are multiplied (such as when a filter is applied to the canvas), the brightness of the corresponding pixels of each color channel are multiplied together.
Blue Channel. The Blue Channel refers to the blue pixel component of a color picture. The blue channel is ignored by the Image Synth when sounds are generated. The Blue Channel is free for harmonic templates or grids but this usage is now deprecated and replaced by the Grid Layer (which the Image Synth draws as blueish) that is present enven for mono sound (all sound pictures have a Grid Layer).
Frequency Map (Tuning Space). To play a sound picture, MetaSynth needs to know how to map the vertical scale of a picture to pitch (frequency). This is done with frequency maps (also called tunings) that define the tuning space. There are a number of built-in frequency maps that include whole-tone mapping, semitones, the major scale, microtonal tunings and other common tunings. It is also possible to define custom tunings. Custom tunings make MetaSynth the perfect tool for exploring almost any imaginable tuning or intonation system.
With Color intensity describing the amplitude and pixel position describing time and frequency Metasynth has all that is needed to synthesize an incredible vast amount of sound, the amount multiplied by all the possible variations of the sound source. When the source is a simple sine wave, the image synth is a powerful additive synth capable of integrating thousands of harmonics.
Master Tuning Pitch. A sound picture has an associated reference pitch which is set with the Master Tuning tool. The
reference pitch defines a sound picture’s base pitch (or the fundamental key of a scale ).
Filter Library. A filter library is a file that contains a collection of pictures intended to be used as graphic filters. Any image displayed on the canvas can be added to the current filter library by clicking on the Add Filter icon. There is always an active filter library. At startup, MetaSynth automatically opens the library named MetaSynth.filters found in MetaSynth’s Filters folder. The active filter library is accessed by clicking on the Choose Filter icon. Filters and preset libraries (see below) share the same file format.
Filter (Filter Picture). A picture found in a filter library. When discussing the Image Synth Room (or Image Filter Room), a filter or filter picture is an image chosen from the active filter library that is applied to the canvas using the multiply transfer mode described below.
Multiply. When you apply a filter picture, this transfer mode is used. When two images are combined using the multiply transfer mode, the pixels of the corresponding color channels are multiplied together (red channel times red channel; green channel times green channel) to calculate the new image. Only pixels common to the corresponding color channels of both images remain. Each pixel’s brightness is the product of the luminosity of the contributing pixels. Brightness is measured on a scale of 0 (black) to 1 (maximum brightness) (except when using the Filter Brush).
When a red picture (i.e. the green layer is black) is multiplied by a green picture (i.e. the red layer is black), the result is black. When yellow is filtered (multiplied) by green the result is green, and so on… See Color Channels above.
Preset. A sound picture that has been stored in a Preset Library. A preset stores the image and settings required to
play it back: instrument, tempo, tuning space and master tuning pitch.
Preset Library. Preset libraries are files that contain collections of sound pictures. There is always an active Preset Library per project. When MetaSynth is started the preset library of the last used project is made the current one. A preset library appears to be a file in the Macintosh Finder but is actually a file package, a special kind of folder that behaves like a file. The package can be viewed as a folder by control-clicking the file’s icon in the Macintosh Finder and choosing Show Package Contents from the popup menu. The package contains a file <file_name>.presets, a folder named Synths that contains the instruments used by the presets, and a folder named Picts that contains separate png format image files for every layer of every preset. The preset library can contain additional information like custom tunings and individual presets information (<file_name>.infos) like size, tuning, number of layers etc.
Sound Picture. A sound picture is an image intended for sound synthesis. Sound pictures contain image data as well as settings needed to interpret the picture as sound. Presets are sound pictures stored in a preset library.
Transfer Mode. A transfer mode is the algorithm (rule) used to combine two images (such as when filtering one image with another or when pasting one image onto another). In the Image Synth and Image Filter rooms, one image is often used to process another image. When an image is applied to another image, the corresponding pixels in the two images are processed together to create the final image. Each color channel’s pixels interact with the corresponding pixels of the corresponding color channel of the other image. A full discussion of these
operations is discussed in the Transfer Modes section later in this chapter.
Tuning Space. See Frequency Map.
Canvas
The Image Synth room’s content area is a painting surface called the canvas. The canvas is where images are created and edited. Images can be painted from scratch, imported using the Open Pict menu command, chosen from a preset library, or pasted onto the canvas. The Image Synth’s toolbars provide a wide array of brushes and tools for working with images. Images can be 8 bit or 16 bit gray level or RGB 8 bit per component or 16 bits per component. Using 16 bits per component is particularly important for sounds that are reconstructed from analysis or sounds that have a lot of low amplitude harmonics that get skipped in 8 bit. The main difference between an 8 bit image and a 16 bit image is the amount of tones available for a given color. Translated to audio this means that frequencies with low levels will not be lost because of the higher dynamics in the signal.”
How To Audition Particular Notes/Pixels
Control+option-click on the canvas to audition (playback) the pitch which corresponds to the mouse position. The pitch is played by the Image Synth current instrument and in the tuning space of the image.
Tools
The canvas is surrounded on each side by tools.
The upper toolbar serves as the palette’s menu bar and is where you set most of the parameters which govern the image’s playback: input source, number of channels, scale and tuning. The Image Synth (like all of the rooms) has its own File and Edit popup menus. The Image Synth has a number of special paste modes. The Image Synth also has its own clipboard which it shares with the Image Filter room. This picture clipboard is independent from the Sample Editor’s sound clipboard which is accessed via the application’s main menu bar and command keys.
The right-hand toolbar contains the Graphic Effects Filters which are processes like echo and reverb that work in the time domain.
The left-hand toolbar contains the tools for choosing among the many available brushes and brush modes. There are also pitch tools for modifying the picture’s vertical (frequency) domain (pitches and harmonics).
The lower toolbar contains a number of other useful tools. The Synthesize (compute/render) and Preview tools are found here as are the Displacement tool and tools for rotating and scaling the image and adjusting the brightness and contrast of the image.
Upper Toolbar
File popup
Pressing the File Submenu icon displays a menu with the following items:
New Presets File…
Create a new preset library. The library becomes the active preset library. A preset is created in the new library with the contents of the canvas.
Open Presets File… (o)
Open a preset library and make it active. This command invokes MetaSynth’s Open File dialog and makes the selected file the active preset library.
MetaSynth CTX can open files created in version 5 or later. Preset libraries created from earlier versions must have their thumbnails converted from Apple’s QuickDraw PICT format to .PNG format. In MetaSynth version 5 or 6, hold down the Control key then select the Open Presets File (o) command.
Then “right-click and select to open the .presets Package file” and then remove the F from the Picts and Synths folder names. This is useful when working with old-format (version 4) preset libraries or in cases where a library’s thumbnails have become corrupted (this is a rare occurrence).
Make sure to configure the associated instruments before migration.
Open Filters File…
Open a filter library and make it active. This command invokes MetaSynth’s open file dialog and makes the selected file the active filter library.
Open Displacement File…
Select the preset library to be used by the Apply Displacement Map too. At startup, MetaSynth uses the
library called Displacements.filters found in the MetaSynth CTX/Filters/ folder.
You can create your own in the Image Filter room. Select new Preset, save the .filters file, then add images. Then in the Image Synth room open your Displacements (.filters) file, control+click to select a filter. See details in the displacement map section of this manual.
New Presets
This command creates and ads new empty preset to the current bank.
Save current Preset (s)
Saves the current preset in the current bank at the same spot.
Note that S (shift s) shortcut calls Add preset in the final 1.2 release.
Add current Preset (S)
Add the current preset in the current bank at the first empty spot. This command echoes the button Add preset.
(available in final 1.2 release.)
Render to Disk and Save ($)
Echoes the render command ($) . See below the Render command section (LINK ?)
Open Picture File…
Open a picture and display it on the canvas. The selected picture is rescaled to fit the canvas. MetaSynth
can open most images that can be displayed by QuickTime.
Save As Picture File
Save the image displayed on the canvas as TIFF (.tif) format image.
Analyze Spectrum (n)
Create a picture based on the Sample Editor’s current sound. This command is one of MetaSynth’s most powerful and misunderstood features, frequency analysis can be used as a starting point for synthesis, pitch detection and harmonic content analysis. It has also a great pedagogical value in displaying the frequency content as an image to understand how a sound is made.
Analyze Spectrum performs a Fast Fourier Transform (FFT) of the currently loaded sound and places the resulting sonogram on the canvas. The analysis is mapped into the room’s tuning space and tempo/ duration settings. You can increase the amplitude resolution using a 16 bit image and the time resolution by using the widest picture possible with a low Samples Per Pixels value (which is set in the Tempo/Duration Dialog).
This tool is very helpful in analyzing and fine-tuning Effects and Filter parameters as well as for creating new sounds. If you are fine-tuning an EQ setting in the Effects Room, for instance, analyze the eq’ed and the un-eq’ed sounds to different layers of the canvas and compare them visually.
Use this command in the Image Filter Room to create “morph” and vocoder effects by analyzing a sound– such as a speaking voice or a drum loop– and applying it as a filter to another sound. You can also extract melodies or harmonies from a sound file by doing an analysis. This requires some work manipulating the resulting image, but the results are well worth the investment. Another use for analysis is to create new instruments with some of the characteristics of a sampled instrument.
As a result of quantization artifacts and phase loss, re-synthesized sounds cannot sound the same as the original sound. For the best results, you will need to adjust the Image Synth settings to match your goal. Experiment with different frequency maps and picture sizes. Analysis/re-synthesis is not intended as a way to re-create sounds but rather as a jumping off point for explorations. For serious spectral synthesis work, use the Spectrum Synth as it keeps the phases and has a higher frequency resolution.
Tip! It is advisable to use the Fit duration to current sample command in the Tempo and Duration Dialog (discussed later in this chapter) before performing an analysis. Frequency and time resolution can be fine-tuned to the sound. In some cases microtonal tunings give the best results. Similarly, wide pictures can be used to improve time resolution and transient response.
Tip! Use analysis to tune samples precisely. Perform an analysis in semitones. Mouse over the prominent harmonic (the sound’s actual fundamental) and observe the frequency in the Tips Display. Set the Master Tuning parameter of the Image Synth to a pitch near the sample’s fundamental. Set the frequency map to Micro32. Mouse over the fundamental and observe the frequency in the Tips Display. Use Pitch & Time in the Effects Room to transpose the sample to the desired frequency.
Import Current Sequence (q)
Import the Sequencer Room’s current sequence as a sound picture. When importing a sequence, the Image Synth will scale the sequence to fill the canvas width where possible–adjusting the Pixels Per Beat setting as needed. The Image Synth uses a maximum setting of 32 pixels per beat when importing from the Sequencer. So, if the Image Synth canvas is wide and the sequence is short, the image may not fill the canvas.
Edit Submenu
MetaSynth maintains separate clipboards for each of the types of data handled by the rooms and for the Sample Editor’s sound data. The Edit submenu affects only the graphics clipboard, and its keyboard shortcuts do not use the command key. The operations available from this menu provide sophisticated processes for combining images. Pasted images can be applied as filters, added to, merged with, subtracted from, faded into or out of the current picture. In addition, the Transfer Modes available from the left-hand toolbar’s Transfer Modes popup menu affect the way that data pasted with the Insert command interacts with the underlying image. Images from any graphics application can be pasted onto the canvas.
When an image is pasted, it is scaled to the current selection (or the entire canvas if there is no selection). If the shift key is held down when pasting, the image is scaled to the entire canvas area and clipped to the selection area. In this case, if the source image is the same size as the canvas, the marquee acts as a clipping region and no rescaling is done.
Edit operations respect the setting of the Stereo Edit Mode. Operations only apply to the active color channels. Many of these commands can be combined to accomplish frequently desired effects such as brightening or dimming the current image. We encourage you to explore the transfer modes and special paste commands as they provide powerful functionality.
Note: Each of the special paste commands has an analogous Transfer Mode. For a table of the transfer modes with pictorial examples, see the Transfer Modes section of this chapter. Pressing the Edit Menu icon displays a menu with the following items:
Undo (z)
Undo the most recent edit operation. Undo toggles between Undo and Redo. MetaSynth maintains a single level of undo.
Cut (x)
Cut the current selection to the clipboard.
Copy Pict (c)
Copy the current selection (or the entire canvas if there is no selection) to the PICT Clipboard. All color channels are copied. The Stereo Edit Mode Selector filter acts in the various paste commands.
Paste Pict (v)
Paste the clipboard into the current selection or canvas, scaling the image to fill the selection or canvas area. The new pixels replace previously existing pixels. To paste without scaling the image, use Insert Pict or Paste & Clip. The Stereo Edit Mode Selector is applied immediately when no floating selection is present otherwise the filter applies when the floating selection is validated.
Paste & Clip (V)
Paste the clipboard into the current selection, without scaling or offsetting the source image so that the selection acts as a clipping area. This offers an easy way to create preset variations by accumulating elements : ‘x’ copy a full preset and clear the image. Select a region and type V to fill that part.
Eventually Add the preset using “S”; Select another region and type V. Eventually Add the preset “S”.
You can use the same technique for live performance when you want to turn ON various elements while playing.
Insert Pict (b)
Paste the clipboard maintaining the original proportions using the current transfer mode. The selection does not necessarily replace the pixels of the existing sound picture. The inserted material is added as a floating selection that is initially centered but which can be moved by dragging or nudging. The transfer mode can be changed after inserting the clipboard and the selection moved (by dragging with the mouse or nudging with the cursor keys or lower toolbar nudge tools) to achieve a wide variety of effects.
Use this command to maintain the proportions of the inserted image, or if you want to apply the selection with one of the transfer modes. If there is a already a selection when the command is applied, the inserted image will be scaled to the selection.
Insert Pict makes the Selection Tool the active Brush Tool, and the Choose Color popup is replaced by the
Transfer Mode popup.
The Stereo Edit Mode Selector filter applies when the floating selection is validated.
Tip! To see how this works, choose a preset. Copy the canvas (type ‘c’). Insert the image (type ‘b’). Now, use the Transfer Mode Selector to change the transfer mode to Subtractive or Differences and move the selection around.
Clear
Delete (erase) the current selection (or the entire canvas image if there is no selection). The selection area becomes black. Pressing the backspace/delete key of the computer keyboard has the same effect.
Invert (!)
Invert the colors of the selected area (or the entire canvas image if there is no selection).
Fill (f)
Fill the selection with the current brush color. Stereo Edit Mode Selector applies immediately.
Tip! Fill can be used to load any Filter as the canvas image. Fill the canvas with yellow or white depending upon the Stereo Edit Mode. Choose the desired image using the Filter selector to filter the plain color.
Max Pict (k)
Paste the PICT Clipboard contents into the selected area, treating the clipboard’s black pixels as transparent. Where there are coincident pixels, the brightest one is kept. Scaling is performed as described for the Paste Pict command.
Min Pict
Combine the PICT Clipboard contents with the selected area, keeping the pixels of lowest amplitude in the combined image. Where either picture is black, the result is black. Where there are coincident pixels, the least bright is kept. Scaling is performed as described for the Paste Pict command.
Add Pict (e)
Combine the PICT Clipboard with the selected area adding the luminosities of the two images. Scaling is done as described for the Paste Pict command.
Tip! type ‘ce’ to brighten the canvas image : Add Pict is a quick, convenient way of brightening an image or selection. To brighten the canvas image,
copy the canvas (type ‘c’) then use the Add Pict command (type ‘e’) as many times as necessary. You may type ‘d’ or ‘a’ to select/deselect all before if there is an active selection.
Subtract Pict (l)
Subtract the contents of the PICT Clipboard from the selected area. Darker colors from the PICT Clipboard overlay and replace the pixels of the selection. This command can be useful for forcing a rhythmic or harmonic structure on an existing image. Scaling is performed as described for the Paste Pict command.
Multiply Pict (M)
Multiply the selected region (or the entire canvas if there is no selection) by the PICT Clipboard. This performs the same operation that is performed when applying a filter picture with the Apply Filter tool. The luminosities of the corresponding pixels of the selection and the clipboard are multiplied together. Luminosities are internally represented as values between 0 (black) and 1 (maximum brightness). When a stereo image is multiplied by a stereo image, the pixels of the corresponding color channels are multiplied. Hence, green times red is black. Yellow times green produces green. Black times anything yields black. If either pixel is less than maximum brightness the result will be attenuated luminosity. Scaling is performed as described for the Paste Pict command.
Merge Pict (m)
Merge the PICT Clipboard with the selected region (or the entire canvas if there is no selection) using a
50% blend. Scaling is performed as described for the Paste Pict command.
Crossfade Pict (w)
Crossfade the PICT Clipboard with the selected region (or the entire canvas if there is no selection). A linear crossfade is performed from left to right with a 0 to 100% gradient.
Tip! ‘ctw’ :Create a symmetrical image using the following key combination: c (copy), t (reverse time), w (crossfade).
Fade in out Pict (u)
Fade the PICT Clipboard in and out while also fading the selected region out then in. This process results in a gradient blend effect.
Tip! ‘xu’ : Fade the current picture in and out with the following key combination: x (cut), u (fade in/out).
Select All (a)
Select all of the pixels of the active color channels.
Deselect All (d)
Deselect the current selection.
Export Selection Time
Select the corresponding time in the Sample Editor.
Fit Tempo (F)
Set the duration of the Image Synth to that of the Sample Editor selection if possible. This command changes the tempo of the current IS and is usually used when creating a preset by a sound analysis to match the sound duration.
Add Preset / Replace Preset (with option)
Click here to add the currently displayed sound picture to the active preset library. The sound picture is added as a preset to the first empty position in the active preset library. Typically, you will save sound pictures by using this function to add them to preset libraries.
Option-click to replace the most recently selected preset. This functionality lets you choose a preset,
modify it and save it back to the same location in the preset library.
 Select Preset Popup / Remove Preset (with option)
Click on the icon to pop up the active preset library. Click on a preset to make it active. Drag the mouse over a preset to see information about the preset displayed at the bottom of the popup. It is also possible to select a preset by clicking on the icon and dragging in the popup that appears. Drag past the pop-up’s lower boundary to display more presets if there are more presets stored than can be displayed in a single screen.
When MetaSynth first launches, the default preset library, Metasynth.presets is opened. Use the Open Presets File command in the Image Synth’s File popup to make another library active. A list of the recently opened libraries and the libraries found in MetaSynth’s More Presets folder is displayed in the File popup. You can make a library active by choosing it from this list.
To view the presets of the second library listed in the File popup (usually the previously visited library), command-click the Select Preset tool. This is very handy for working with two preset libraries and copying images between them.
To remove a preset: hold down the option key (the cursor becomes the X—delete—cursor) and choose the
preset to be deleted from the Select Preset Popup. This command cannot be undone!
Add Filter
Click on this tool to add the current canvas as a Filter Preset in the current Filter Library.
Apply Filter
Click and drag here to pop up the active filter library. Choose a picture from the library to apply it as a filter to the canvas image or selection. An image is applied as a filter by multiplying its pixels with those of the canvas image (or selection). Applying an image as a filter is the same as pasting the filter with the multiply Transfer Mode. Grayscale filters can be applied to color pictures and are applied equally to each active color channel. When applying color filters, the best results are achieved with color pictures. Mono pictures can be made stereo by clicking the Mono/Stereo Toggle.
The file Metasynth.filters found in MetaSynth’s Filters folder is the default library opened when MetaSynth launches. Use the Open Filters File command in the File popup to make another library active.
Filters have a large number of uses. Color filters can be used to stereo-ize a picture. They can also be used
to provide complex envelopes to sounds and notes. They can be used to remove dissonance. They can be
used to adjust the harmonics of a sound picture. When using sine wave/wave table synthesis, this process
is similar to subtractive synthesis and amplitude shaping.
Shift-select a filter, to invert it before application.
To remove a filter, option-click the Filter Selector. The cursor becomes the delete cursor.
 Edit Preset Info & Comments (?)
Open the info and comment window. This displays the current preset’s title, comment and instrument name. Use this window to edit the title and comments or just to view them (if the Show Comments preference is turned off).
Analyze Spectrum (n)
Create a MetaSynth sound picture from the currently loaded Sample Editor sound (or selection). This performs the same function as the File popup’s Analyze Spectrum command. For a detailed discussion, see the Analyze Spectrum entry in the File popup discussion earlier in this chapter.
Grid Layer Menu
This popup menu provides functions for using the Grid Layer. Every MetaSynth sound picture (Image Synth preset) has a grid layer (drawn in blue) whose graphics can be used as guides (scales, chord progressions, rhythmic filters) or reminders. The grid layer can even be used to filter the graphics of the image layers that are used to create sound. The Grid Layer is ignored by MetaSynth when translating the canvas from image to sound.
Using the grid layer as a scale : A grid layer scale is simply a subset of frequencies that are chosen to build a particular scale. In semitones, a major scale is a subset of the 12 semitones. Lines not part of the scale are black (OFF) and the lines in the scale are white (ON) (shown in blue). The scale repeats for every octave.
Once you have the grid channel scale it is easy to enter notes in the correct scale. And you can at any time filter out content not in the grid using the “Grid Filter” button or the Filter with Grid Channel menu command.
tip :It is easy to build a scale layer from existing IS content: Simply type “;Y” : that is “;” to get each note fill the entire canvas and ‘Y’ to echo the keys to all octaves inside the grid channel.
Using the grid layer as chord progression grid : In a similar manner you can put in the grid a chord progression. You can build the chord progression easily in the sequencer or even do it directly in IS with the notes tools using a scale grid channel if needed. Once you have your chord progression simply type Y to echo them in all octaves inside the grid channel. This is a very powerful technique to compose arrangements on a tonal piece. If all presets follow the grid you can be sure they will overlap gracefully.
- Draw Default Grid (g)
- Draw the default grid to the grid layer. The grid’s horizontal lines mark the octaves of the Master Tuning pitch and the vertical lines represent beats and measures. Lines marking the measure boundaries are darker than lines marking the other beats. Use the Tempo & Duration dialog to change the beat settings used to calculate the default grid. By default, there are 4 beats per measure with 32 pixels per beat.
- Add X Grid (G)
- Add vertical lines to mark each beat (as defined in the Tempo & Duration settings dialog) and measure. Measure lines are slightly darker than the other beat lines. This command adds the lines to the existing grid contents.
- Draw Octaves Grid
- Replace the current grid layer with a picture representing the octaves of the master tuning reference pitch.
- Echo Current (y)
- Replace the current grid layer with a copy of the image layer’s graphics. If there are multiple image layers,
- only the active layer’s graphics are copied. This offers a quick way to set the grid channel from your current image.
- Echo Octaves (Y)
- Echo the current image layer to the grid layer (replacing the previous grid layer) and echo the pixels to every visible octave. Echoing octaves is useful when the image layer contains notes. This allows you to see all octaves of the notes which makes it easy to avoid unwanted dissonances between octaves. It is also often used to build scales grids or chord progression grids.
- Copy Grid Channel
- Copy the grid layer to the clipboard. In general this is useful when you want to paste the grid from another preset.
- Paste to Grid Channel
- Paste the image clipboard’s contents to the grid layer. With this command you can set the grid to almost anything, but usually it will be with a grid copied from another preset.
- Filter with Grid Channel (%)
- Apply the grid layer as a filter to the image layer. This command is available as a button on the right of the Image Synth UI : “Grid Filter” and with the % shortcut.
Tip! Construct a Blue Channel image from a melodic figure using Echo Octaves then paint freely in the Red and
Green channels. Choose Filter With Grid Channel to remove notes that don’t fit.
Delete Grid Channel
Delete the grid channel.
Analyze Spectrum to Grid
Perform a fast spectrum analysis of the Sampler Editor sound (or selection) and draw it into the grid layer. This
analysis is lower resolution (but faster) than the one created when using the Analyze Spectrum command. This command is very helpful when trying to draw a sound picture that will be used in conjunction with an existing sound. For instance, you can paint notes that coincide with harmonics visible in the analyzed spectrum, or you could paint in the image layer and use the Filter With Grid Channel command to filter out all pixels that don’t overlap the analyzed sound. You can create interesting vocoder and convolution effects this way.
Layer Menu Popup
The image used to synthesize sound may have one or more layers. Collectively, these are known as the image layer(s). Drawing and filtering is performed on the active layer and the other image layers and grid layer are not affected. To make a layer active, choose it from this menu. Use the menu’s commands to add and merge layers.
The active layer (the one to which all graphic operations will be applied) is displayed in its usual color (gray for mono images, RGB color for stereo images, blue for the Grid Layer). All other layers are displayed in dim blue shades.
To delete a layer, hold down the option-key and select the layer to be deleted from the menu.
New Layer
Add a new layer to the image.
Duplicate Layer Duplicate the current layer. Merge Layers
Merge the current layer with the next lower (numbered) layer.
Grid Layer
Select the grid layer for direct editing. Note that the grid layer is always 8 bit and gray levels.
Layer 1 [2, etc.]
The image layers are listed here. Select a layer to make it active. Option-select a layer to delete it.
Stereo Edit Mode Popup
Stereo Edit
Edit All
Edit Left
Edit Right
Edit Blue Channel
This popup menu is only available when working in stereo (color). The popup allows you to determine which color channels (Red, Green, and Blue) are affected by graphic operations. This tool allows independent processing of the left (red) and right (green) channels which makes for mind-bending effects. The channel edit mode determines which channels are affected by edit operations. Most editing operations and tools apply only to the active color channel which makes incredible stereo manipulation possible.
The icon’s appearance in the toolbar changes to reflect the current edit mode. The area is left blank if the canvas is set to mono. The available modes are: red and green active, red only, green only, blue only, all (red, green and blue) active. The default mode is red and green active.
Tip! Try applying different filter pictures to the red and green channels of an image! For example, you might apply a fade in filter to one channel and a fade out filter to the other.
Tip! Apply different Hot Filters (the right-hand toolbar’s graphic effects) to the left (red) and right (green) channels of a picture! For example, incredible effects can be created by using different grid intervals for the red and green channels when applying the Pulse, Saw, or Echo Hot Filters. Or, start with a mono image, and apply Echo to the red channel and Pre-Echo to the green.
Stereo/Mono Toggle

Click here to change whether the sound picture is mono (grayscale) or stereo (color). When stereo mode
is chosen, the Stereo Edit Mode Popup becomes visible and active. Stereo pictures have three color channels: red (left), green (right), blue (comments). The Stereo Edit Mode selector allows you to selectively manipulate individual color channels. Mono pictures have a single, grayscale channel where luminosity determines amplitude.
NOTE! Changing the stereo/mono setting is not undoable!
 Choose Instrument Popup & Edit Instrument Button
This popup menu provides commands for choosing or creating the instrument (synthesizer) to be used when synthesizing the image. The pixels in the image are oscillators of the chosen instrument. MetaSynth provides several types of instruments (called Input Sources in earlier versions of MetaSynth) which are covered in the Instruments chapter of this manual. Choose an empty slot (or the popup’s Open command) to load an instrument from the disk. More conveniently use the Browse Synth or Browse Samplers item to browse the entire instrument library.
Any instruments you open will appear in the popup during your session. When a preset is selected, the name of the instrument used by the preset is displayed in the menu. The Choose Instrument popup’s icon indicates the type of instrument currently in use and, thus, changes when the instrument changes.
Note : Instrument variations are saved with the presets, so you can freely adjust release, modulation or many other instrument parameters for each image preset.
Click on the Edit Instrument icon to open the instrument editing window. See the Instruments chapter for more information about instruments and instrument editing.
 WaveSynth
A simple single oscillator wavetable synth.
 GrainSynth
A unique lightweight granular synthesis-based synthesizer that is capable of creating sounds with complex filter-like sweeps and much more.
 MultiWave Synth
The MultiWave Synth is a three-oscillator synthesizer capable of diverse synthesis modes that includes wavetable synthesis, FM synthesis, Phase Distortion and a number of synth modes unique to MetaSynth.
 Sampler
A single-sample sample-based instrument.
 MultiSampler
A multi-sample sampler instrument.
Open…
Choose this command (or any empty slot) to open an instrument that has been saved to disk.
New MultiSampler…
Choose this command to create a new empty multisampler instrument. Samples can be added to the instrument in the Edit Instrument window which appears after selecting this command.
Build MultiSampler…
Build a new MultiSampler instrument from “related” samples and display the Edit Instrument window. MetaSynth presents an open file dialog for you to choose a sample file. If other related sample files are found in the same directory, they are automatically added to the instrument and mapped to the pitch and octave suggested by their names. To be “related”, the files must share the same base name which is the file’s name minus the pitch designation. For example, Guitar A2, Guitar C2, and Guitar E2 are related. But, Guitar A2 and Eric Guitar C2. The ‘.L’ and ‘.R’ extensions of split stereo/dual mono file pairs is ignored when determining the base name.
Many commercial sample libraries follow this naming convention.
Tip! If you have a group of samples from which you would like to build an Instrument, it is generally more convenient to rename the files in the Macintosh Finder according to this convention and have MetaSynth build the Instrument than to manually load samples and assign their pitches in the Edit Instrument dialog.
 Master Tuning (Reference Pitch) Popup
This tool lets you change the reference pitch used by the Image Synth. Click on the tuning fork icon to pop up a list of pitches or option-click the Master Tuning Octave Transpose arrows to change the pitch by a semitone. The default setting is A2 (220 Hz) and can be set in semitone increments from A -2 through A12. Changing this setting changes the pitches played back by the canvas image. The reference pitch is also taken into account when the File submenu’s Analyze Current Sound command is executed. Change the reference pitch’s octave using the Master Tuning Octave Transpose arrows.
Optimizing Frequency Analysis with Master Tuning
When analyzing the sample of a note, you can sometimes optimize the analysis by using the following technique. Perform the first analysis with A2 as the reference pitch and the semitones frequency map. Observe the basic pitch of the note. Set the reference pitch of the picture to that note and octave. Change the frequency map to a microtonal or harmonic frequency map and set the picture height only as large as needed to accommodate the sample’s frequencies. Perform the analysis again. Harmonic frequency maps (see Custom Scales) work well for analyzing stringed instruments.
Master Tuning Octave Transpose
Click on the up or down icons to change the reference pitch in one octave increments. This behavior is handy when computing sounds to be used in multi-sample Instruments.
Option-click the arrows to increment/decrement the pitch by semitones rather than octaves.
 Set Tuning Space (Frequency Map) popup
Define the mapping of the canvas’ vertical axis to pitch. The tuning space/frequency map used by the canvas has enormous influence on the sound created. The tuning space can be changed to use almost any imaginable custom tuning or intonation system. Ethnic tunings and alternate intonation systems can be used for creating period and ethnic music. For creating sound sculpture and timbres, the tuning space can be set to harmonic-based or analysis-based tuning spaces. For example, the tuning space can be set to have only odd harmonics or to have the harmonics from a pizzicato violin attack. Customizing the tuning space makes it possible to create an infinite variety of sound and music. Custom tunings can have steps that are out-of-order and can have “octaves” that span a range of many octaves (such as when using harmonics-based tunings).
Click on the tool to pop up a menu of the tuning space choices. The name of the current tuning space is displayed in the toolbar if it is one of MetaSynth’s built-in tunings. Otherwise, the words Map Custom Tuning appear. The popup’s Custom Tunings option invokes the Custom Tunings Dialog that allows you to define, import and export custom tuning spaces. The options are:
- Exponential. The pixels represent consecutive integer ratios of the fundamental. The first pixel is 1:1, the next pixel is 2:1 (the octave), etc. This mode can be used to create interesting waveforms when there are stacked clusters of pixels. In this mapping, the notes get closer and closer together as you reach the top of the canvas.
- Custom Tuning (&). Choosing this option invokes the Custom Tunings dialog described in the next section.
- Major Scale. Each pixel represents one step of the major scale. The lowest pixel will sound 2 octaves below the sound picture’s reference pitch. In this mapping there is not an even mapping of consecutive pixels as there will be a whole step (tone) between some pixels and a half step (semitone) between others. There are seven pixels to an octave in this tuning. In general 7 notes scale should be used with no more than 64 pixels height image as keys will quickly go above hearing range.
- Whole Tones. A whole tone (200 cents) separates each consecutive pixel. There are six pixels to an octave with this tuning.
- Semitones (the default setting). A semitone (100 cents) separates consecutive pixels. There are 12 pixels per octave in this tuning.
- Quartertones. A quartertone (50 cents) separates each consecutive pixel. There are 24 pixels per octave in this tuning.
- Micro8. One-eighth of a whole tone (25 cents) separates the pixels. There are 48 pixels per octave in this tuning.
- Micro12. 1/12th of a whole tone (18.75 cents) separates the pixels. There are 72 pixels per octave in this tuning.
- Micro16. 1/16th of a whole tone (12.5 cents) separates the pixels. There are 96 pixels per octave in this
tuning.
- Micro32. 1/32nd of a whole tone (6.25 cents) separates adjacent pixels. There are 192 pixels per octave in this tuning.
- Micro50. 1/50th of a whole tone (4 cents) separates adjacent pixels. There are 300 pixels per octave in this tuning.
- Pythagorean. Consecutive pixels are mapped to the seven note Pythagorean scale whose pitches are
arranged with the classic Pythagorean ratios: 1, 9/8, 81/64, 729/512, 3/2, 243/128.
- Minor Harmonic. Standard harmonic minor scale.
- Minor Melodic. Standard melodic minor scale.
To see the pitch played by a particular pixel, move the mouse over the pixel and read the ToolTips display. You will see the pixel’s pitch displayed as a note and octave (i.e. A2), a degree of pitch shifting, and absolute frequency.
When designing sounds, you can achieve some very interesting effects by applying a process that generates frequencies (such as Add Harmonics or Fit to Scale) then changing the frequency map. This allows you to quickly generate a number of harmonics that do not conform to the harmonic series.
Tip! Use this technique to generate the odd harmonics: choose Micro8 as the frequency map, draw a line, choose Add Harmonics from the Pitch and Harmonics submenu of the left toolbar then change the frequency map to Quartertones.
The tuning space determines the image’s pitch range. Microtonal frequency maps require many pixels in order to travel a small tonal distance. In Micro50, for instance, it takes a vertical distance of 50 pixels to go from C2 to D2. By contrast, it takes just one pixel in the Whole Tones mapping to travel the same distance. The best choice for the canvas’ vertical dimension, therefore, is closely tied to the choice of tuning space. The closer together the steps of the tuning are, the taller the picture should be. Tunings that have widely- spaced intervals, by contrast, don’t need tall canvases. In fact, in semitones tuning, a canvas 128 pixels tall has a range beyond that of human hearing.
Observe the frequency range of a picture by regarding the Tips Display while mousing over the low and high pixels of a picture. The Pitch and Harmonics popup contains several commands that are useful when changing frequency map. You can contract or expand the vertical spacing of the canvas’ pixels with these commands.
Tip! Use custom scales based on the harmonic series to create new waveforms and sounds to use as input sources or for your sampler.
Custom Tunings Dialog (&) (IMAGE ?)
To invoke this dialog, choose Custom Tuning from the Set Tuning Space popup. Some commonly-used scales, like equal-tempered semitones, are provided in the Set Tuning Space popup as presets, but much more interesting tunings can be created using the Custom Tunings dialog. Custom Tunings allow you to tune
the Image Synth any way you want. You can enter values directly or import and export custom scale files. Scale files are text files where each note of the scale is defined in terms of fractions, cents or absolute ratio values. Highlights of the provided scales are:
- Pentatonic scale.
- Harmonic minor scale.
- Natural minor scale.
- Major scale in Just intonation.
Harmonic 16 and Harmonic 32 are 16 and 32 note scales which follow the natural harmonic series (ratios of 1, 2, 3, 4, etc). It is a very interesting non-linear mode where the Image Synth behaves almost like a subtractive synthesis filter. Each pixel line is a specific harmonic of the fundamental. So you get an interesting wrapping of pitches as you ascend the scale. For example when using Harmonic 16, the pixel at y=16 is much higher in pitch than the pixel at y=17. Great techno and synthesizer sounds can easily be simulated using these scales. Harmonic16 and 32 are great for constructing sounds since even dense blocks of pixels yield interesting wave forms. When using harmonic scales to create waveforms, it is often useful to use the Amplitude Map to roll off the response of pixels high in the picture.
See the appendix for a full description of the custom tuning dialog.
Depth picker
Choose the depth of the image. It can be 8 or 16 bit per component. 16 bit depth is advised for complex sounds with a lot of low amplitude harmonic content to avoid quantisation artefacts.
 Choose Picture Width Popup
Set the pixel width of the canvas. When composing music in the Image Synth, picture widths divisible by 2 should be used for duple meters (4/4, 2/4, 2/2 etc). Picture widths divisible by 12 (288, 576, 1152) are well-suited to triple meters such as 3/4, 6/8 and 9/8. Changing the picture width changes the duration of the picture.
Tip! Use the Tempo/Duration tool to adjust a sound picture’s duration or tempo.
Tip! When designing sounds with rapidly changing dynamics or explosive, percussive attacks, use a wide
picture with a small Samples Per Pixel setting.
 Choose Picture Height Popup
Set the pixel height of the canvas. The frequency range of a picture is determined by three factors: picture height, frequency map and the master tuning (reference pitch) parameter. With microtonal frequency maps, large picture heights are needed to provide a reasonable pitch range. When changing the frequency map for a picture it is sometimes useful or necessary to change the picture size. There is no need for tall pictures in semitone or whole tone frequency maps as only a limited number of pixels is required to cover the entire audible range.
The left toolbar’s Pitch and Harmonics submenu contains a number of functions useful when changing picture sizes and frequency map. These functions can expand or contract the vertical spacing of a picture’s pixels and thus adjust the pitches to account for wider or narrower spacing of pitches.
Tip! To check the frequency range of a picture move the mouse over the pixels from bottom to top and read the Tool Tips where the frequency is displayed. Pixels outside of the audible range have their pitch displayed as dashes.
Left-Hand Toolbar
Brush Mode Selector
Select the brush mode: dot, line or repeat.
In Dot mode, the brush stroke is discontinuous made up of a trail of dots whose size is determined by the brush size. This brush is well-suited to entering discrete notes or copies of the brush shape. In Line mode, the brush strokes are solid.
Repeat mode is a special case of Dot Mode in which every stroke is repeated in time across the grid specified by the Effects Grid Interval (discussed later in this chapter). Repeat mode is handy for creating drum patterns and repetitive musical structures. It will usually be used with the Tool Grid turned on (see below). When the caps lock key is down, every octave is painted as well.
Tip! Press the caps lock key to repeat the strokes in all octaves both above and below the painted stroke. This feature is especially useful for creating harmonic grids to be pasted into the blue channel and for creating pictures to use as filters.
Tip! Use Repeat mode to create super-rich sound pictures (try using the Add Harmonics command to make it
even richer) then paint with sweeping strokes of a thick filter brush to selectively remove harmonics.
 | This picture was created in Repeat mode with the Tool Grid (see below) turned on. Only the first four notes were entered directly; the other notes are repetitions generated by this brush mode. The Tool Grid Interval is 8 pixels. The Effects Grid Interval is set to 32 pixels. |
Brush Palette Popup
Choose a brush or tool for working in the Image Synth. MetaSynth provides a number of brushes optimized for entering music and sound. There are brushes for painting notes, for adding harmonics, for filtering, for smearing existing pixels, for refining note envelopes and more. Several settings work in conjunction with the Brush Palette: Brush Mode, Brush Color and Brush Size. Each brush type remembers its size and mode settings.

SHORTCUTS & MODIFIER KEYS! Holding down the command and option keys together pops up the
Brush Palette when you click on the canvas, making it easy to change brushes while working.

Eyedropper. There is an additional related tool that does not appear on the palette. When any brush (other than the selection tool) is active, press the option key to activate the eyedropper tool. An eyedropper cursor appears and picks the color beneath it when the mouse is clicked.
 Pen Brush (shift-p)
A hard-edged, opaque, rectangular brush with a square on/off envelope that adds paint with the current brush color. Pen Brush strokes are anti-aliased. In line mode, continuous lines are drawn and the Tool Grid acts as a sort of ‘line grid’ for constraining the stroke. This brush is frequently used for entering notes where the note envelope will be primarily supplied by the instrument itself (especially multisampler instruments).
 Air Brush (shift-a)
A round-edged brush with translucent edges useful for creating smooth attacks and decays. Use small brushes one pixel high for notes and large size brushes for unpitched clusters (or rich harmonic clusters, depending upon the current frequency map).
Tip! Large size brushes can be used to great effect with tuning spaces based on the harmonic series.
Note! This brush’s hot spot is at the center of the brush. When the Tool Grid is on, the center of the brush stroke
is aligned to the grid.
 Filter Brush
A brush that filters pixels by applying the selected brush color with the multiply Transfer Mode. While similar to filter pictures (filter presets), Filter Brushes can be used to amplify as well as attenuate pixels. (Filter pictures by contrast cannot amplify/brighten pixels). With Filter Brushes, neutral gray is the shade which, when applied, leaves pixels unaffected; with filter pictures, the neutral color (identity multiplier) is bright
white. In effect, the filter’s brightness is scaled from 0 (black) to 2.0 (white) whereas the values are scaled from 0 (black) to 1 (white) when applying filter pictures. This is a great tool when designing sounds. It gives you fine control over the harmonics in an image. Use colored filter brushes to adjust stereo placement.
 Harmonics Brush
A brush that paints a fundamental pitch and the first five overtones of the harmonic series. The brightness of each harmonic is less than the previous harmonic. The harmonics are: fundamental, octave, octave plus a fifth, second octave, second octave plus a third, second octave plus a fifth. This brush is sensitive to the Frequency Map setting and will do its best to accommodate the current map.
This tool is useful for creating “thick” sounding waveforms to which you can apply the filter brush.
Tip! Try switching to different frequency maps when painting with this brush then switching back to the intended map. This technique works especially well with microtonal tunings.
 Attack Brush
A brush that paints with a hard left-edge (hence a sharp attack) and a soft decay. The upper pixels of the brush (if it has a vertical dimension greater than one pixel) fade out faster than the lower pixels. This brush is great for creating percussive attacks with bell-like decays.
Tip! Try this brush with microtonal frequency maps, like Micro50, or with custom scales based on the harmonic series, like Harmo16 and Harmo32.
 Smoothing Brush
A brush that smooths the pixels over which it passes, giving notes smooth attacks and decays. This brush
affects only existing pixels.
 Spray Brush
A spray paint type brush. Great for creating grainy, noisy textures.
 Decay Brush
A brush that extends existing pixels to the right to increase durations. This brush affects only existing pixels.
Tip! An alternate technique for extending durations is to select the desired region and press option-right arrow to extend the pixels. (Make sure the Transfer Mode is set to Maximum).
Note Brush
A brush for note drawing. Click to paint notes. Press and drag to leave a trail of notes of the same pitch.
Notes are always quantized to the grid regardless of whether it is on or off.
NOTE! This brush behaves differently than in version 2.x. Version 2.x’s note brush can be replicated using the Pen Brush with the grid turned on.
 Line/Harmonics Brush
Also called the Harmonics Brush. A brush that paints a horizontal line (a harmonic or overtone) with the current brush color across the width of the canvas. This brush is most commonly used when using the Wave Table as the picture’s input source. It is useful when using the Image Synth to create waveforms.
Tip! Use this tool on the Grid Layer to provide a harmonic grid to use as a guide when composing music in the Image Synth.
 Smear Brush
A brush that smears the existing pixels. The brush “grabs” the pixels beneath it when the mouse is clicked and smears them as you drag. This brush is nice for modifying a note’s amplitude or pitch envelope (depending upon whether you smear horizontally or vertically).
This tool is unaffected by the Brush Mode.
Tip! You can smear black which is useful for making dense parts of a picture more diffuse.
 Smear Brighter Brush
A brush that smears the existing pixels with a brighter gradient than the Smear Brush. When using this
brush, bright pixels ‘win’ when smeared. Very handy for adding glissandi at notes’ boundaries.
This tool is unaffected by the Brush Mode.
Tip! Use this brush and the Smear Brush in microtonal frequency maps for creating glissandi, pitch bends,
vibrato and other similar effects.
 Clone Brush
This brush captures the pixels under the brush when the mouse button is first pressed and allows you to paint with the captured pixels. Nice effects can be created in both Dot and Line modes. It is a handy tool for retouching notes’ edges.
Tip! Nice Random textures can be created with the Clone Brush when using Dot Mode and a Tool Grid interval of 16 or more.
Selection Tool(shift-s)
The Selection Tool, also called the Marquee Tool, allows you to create a rectangular selection which can be moved by dragging it or by using the Transpose/Nudge tools (and their keyboard equivalents). The selection is the target of most Image Synth tools and commands.
When the Tool Grid is turned on, horizontal selection is constrained to the horizontal (x) grid interval, but the vertical selection interval is not limited. Hold down the shift key (when the Tool Grid is turned on) to constrain the selection both vertically and horizontally to the grid.
Tip! Temporarily, invoke the Selection Tool (no matter what tool is active) by command-dragging in the canvas.
When the Selection Tool is the active brush tool, the Brush Size tool is replaced by the Transfer Mode popup. When a selection is dragged (or option-dragged) or inserted (using the Insert command in the Edit submenu) it is applied to the existing pixels using the current Transfer Mode. See the description of the Transfer Mode popup for more information about Transfer Modes.
The Edit submenu’s paste commands scale the clipboard image to fit the selection size. Pressing the shift key when pasting causes the clipboard image to be scaled to the canvas size then clipped to the selection region.
The Selection Tool makes it easy to move a portion of a picture, copy it, or fine tune it with the Image Synth’s tools. When the Tool Grid is turned on, selection and movement is aligned with the grid.
The selection’s behavior follows the standards observed by most graphics applications:
- Option-drag (or option-arrow key) leaves a copy of the selection behind,
- Arrow keys displace the selection by a pixel in any direction,
- Delete key clears the selected region
- ‘a’ selects all (and automatically makes the Selection Tool the active brush tool)
- ‘d’ deselects the currently selected region.
The following shortcuts are useful when transposing/moving a selection (or the entire canvas):
- Up/Down/Left/Right arrows–nudge the selection one pixel in the indicated direction,
- Shift-Up/Down arrows–transpose up/down by current Tool Grid Y setting,
- Shift-Left/Right arrows–shift left/right by the Effects Grid interval,
- Page Up/Down arrows–transpose up/down by octaves
- Shift-Page Up/Down–transpose up/down by fifths.
Shape Brushes
Select one of these brushes then click and drag in the canvas to draw the shape displayed in the popup. The line brush is not anti-aliased (smoothed) in Dot brush mode which allows the drawing of stair-step patterns. All of the other shape brushes are anti-aliased.
Brush Color Selector
Choose a brush color or change the selection’s color. Click and drag on the Brush Color Selector, found below the Brush Palette icon, to change the brush color. The current brush color is displayed in the tool’s display in the toolbar. The palette of colors which is displayed reflects the canvas’ color mode. At the left edge of the selector’s pop-up palette are six convenient preset colors.
When there is an active selection and the selection tool is active, selecting a color applies the new color to the selection using the multiply transfer mode. You cannot change red pixels to green or vice versa, but you can change the amplitude of any pixels or the degree of panning.
Brush Size Popup
Change the brush size by selecting a preset brush from the palette or by dragging in the lower-left region to create a custom-size brush. The lower-right portion of the popup displays the current brush type at the selected size and the tooltip displays the chosen size dimension.
This item is replaced by the Transfer Mode popup when the Selection Tool is active.
Transfer Mode Submenu
This menu is available in the space below the Brush Palette tool when the Selection Tool is active. The transfer mode determines how a selection interacts with the pixels of the existing image. Most of these processes have a corresponding paste command in the Edit submenu. The selection may be created by using the Selection Tool or by using the Edit submenu’s Insert Pict command (shortcut: ‘b’). The transfer is not complete until the region is deselected.
In some transfer modes (Differences or Subtractive, for example), the image may appear to disappear when
perfectly aligned with the selection. Slight movements of the selection can have interesting effects.
Tip! Try this, select a preset with a dense image. Type ‘c’ to copy the image. Type ‘b’ to insert the image. Choose Differences from the Transfer Mode submenu. Now, use the arrow keys to move the image around, and see what happens!
The default transfer mode is Maximum.
The following table demonstrates the transfer modes:
 Canvas Image Canvas Image |  Inserted Image Inserted Image | |
| Transfer Mode | Resulting Image | Notes |
| Erase | | The selection replaces the existing pixels. |
| Blend |  | A 50% blend of the two images is made. |
| Maximum |  | The default Transfer mode. The images are combined with the brightest pixels taking precedence. |
| Minimum |  | The images are combined with the least bright pixels taking precedence. |
| Additive |  | The images are combined by adding the brightness of the two layers. |
| Subtractive |  | Subtract the selection’s pixel values (brightness) from the existing image’s. Subtracting black pixels has no effect. |
| Multiply |  | Multiply the brightness values of the two images’ pixels. This is the same process used when applying filter pictures. Multiplying by black results in black. |
| Fade in |  | Crossfade the two images (the selection fading in as the existing pixels fade out). |
| Fade out |  | Crossfade the two images (the selection fading out as the existing pixels fade in). |
| Fade in out |  | Fade in the selection then fade it out while fading out the existing pixels then back in again. |
| Xor |  | Combine the two images by keeping the pixels that exist in one but not both images. |
| Differences |  | Pixel values are determined by the absolute values of the differences between the two layers. |
Processes & Effects Popup
This menu provides a number of graphical processes useful for shaping images into sounds. While these processes are not musical in the same sense as the commands in the Pitch and Harmonics submenu, they can help you transform just about any picture into a sound picture. They can also create graphics beautiful in themselves.
Tip! Importing pictures is a nice way to discover found sounds, but most pictures that were not intended to be sounds need help in their metamorphosis. Pixel density and distribution generally need to be altered. Use the commands in this submenu to massage found pictures into sounds. Turning these pictures into useful sound also generally requires finding a tuning space that works with the image.
Blur (h)
Apply vertical and horizontal smoothing. Since it applies to both axes, Blur influences both the harmonic content and envelope of the sound. Successive applications of this process force an image to grow increasingly out of focus. This process yields especially nice results when used with microtonal frequency maps to create haunting, other-worldly sounds. Blurring has very interesting effects in microtonal tunings and tunings based on the harmonic series.
Tip! You may find it useful to apply the lower toolbar’s Normalize tool after applying this process since blurring reduces the overall brightness.
Tip! Create a halo effect with this sequence: ‘c’ (Copy Picture), Blur, ‘e’ (Add Picture).
Blur More (H)
An intense blur effect, resulting in an “out of focus” look. Adds dissonance to an image by blurring adjacent
frequencies.
Tip! You may find it useful to apply the lower toolbar’s Normalize tool after applying this process since process
tends to reduce the overall brightness.
Tip! For a glow effect try this sequence: ‘c’ (Copy Picture), Blur More, ‘e’ (Add Picture).
Triangle Filter
A solarization effect where luminance above 50% is changed to black across the canvas (or the selected
region). This process is useful for reducing the density of images with lots of bright pixels.
Tip! You may want to normalize the picture (or selection) or increase its brightness before applying this process to ensure that there are pixels above the filter’s threshold.
Tip! Create nice, psychedelic images by repeatedly normalizing the picture then applying the Triangle Filter.
Noise Filter
Remove isolated pixels. This is useful for cleaning up noisy pictures and sound analyses. Often when you create a picture by using the Analyze Current Sound command (in the File submenu), there are little quantization artifacts (especially when analyzing speech or other sibilant sounds) or other isolated pixels which this process can remove.
Emboss Left
A convolution filter that tends to emphasize the trailing edges of shapes and, in some cases, creates a three-dimensional impression of a light source coming from the above left. Pixels tend to shift to the right. Applying this process repeatedly can result in solarization effects.
Tip! You will generally apply this process a few times until you get the desired effect. It is often useful to apply the lower toolbar’s Normalize and Smooth tools when you apply this process.
Tip! Interesting effects can be created by applying this process to a single color channel.
Emboss Right
A convolution filter that tends to brighten the leading edges of shapes and, in some cases, creates the three-dimensional impression of a light source coming from the above right. Pixels tend to shift to the left. Applying this process repeatedly can result in solarization effects.
Tip! You will generally apply this process a few times until you get the desired effect. It is often useful to apply the lower toolbar’s Normalize and Smooth tools when you apply this process.
Tip! Interesting effects can be created by applying this process to a single color channel.
Quantize 4
Rhythmic quantize. Force notes to start and end at the positions determined by a grid. This command uses a four-pixel grid (regardless of MetaSynth’s grid setting). Use the button Quantize ( in the graphic effects list of the right-hand toolbar.) to have the Effects Grid interval. Quantize is similar to the “pixelate” function found in some graphic editing applications. MetaSynth, however, only applies the effect horizontally (in the time domain).
Trace Edges V
Trace edges vertically. Traces the edge of pixel lines along their horizontal boundaries. Where adjacent pixels are on Trace Edges V turns them off. If there is a large difference in brightness between adjacent pixels, a pixel will appear at the boundary in the resulting image.
When applied to a solid rectangle, for instance, the resulting image is a pair of vertical lines at the rectangle’s left and right edges. When applied to a horizontal line, the result is a pair of pixels defining the line’s endpoints.
Tip! To achieve a classic edge tracing effect use this command sequence: Trace Edges V, Copy Pict (‘c’), Undo
(‘z’), Trace Edges H, Max Pict (‘k’) or Add Pict (‘e’).
Trace Edges H
Trace edges horizontally. Traces the edge of pixel lines along their vertical boundaries. Where adjacent pixels are on Trace Edges H turns them off. If there is a large difference in brightness between adjacent pixels, a pixel will appear at the boundary in the resulting image.
When applied to a solid rectangle, for instance, the result is a pair of horizontal lines at the rectangle’s top and bottom edges. When applied to a single pixel high line, the resulting image is two new lines either side of the former line’s location (which will be black in the resulting image).
Tip! To achieve a classic edge tracing effect use this command sequence: Trace Edges V, Copy Pict (‘c’), Undo
(‘z’), Trace Edges H, Max Pict (‘k’) or Add Pict (‘e’).
Repeat Twice (r)
Paste a copy of the first half of the canvas (or the selected region) onto the second half. This command is
useful for repeating a pattern or phrase when switching to a larger picture width.
Reverse Time (t)
Flip the canvas (or the selected region) horizontally to reverse it in time. The pictorial equivalent of playing
a record or tape backwards.
Twice Faster (<)
Effectively double the tempo and repeat the passage by scaling the image 50% horizontally and repeating
the image.
Twice Slower (>)
Effectively halve the tempo by scaling the image horizontally to double its width. If the image fills the
canvas horizontally, you should double the canvas width before applying this command.
Delete Blue Channel
If the current layer has a blue channel, delete it.
Filter with Blue Channel
Apply the blue channel (not the Grid layer but the image’s blue channel) as a filter.
Swap Red and Green (j)
Swap the red pixels to the green channel and the green pixels to the red channel.
Tip! To move only the red or green pixels, set the Stereo Edit Mode to edit that color channel, choose Copy (type
‘c’), switch the Channel Edit Mode to the channel to paste into and Paste (‘v’) the clipboard image.
Pitch and Harmonics Popup
This submenu is dedicated to processes in the pitch (vertical or frequency) domain. Unless otherwise noted, the current frequency map affects the outcome of the operation.
Remap to Semitones Scale (=)
Remap all pixels to the closest position within the current semitones scale and current key (C to B). You can have the canvas set to microtuning and still want to fit to a semitones subset or to all 12 semitones (dodecaphonic).
By default (after Install) the current semitones scale is set to a Major scale but MetaSynth will remember the last scale used. You can change the current scale using the Filter to Scale Popup (see below).
Remap to Octaves And Fifth
Attenuate all pixel lines of the canvas (or the selected region) except for the octaves and fifths centered around the sound picture’s reference pitch (see Master Tuning). This adds a pitched resonance and is most commonly used to add a sense of pitch when working with “noisy” pictures.
Lower Even Lines
Reduce the brightness (amplitude) of the even-numbered pixels by 50%. Several applications in a row are needed to actually remove the pixels. This process acts like a comb filter. The frequency map does not effect this command. This command can help reduce the clutter in dense pictures.
Lower Odd Lines
Reduce the brightness (amplitude) of the odd-numbered pixels. Several applications in a row are needed to actually remove the pixels. This process acts like a comb filter.
Add Fundamental (.)
Draw a horizontal line with the sound canvas’ reference pitch (see Master Tuning). This command is useful when starting to draw a sound. Frequently, this command will be followed by an application of the command Add Harmonics to generate overtones.
Add Harmonics (,)
Add harmonics (overtones) of the picture’s existing pixels, a sort of “vertical echo”. The overtones correspond to the first five overtones of the standard harmonic series (octave, 8va fifth, 8va octave, 16va third) and are added with decreasing amplitude.
Option-select this command from the submenu to generate the first 30 harmonics rather than just the first five. (This option is only available when choosing the command from the submenu).
Tip! To thicken up sounds, successively apply Add Harmonics which will add harmonics of the harmonics.
Tip! After applying this command, you will probably want to use the Filter Brush to adjust the contours of the
harmonics so that the sound will “breathe”.
Expand 2
Vertically expand the pixel spacing by a factor of two. Expansion is done from the bottom up. Use this command to maintain a picture’s relative harmonic content when switching between frequency maps (i.e. going from semitones to quarter tones). Pixels disappear when they are expanded beyond the canvas height. It is a good idea to increase the canvas’ height to accommodate the expansion.
Since expansion is done from the bottom, absolute pitches will change. The image can be transposed
after expansion to restore the absolute pitch of the unexpanded picture.
Tip! Before expansion, identify the pitch of a line in the picture by mousing over the pixels and observing the pitch displayed in the Tips Display. After expansion (and the selection of the new frequency map), mouse over the corresponding pixels to find their new pitch. Now, simply transpose the pixels back into place with the up and down arrows.
Expand 4
Vertically expand the pixel spacing by a factor of four. See notes for Expand 2 above.
Expand 12
Vertically expand the pixel spacing by a factor of twelve. See notes for Expand 2 above.
Contract
Contract the vertical space between pixels by a factor of two. Use this command to restore the relative pitch of pixels when changing frequency maps (for example, when switching from Micro8 to Quartertones or Quartertones to semitones). There is a reduction of pixel brightness (to avoid pixel ‘clipping’). The command can, of course, be applied repeatedly to contract the pitch even more (as when switching from Micro50 to semitones).
Tip! Generally, you will want to normalize the picture after each application of this process.
Tip! The absolute pitch can change when applying this process. See the notes for Expand 2 for tips about restoring the original pitch.
Invert Pitch
Flip the canvas (or the selected region) vertically to invert the picture’s pitches.
Repeat Pitch
Replace the upper half of the canvas (or the selected region) with the lower half. This command is not affected by the current frequency map.
Tip! You may want to adjust the brightness of the new pixels after applying this process.
Harmonic Maximum (;)
Find the maximum brightness of the pixels of the canvas (or the selected region) and replicate them horizontally. Use this command to create long, sustained tones, generate a harmonic grid in the Blue Channel or create a filter from the frequency spectrum of the analysis of a sound.
 Fit/ Filter to Scale Popup
This menu provides commands to either remap the image’s pixels to a musical scale or to filter out pixels that are not part of a particular musical scale when invoked with the option key.
By default, choosing an item from this menu fits the pixels to the selected scale. Option-select an item from the menu to filter out the pixel not belonging to the selected scale.
Built-in Scales List
All of the items in the popup (except for the Custom Scale… item) are built-in scales. Some of the scale names in the list are followed by numbers that indicate the steps between the notes of the scale. For example Minor Melodic 2122221 indicates that the scale is constructed by taking the root (a given for all scales) followed by the note 2 semitones up, followed by the note one semitone up from that, etc.
Custom Scale…
Choose custom scale to invoke the Custom Scale editor. Use the dialog to create your own scales. A scale can have 3 to 12 steps. The Custom Scale editor uses a reference of C. ‘C’ – in this context – signifies the “root” rather than an actual ‘C’ pitch. So, ‘C’ corresponds to whatever pitch has been set as the Master Tuning pitch For example, if you create a four-note scale that consists of C E G B the notes will be treated as A C# E G# when the Master Tuning pitch is A.
Remove pixels that do not fit a user-definable diatonic scale. Unlike Fit to Scale, pixels are removed not remapped.
Tool Grid Controls

The Tool Grid is an invisible grid that can be used to restrict the brushes and selections to rhythmically and harmonically (depending on the tuning space) meaningful boundaries. Click on the Tool Grid toggle to turn it on or off. The Tool Grid’s icon is drawn in color when it is turned on. Tool Grid X controls the horizontal grid spacing. Tool Grid Y controls the vertical grid spacing. The vertical setting is ignored when making selections unless the shift key is held down. Set Tool Grid Y to 1 when painting if you do not want your strokes to be limited by the grid.
Shortcut: The grid can be turned on temporarily by pressing and holding the shift key prior to initiating a
paint stroke or selection.
Tip! Use vertical constraint to paint chords and other interesting harmonic structures. Set the Brush Mode to Dot Mode. With a semitone frequency mapping, for instance, set the Tool Grid Y interval to 5, and use vertical strokes to paint stacks of fourths.
Tip! Here is an example of how to set up the grid. In the Tempo/Duration Dialog, set your tempo and set the pixels per beat to 16. Setting a Tool Grid interval of 16 will restrict your notes to occurring on the beat. Setting the Tool Grid X Interval to 64 will restrict notes to occurring on the first beat of a measure. Setting a Tool Grid X Interval to 4 will restrict notes to 16th note boundaries. And, so on…
Lower Toolbar
Zoom Tool (Shift-A/Shift-Z)
Zoom the image in and out while maintaining the image center.
Scroll View (h)
Scroll the canvas within its frame. There are two ways to use the tool: click on the tool and drag in any direction to scroll the image. Alternately, move the mouse over the canvas area, press the ‘h’ key to get the hand cursor and drag the mouse to pull the desired portion into view.
Shortcut: Press the ‘h’ key to get the scroll hand cursor and drag the mouse in the canvas to scroll it
directly.
Note! Don’t confuse this tool with the Offset & Transpose Tool whose icon is the outline of a hand.
Scale XY
Scale the picture vertically and/or horizontally with or without wraparound. The tool can be invoked in two ways: clicking on the tool and dragging the mouse or double-clicking the tool’s icon to invoke its dialog box. To invoke the Scale Picture Dialog Box, double-click the tool’s icon. The dialog allows numerical entry of horizontal and vertical scale amounts and allows wraparound to be turned on and off. By default wraparound is turned on. The dialog provides a Scale From Center checkbox which determines whether scaling is done from the center or the left edge of the sound canvas. When wraparound is turned on, shrinking the image results in copies of the image being wrapped into the vacated region. This is useful for creating repeating motifs.
Constraints: option-Scale Picture restricts scaling to the vertical dimension. Shift-Scale Picture restricts scaling to the horizontal dimension.
Rotate
Rotate the image freely with or without image wraparound. The tool can be invoked by clicking and dragging the tool or double-clicking to invoke its dialog box. When dragging the tool, left-right mouse movement rotates the image. Rotation can be constrained to 45 degree intervals by holding down the shift key before clicking the tool. The dialog box allows numerical entry of the rotation amount and allows wraparound to be turned on and off. Wraparound is on by default. With wraparound turned on, parts of the image that are rotated beyond one boundary are rotated back in at the opposite boundary.
Constraints: option-Rotate restricts rotations to multiples of 45 degrees.
Offset
Offset the image vertically and/or horizontally with or without wraparound. The tool can be invoked by clicking and dragging the tool or double-clicking to invoke its dialog box. The dialog box allows numerical entry of the offset amount and allows wraparound to be turned on and off. By default, wraparound is turned on.
With wraparound turned on, the parts of the image that are shifted beyond the canvas’ boundary are
wrapped around to the opposite boundary.
Constraints: option-Offset restricts offsets to the vertical dimension. shift-Offset restricts offsets horizontally. When the Tool Grid is on, shift-Offset restricts offsets to the Tool X Grid interval.
Contrast and Luminance
Adjust the image’s brightness and contrast. The tool can be used by clicking and dragging or by double- clicking to access the Remap Color Dialog. When dragging, horizontal movement changes the image contrast and vertical movement changes the brightness (luminance). Constraints: Use the option key to constrain the tool to luminance. Use the shift key to constrain the tool to contrast.
Remap Colors Dialog
Double-clicking the Contrast & Luminance tool invokes the Remap Colors Dialog. This tool can be used to create a range of effects. You can use it to achieve the visual equivalents of audio compression, gating and expansion or to create wild psychedelic effects. There are two remapping modes. When Map Luminosity is turned on, pixel luminosity in the original picture (regardless of the source pixel’s color) is mapped to a color as defined by the curve. When Map Luminosity is turned off, the luminosity of each color channel’s pixels are remapped independently using the corresponding curve in the remap dialog. The curve represents the mapping of the original pixel brightness to the new pixel brightness. It is like the compression curve displayed in many digital audio compressors. In version 2.x, remapping was done this way.

Above the envelope editor is a color bar that displays the remapped spectrum. Click any point on the color bar to pop up a color picker. The red, green and blue envelopes can be edited independently. Click on the Color Edit Mode selector to select which color envelopes the tools apply to: Red & Green, Red only, Green Only, Blue only. The Protect Black checkbox can be used to ensure that silence remains silence. Turning this option off allows black to be remapped which can result in undesirable side-effects if you don’t make sure that some other shade is remapped to black. Use this tool to remove faint pixels after doing an analysis of a sound.
Note! When Map Luminosity is off, Remap Colors only influences the pixel brightness which makes it useful for adjusting contrast and removing low-level pixels. When it is off, it can be used to remap to completely new colors.
Apply Displacement Map
Displace the image by warping it with another image (the displacement map). Click on the tool and drag the mouse in any direction to deform the image by bending it against the selected displacement map. Displacement mapping is incredibly powerful. You will probably find it useful for creating beautiful images in addition to creating sounds. Option-click the tool to pop up a menu of the images in the Displacement Library. The Displacement Library can be any MetaSynth preset or filter library. The default Displacement Library is called Displacements.filters and is found in MetaSynth’s Filters folder. It is best to use only mono (grayscale) images in the Displacement Library. To edit the default library, make it the current preset library by choosing it from the File popup.
How displacements are done. The amount of displacement is determined by the luminosity of each pixel of the image used as the displacement map. Gray values (127) are neutral while Black and White will create maximum displacement in opposite directions. When the Anti-Alias Transforms preference is turned on (in the Preferences dialog), lines are bent in smooth, continuous curves. When it is turned off, lines break discretely where edges occur in the displacement map.
Use displacement maps with Anti-Alias on to skew images and create pitch modulation effects (such as vibrato, pitch bending, and glissando). Use displacement maps with Anti-Alias off for diffusion effects and to re-contour melodic and rhythmic lines. Use them in the Image Filter Room, to create filter sweeps.

Constraints: Displacement mapping can be constrained horizontally with the shift key or vertically with
shift-option.
Octave Transpose
Transpose the image up or down in one octave increments. Hold down the option key when transposing to leave a copy behind. Shift-click to transpose the image up or down by a fifth.
 Nudge/Transpose
Nudge the image in single pixel increments (when the Tool Grid is turned off) or by the grid interval when the Tool Grid is on. Holding down the option key, leaves a copy behind. Modifier keys can be used to nudge by other increments:
- Up/Down/Left/Right arrows–nudge the selection in the indicated direction,
- Shift-Up/Down arrows–transpose up/down by Tool Grid Y interval (even if grid is off),
- Shift-Left/Right arrows–shift left/right by the Effects Grid interval,
- Page Up/Down arrows–transpose up/down by octaves
- Shift-Page Up/Down–transpose up/down by fifths.
Normalize
Click here to normalize the image. Normalization remaps brightness so that the image’s brightest pixels are remapped to maximum brightness, the dimmest pixel mapped to black and the rest of the pixels being remapped accordingly. This command ensures that the full dynamic range is used. If there are black pixels already in the picture, this will maximize the volume. However, if there are no black pixels in the image, the lowest level pixels will be mapped to black. Note that in MetaSynth 2.x, normalize worked slightly differently; it only made pixels brighter so that the brightest pixels were at maximum brightness and did not rescale the least bright pixels to black.
Smooth
Soften the left and right edges of all pixel lines of the canvas (or the selected region). This command softens the attacks and decays of a sound picture’s notes. Unlike the Blur process, diffusion happens only in the time domain; the harmonic content is unchanged. Repeated application removes sharp attacks.
Smooth Decay (Smooth Right) / Smooth Attack (with option)
Soften and extend the decay of all pixel lines (notes) of the canvas (or the selected region). Use this tool to add sustain and soft decay to notes without affecting the attack. Option-click this tool to smooth the attacks (left edges) only.
Interpolate
Create smooth (interpolated) transitions in amplitude along the time axis. Interpolate is usually used to modify the envelopes of individual notes or clusters of notes. A smooth gradient is calculated between the pixels at the right and left boundaries of the selected region. Interpolate is the visual equivalent of crossfading.
Generally, you will select either the attack or the decay of a note (or note cluster) before applying this process. Use this tool to smooth out abrupt changes in brightness or to lengthen note durations (by selecting the end of a note and the area to the right of the note).
 Before Interpolation Before Interpolation |  After Interpolation After Interpolation |
Tempo/Duration Tool
Use this tool to adjust the tempo/duration of the picture. Click and drag left/right to change the sound picture’s tempo/duration. Double-click the icon to open the Tempo/Duration Dialog which provides access
to tempo-related settings and commands. Use the dialog to define the number of pixels per beat and the
beats per measure.
Tempo/Duration Dialog
The Tempo/Duration dialog is invoked by double-clicking the Tempo/Duration tool. The duration of a picture can be defined in terms of either samples per pixel (spp) or beats per minute (bpm). MetaSynth can even fit the duration of the picture to match the length of the currently loaded sound! Changing the value in some fields may cause the values in other fields to change as well. For instance, changing Samples Per Pixel will change the Total Duration and Beats-Per-Minute which allows you to work with the units that make the most sense for your application. For instance, if you are trying to set the tempo of a preset, it makes sense to work in terms of BPM. But, if you need to set a precise duration, you may prefer to set the Total duration setting.
Entering values. After typing in a numeric value, type the enter key to complete the entry.
Samples Per Pixel is the number of samples (at 44.1 kHz) that are mapped to a single pixel. BPM is the Beats-Per-Minute and is calculated from the other fields in the dialog. Pixels Per Beat is the number of pixels that are mapped to one beat at the current tempo. This setting is used to draw the Grid Layer’s X grid and by some instrument settings. The Image Synth is pixel-based. As a result, the precision with which you can set the duration is limited by the samples per pixel setting, the picture width and sample rate. See the Tech Note below for more information. The Samples Per Pixel also limits the length of an instrument’s attack that is actually used. If an instrument’s attack time is longer than the Samples Per Pixels duration, the Image Synth uses the Samples Per Pixels duration as the attack time. This generally is not an issue since notes can easily be given long attack times through graphic manipulation. Samples Per Pixel is something of a misnomer as it is 44.1 kHz based regardless of the actual sample rate setting.
Shortcuts: In any field type ‘*’ to double the value or ‘/’ to halve the value. This shortcut replaces the ‘*2’
and ‘/2’ buttons that were present in earlier versions of MetaSynth.
The dialog features two text buttons:
Fit duration to current sample – Set the duration of the sound picture to the duration of the currently loaded
sound.
Apply to all presets – Change the tempo/duration settings for each preset of the current library. This function makes it easy to set all of the presets in a library to the same tempo. This is useful when the preset library contains sound pictures that will be used to construct a song. Note! Be careful not to press this button accidentally. This function cannot be undone.
Tip! Higher SPP values yield longer sounds but less precise envelopes. Small values (20 to 150) are good for
sounds with rapid transients while higher values are more suited to ambient, slowly varying “pads”.
Set Sequence Loops
Set the number of iterations of the sound picture to be rendered when synthesizing (rendering) the sound
to the Sample Editor or to disk.
 Synthesize Current Pict (Render to Memory (@))
The icon is a shortcut to Render to Memory (@) : the entire sound canvas is rendered and loaded into the Sample Editor.
Render options popup. (need correct Icon)
Render options popup. Option-click on the Synthesize icon to pop up a menu of rendering options: Render to Memory (@) :
The entire sound canvas is rendered and loaded into the Sample Editor. In general it is used for proofing, waveform inspection or may be needed when the sound has to be further processed. The sound is automatically played back after it is computed. Synthesize can be a CPU-intensive task, and the computation time is influenced by a number of factors: the size of the picture, the number of non-black pixels in the image, the input source. Sound pictures with wave-table input sources require the least computation and multi-sample Instruments require the most.
To cancel rendering press your keyboard’s escape key.
Render to Disk As (^)
The current preset sound canvas is rendered to disk under the given name. This command is rarely used when using default MetaSynth workflow and the montage room but can be handy to export sound for other softwares.
Render to Disk and Save ($)
The preset is saved and rendered to disk with the default montage name inside the IS Sounds folder for further use in the montage room. This is probably the most important command in IS in terms of workflow when composing a full MetaSynth piece. When using it each Image synth presets is immediately available in the montage room and there is no need to worry about where to place the sound, how to name it and to make sure the latest changes are indeed saved.
Oversampled Render to Disk
Oversampled Render to Disk does a 2X oversampling and dithers down to the target sample rate.This command is only available when SR is <= 48k
Preview to Disk.
Preview to disk allows to record all the sound modification in real time while you play and edit the sound canvas. It is a very powerful feature to capture real time performances.
When you select this command, MetaSynth prompts you for a file name
and starts preview playback of the current preset. As long as playback continues, the Image Synth sound output is recorded to disk (with the preview sample rate). When playback is interrupted, recording stops. You can record as you paint and manipulate the canvas image and switch between compatible presets using the “live switching” technique described below. By sequencing a series of compatible presets, you can record a performance to disk. Note that if you live-switch between incompatible presets, the recording will end.
Batch Process Sound folder (MS CTX 1.2)
Available only in Image Filter room, this render command process all sound files in a chosen folder with the current image filter. This is often used to process list of samples for instruments and as with the Batch Effect process it is recommended to turn “append flt” OFF in preferences if ON.
Live-Switching. MetaSynth can seamlessly switch between adjacent presets using the ( and ) or [ and
] keys during playback so that you can perform with Image Synth. If the presets are compatible (same picture size and same mono/stereo setting), MetaSynth will continue playback in the new preset from the position of the previous preset. For example, if you press ] on beat 2 of measure 2, playback will continue from the same position in the new preset. If the presets are incompatible, MetaSynth will start playback of the new preset from the beginning. Switching between incompatible presets will cause recording to end if you are previewing to disk.
The tempo cannot change during real-time previewing. So, any difference in tempo settings is ignored
when live-switching.
Preview (spacebar)
Play a real-time preview of the canvas. While the picture plays, an orange Play Position Indicator dot moves across the top of the picture to indicate the play position. Hold down the command key when pressing the Preview icon or press option-spacebar to preview only the selected portion of the canvas.
Tip! If playback stutters when previewing, you may use a selection to diminish the number of voices; Ultimately rendering to memory may be required instead of real time preview. Note that stuttering is pretty rare on modern computers and would require several hundreds of simultaneous voices with a slow instrument.
Preview Selection (command-spacebar)
Preview the selected area.
Right-Hand Toolbar
The right-hand toolbar provides the Amplitude Map, time-domain graphic effects (like graphic echo, reverb and quantize) and the Effect Grid interval. These tools can be used to add echo and reverb, add a rhythmic pulse to a picture, sharpen or blur note attacks, and more. Most of the time-domain graphic effects are applied with the spacing determined by the Effects Grid Interval indicator displayed at the toolbar’s base. The effects are applied to the selected region (or the entire picture if there is no selection).
Tip! For ear-bending effects, apply Hot Filters (the right-hand toolbar’s graphics effects) to the left and right (red
and green) channels using different grid intervals!
Tip! Apply these processes to the pitch domain to achieve surprising harmonic textures by rotating the picture
90 degrees to the right, applying the process, then rotating the picture back into position.
Amplitude Map
The Amplitude Map is like a graphic eq for pixel to sound translation; it allows the pixel amplitude to be influenced by vertical position on the canvas. Depending on the tuning space and instrument and picture, the Amplitude Map can be thought of like a keyboard velocity contour curve, or a synthesizer filter’s keyboard tracking control. Drag in the map itself to edit the curve or use the tools below it to modify it. The Amplitude Map is especially useful for rolling off the amplitude of high frequencies but can be used for other applications as well (such as emphasizing notes in a particular pixel range without modifying their brightness in the picture).
The horizontal axis represents pixel height – the further you travel to the right the higher the vertical position of the pixel that is represented. The vertical axis represents amplitude gain or reduction. The vertical mid- point represents no gain or reduction. The lower a bar is in the graph, the lower the amplitude of the sound generated by the pixels in its range.
Note that the mapping is done by vertical pixel position not frequency. If the tuning space rises in pitch throughout its range, the map will remap amplitude by frequency. However, if the tuning space is such that pitch does not rise with the vertical pixel position throughout the vertical range, the result will not strictly be a mapping of amplitude based on frequency. For example, a tuning space based on the harmonic series can have pixels high in the picture that represent frequencies lower than some of the pixels below them. Such a tuning space’s octaves, for instance, are always pitched lower than the pixel below precede it.
Exercise: Create a preset that is all white (or yellow). To do this, type ‘f’ to fill the canvas. Set the tuning space to Custom Scale. Enter ‘64’ for Divisions per Octave and click Harmonic Series. Click the OK button. Start previewing the preset. Zero out the curve so that no sound plays. Now, selectively click in the Amplitude Map to bring certain pixels or pixel ranges in and out : you will see the Map works like a 64 band graphic equalizer .
Amplitude Gain
This sets the output gain applied to the preset. The gain control’s units are percent, where 100% is 0dB of gain. Use this to fine-tune the overall amplitude of the signal to avoid clipping or compression. If the Level Indicator pushes into the red, lower the gain just enough so that the overall levels are as high as possible without triggering the red light in the Level Indicator. (See the Level Indicator section for further details.)
Graphic Effects (Hot Filters)
The following items are Graphics Effects used frequently when creating sound pictures.
Motion Blur
Smooth out rapid transients and remove short, isolated pixels. The intensity of the filter is determined by the Effects Grid interval. It is especially useful when applied to analyzed sounds to remove quantization artifacts and to generate slowly moving pads. Use it to smooth out or remove the ‘static’ in a noisy picture (one with lots of dots or isolated little pixel islands). It is also great for smoothing out the attacks and decays of pictures with lots of hard edges.
Tip! Apply this separately to the red and green channels with different Effects Grid settings for great stereo depth.
Quantize
Rhythmic quantize. Force notes to start and end at the positions determined by a grid. By default, Quantize uses its own four pixel grid, but when the option-key is held down it uses the Effects Grid interval. All notes are quantized to the brightness of the brightest pixel in each pixel group. Quantize is similar to the “pixelate” function found in some graphic editing applications but only applies the effect horizontally (the time domain).
This effect is great for finding interesting rhythmic patterns, especially when processing analyzed sounds.
Try it on slowly evolving sounds to add some ‘groove’ to them.
Tip! After applying Quantize, it is often useful to apply the option-Shorten effect to separate adjacent notes.
Tip! Interesting effects can be created by inverting an image before and after quantizing. Type ‘!’ to invert the canvas. Apply the Quantize effect. Type ‘!’ to invert the canvas again, returning it to its original color orientation.
Echo (#)
Echo the canvas (or the selected region) by repeating the pixels to the right with decreasing brightness (volume). The Effects Grid interval determines the echo delay.
Tip! Get a multi-tap delay effect by successively applying Echo with different grid intervals.
Tip! With a sparse motif, try applying Echo to one color channel and Pre-Echo to the other.
Pre-Echo
Pre-Echo the canvas (or the selected region) by repeating the pixels to the left with decreasing brightness (volume). The Effects Grid interval determines the pre-echo delay time.
Reverb
Simulate reverb by extending and fading the durations of all pixels of the canvas (or the selected region).
Tip! In addition to creating a reverb effect, this process is useful for selectively increasing the decay time of
notes in different regions of a picture.
Repeat
Repeat pixels identically across the canvas (or the selected region). The Effects Grid interval determines
the grid used to repeat the pixels. Unlike Echo, there is no alteration of pixel brightness.
Tip! Use this process to duplicate a motive or pattern across an entire picture. For example, set the canvas width to 64, set the Pixels Per Beat setting (in the Tempo/Duration dialog) to 16 and set the desired tempo, paint in a rhythmic or melodic pattern, increase the picture size to 1024, set the Effects Grid interval to 64 and press Repeat to repeat the pattern across the entire picture width.
Grid Filter (%)
Filter the image with the Grid Layer. This command is equivalent to the Grid Layer popup’s Filter with Grid Channel command. (xref to Grid menu that explains more on what to do with grid)
Pulse
Pulse the canvas (or the selected region) by removing pixels using the current Effects Grid interval. A grid interval of 16 removes every other 16 pixels of the picture (i.e. 16 pixels unchanged followed by 16 pixels of silence and so on).
This command is useful for creating strong rhythms.
Tip! There are a number of processes which complement Pulse in helping to create rhythmic interest in a picture. Try using Echo and Pre-Echo or Reverb after applying the Pulse Hot Filter.
Tip! Try applying the Attack effect a few times (with the same grid interval) after applying Pulse.
Tip! Create a swelled pulse effect by setting the Effects Grid interval to a medium-small interval (8 pixels, for example) and executing the following edit sequence: Copy (c), Clear (delete key), Fade in out Pict (u), Pulse (p)…
Tip! For pulses that morph into sustained tones, use this command sequence: Copy (c), Pulse (p), Crossfade Pict
(x)…
Saw
Similar to Pulse, but a fade out effect is applied at the intervals specified by the Effects Grid interval rather
than hard cuts to silence. Use this effect to add rhythmic drive to material.
Tip! Try the tips suggested for Pulse.
Shorten
Shorten the duration of pixel lines in the canvas (or the selected region) by a pixel. Single pixels are not removed. To remove single pixels, use the Noise Filter command from the Processes submenu. This tool is handy for shaping decay envelopes. It is often useful to apply Shorten a few times before applying Quantize, Pulse, Saw or M Blur.
Attacks
Sharpen the attacks of notes. Brighten by 1.5 times the first pixel of all notes except where the first pixel is faint. Use this command to add a percussive attack to notes. It is often used several times in succession to achieve the desired degree of percussiveness.
Tip! It is often desirable when creating percussive music to use wide pictures with a low Samples Per Pixel setting (specified using the Tempo/Duration Dialog). Such settings allow for precise control of note envelopes and attacks.
Maximum
Replicate the brightest pixel (maximum intensity) vertically at the interval specified by the Effects Grid interval. When applied to an entire picture, this results in vertical lines or bands. This command is most often used when creating images to be used as rhythmic filters.
Tip! Use this command on the Grid Layer or on a blue channel to make rhythmic grids.
Effects Grid interval (number)
Set the spacing for the Hot Filter graphics effects processes. Enter a value by typing, using the arrows or
making a selection from the popup menu to its right. The grid icon next to it proposes some often used preset values.
Image Filter Room
About This Chapter
This chapter describes the Image Filter Room’s unique features. The Image Filter Room’s tools are nearly identical to those of the Image Synth Room. Familiarity with the Image Synth Room is essential to understanding the Image Filter Room. For information about the room’s tools, see the Image Synth reference chapter. This chapter covers only those features that distinguish the Image Filter Room from the Image Synth. Performing the Image Filter Room tutorial is suggested before proceeding with this chapter.
Image Filter Basics
The Image Filter Room is used to apply dynamic filters to the Sample Editor sound. Where the pixels in the Image Synth picture represent oscillators, the pixels in the Image Filter represent high-resolution stereo bandpass filters. A column of pixels essentially represents the settings of a programmable graphic equalizer so that as the sound plays successive pixel columns are activated to filter the sound.
When you click the render icon (Apply Picture Filter), the Image Filter is applied to the Sample Editor sound in memory. Pixel brightness determines gain, and pixel color determines spatial balance. It is important to keep in mind the notion of color channels — that every pixel of a color picture has a red, a green, and a blue channel. Unless a pixel is pure red or pure green, it has a red portion and a green portion. The red portion’s brightness determines the left channel gain and the green portion’s brightness determines the right channel gain. The gain can be positive or negative. 50% brightness represents 0 db gain (the signal passes through unchanged). So, an image of solid bright yellow amplifies the sound considerably.
The overall set-up is very similar to the Image Synth. Just as in the Image Synth, the frequency represented by any pixel is determined by the Master Tuning pitch, the tuning space (frequency map), and the pixel’s vertical position. Unlike the Image Synth, there is no tempo setting. The Image Filter’s timing is scaled to fit the selected portion of the Sample Editor sound (or the entire sound if there is no selection). So the duration is determined entirely by the Sample Editor’s selection.
When the canvas’ frequency range is less than that of the sound being filtered, frequencies below the canvas’ range are filtered according to the pixels in the bottom row of the image. Frequencies above the canvas’ range are filtered according to the top row of pixels in the image. If either row is black, the corresponding frequencies will be removed entirely.
Image Synth / Image Filter Differences
The tools and commands available in the Image Filter Room are identical to those in the Image Synth Room with the exception of the features mentioned in this section. For information about the individual tools, see the Image Synth Room chapter.
Presets. The preset libraries accessed from the Select Preset popup are different in the Image Synth and the Image Filter rooms. At startup, the preset library used by the Image Filter Room is the MetaSynth.filters library from MetaSynth’s Filters folder. You can change it to any other preset library using the File popup’s Open Presets File command. By contrast, both rooms share the same filter library. If you use the Open Filters File command to change the graphic filters in one room, the same filter library will be available in the other.
A project can have a dedicated image filter bank. When there is one, opening a project will also load the associated filter bank. In MetaSynth CTX a source sound reference is also included when you save an image filter preset. This source sound can be automatically loaded if you choose so when selecting a filter preset that has a valid sound reference.
Layers. The Image Filter Room only permits one graphic layer in addition to the grid layer. If a preset with multiple
layers (i.e. created in the Image Synth) is selected, only the first layer will be visible or active.
Amplitude Map. The Image Filter Room lacks the Image Synth’s Amplitude Map as it is not needed since the image itself controls the amplitudes.
Rendering :
When rendering to disk or using render & save, the file name will be set using the name of the preset.
Note : render & save will always place the filtered file inside the Project Sound folder.
Batch : Process sounds folder (V CTX 1.2)
Process sounds folder applies the current filter to all the sound files in the selected directory. When you choose this command, you will be prompted for a folder whose sounds you want to batch process. If the Append flt when processed preference is turned on (which is the default setting), the new files will have “ flt” added to their names if they do not already end with _flt. If the Append flt when processed preference is turned OFF, the original files will be replaced by the new files. Use OFF when processing sounds that are referenced by an instrument or used in the montage.
Real-Time Filtering
Dynamic real-time performances can be created by painting in the Image Filter during real-time previewing. The performances can be captured to disk with the Preview to Disk command (see the Image Synth Room chapter for details). Real-time playback stops if the tuning space or canvas dimensions are changed.
Image Filter Attack Blurring
The Image Filter is based on FFT techniques that make precise artifact free filtering possible. A side-effect of this technique is that the signal will fade in from 0 over the first 25 or so milliseconds. In most cases, this is not noticeable. If the sound starts with a sudden transient this attack may be blurred.
If you find a case where the attack is audibly blurred, insert 25 milliseconds of silence at the beginning of the sound before applying the filter. To do this:
- Select 25 milliseconds or so of audio in the Sample Editor
- Copy the audio to the clipboard
- Set the insertion point with no selection at time 0
- Choose Paste Insert from the Edit Menu
- Press backspace (or choose Silence) from the Sample Editor’s Generate popup menu.
Spectrum Synth
About This Chapter
This chapter describes the features and functionality of the Spectrum Synth Room. Familiarity with the Spectrum Synth tutorial chapter is assumed. We urge all users to perform and not just read the Spectrum Synth tutorials.
EW: I’m in favor of removing all references to tutorials, I would suppress this section. We don’t know which will survive and how.
Spectrum Synth Basics
Spectrum Synthesis is one of MetaSynth’s most powerful and unique features. It uses high-resolution frequency
analysis to construct a series of by analyzing slices of a recorded sound. The result is a much
higher resolution analysis than is possible in the Image Synth. A wide variety of sounds can be created with this technique: intriguing grooves and loops, mysterious abstract sounds, and invented sounds for use in Sampler and MultiSampler instruments. Analyze the decay of a piano and turn it into a killer groove, or create hybrid instruments
of your own invention. Want to create a flugel-vio-piano-horn? The Spectrum Synth Room is the place to go.
It was discovered long ago that all sounds can be thought of as a combination of sine waves of different frequencies and loudness (amplitude). FFTs (Fast Fourier Transforms) are a way of analyzing and representing these component sine waves. These sine waves are also known as harmonics or partials. The Spectrum Room allows you to edit, rearrange and mangle FFT-events and create sounds not easily created with traditional synthesis tools. These spectrum events can also be saved and used as frequency maps in the Image Synth and Image Filter Rooms. The Spectrum Room’s auto-build feature creates a series of spectrum events which are snapshots of the source sound’s changing harmonic content.
Because Spectrum Synthesis is such a new technique, hands-on experience is really required to get a sense of
what it is all about. We urge you to perform the Spectrum Synth tutorials before reading this reference section.
The Spectrum Synth is usually used to create spectrum sequences which are sequences of spectrum events. It is also possible to export a single instant spectrum that contains the detailed spectrum information of a single event. Instant spectra can be used in both the Spectrum Synth and in the Image Synth and Image Filter Rooms where they can be used to create a custom tuning space by using the Build From Spectrum command in the Custom Tuning dialog.
Spectrum Synth Anatomy and Orientation
The content area of the Spectrum Synth Room contains a series of one or more spectrum events. Each event is represented by a pattern of horizontal lines that represent the event’s harmonics. The line brightness represents the strength of the harmonic. The content area is surrounded by tools to create, manipulate and transpose the events. Sequences can be auto-built from the Sample Editor sound (or selection) and sequence events can be replaced by new analyses. Harmonics are defined in relation to a fundamental base-pitch. The room’s Reference Pitch
defines the fundamental (base-pitch) and influences the behavior of the harmonic-manipulating tools (as explained later in this chapter). Each event has an interpolation setting that determines how it is blended with the preceding event — somewhat like an amplitude envelope. So, events can blend together seamlessly or have sudden attacks. Events can be rearranged by dragging them to new locations, changing their durations, or shuffling them with the Randomize tool. Events are mono or stereo depending on the sound they were derived from. All spectrum events are originally derived from an analyzed sound and will have the same number of channels as the source sound. Mono events can be converted to stereo events with the Stereo Spectrum command.
Spectrum Synthesis is computationally intensive. On some machines, it is necessary to use a lowest possible sample rate in order to preview sequences successfully especially if the harmonic-content is rich or the spectrum size is large. The Spectrum Size setting allows you to determine the number of harmonics analyzed and stored by the Spectrum Synth. The larger the spectrum size, the more data that is stored in the events. While the size of a spectrum sequence is generally smaller than that of the sounds they represent, large sequences can occupy non-trivial amounts of disk space.
When MetaSynth launches, it loads the names of all the spectrum sequences found in its Spectrum ƒ folder into the room’s File popup menu.
Workflow. Generally, you begin by opening a sound into the Sample Editor (and optionally selecting a portion of it), setting the number of beats (the number of events per measure) and measures, using the Auto-Build function to build a sequence of events and then editing the resulting sequence. The Auto-Build function analyzes the sound and picks a reference pitch which can be changed by manually. The Image Synth’s Analyze Sound function can be very helpful for identifying the correct reference pitch. Finally, you save the spectrum sequence and render it as a sound file that can be played by other audio programs or used in MetaSynth’s Montage Room.
Previewing. Spectrum synthesis is computationally intensive. If playback stutters, try reducing the Preview Sample Rate in Preferences. Spectrum Size also influences the preview playback. See Spectrum Size later in this chapter.
Rendering. The render time for a sequence is a function of the sequence duration, whether the sequence is mono or stereo, and the spectrum size. Rendering can take some time even on fast machines. The entire sequence is rendered including any blank space at the end. Multiple loops of the sequence can be rendered at once by setting the Loop Options for the room.
Technical Notes. A spectrum sequence can have any number of events. Each event stores amplitude, frequency and phase information for each harmonic. Amplitude and frequency information are stored as 64-bit floating point numbers so there is no frequency quantization (unlike Image Synth analysis/resynthesis). Frequency information is stored in absolute Hz internally and is only played back differently if the Reference Pitch and Synthesis Pitch are not the same. FFT analysis has an inherent trade-off between frequency accuracy and time accuracy. So for drones you would prefer a 2048 FFT size while a 1024 FFT is better for sounds with fast transients. As a result, very short attack sounds might be blurred. To remedy this, shorten the duration of the event in question or increase the sequence tempo. It is sometimes useful to create very short events within the sequence and apply an Attack interpolation mode to sharpen blurred transients.
User Interface
canvas
The canvas is the content area and contains a sequence of events and a timeline. Events can be dragged to move or resize them. Clicking on events selects them. Shift-clicking events toggles their selection. Command-dragging allows you to select events with the selection tool. Shift-command-dragging toggles the selection state of all events in the selection rectangle. Option-dragging copies events when in offset mode. The canvas mode is set with tools in the Left-hand Tools discussed later in the chapter. Use the tab key to advance the selection to the next event (or groups of events).
Events
Events are defined only by their ‘in’ time and have no duration of their own. An event plays until a new event is encountered. When the sequencer is in ‘offset’ mode (its default mode), you can click on an event and drag it to change its start point. Moving an event really moves its start point without moving the other events’ start points. To lengthen a region, use the Change Duration tool or change the start point of the event that follows it. The Interpolation mode determines how the transition is made from one event to another. Control-click an event to preview that event. Control-click the Render Sequence button to render only the first selected event.
Harmonics & Reference Pitch
An event’s horizontal lines represent its harmonics with the line brightness representing the harmonic amplitude
(loudness). Mouse over any harmonic to see its pitch displayed in the Tool Tips area.
The ideal harmonic series is derived by multiplying or dividing the frequency of a reference pitch by whole numbers. The harmonic series for the pitch A 440 is made up of 1 * 440, 2* 440, 3* 440, etc. Doubling the frequency of a note yields its octave. So, multiples (or divisors) that are powers of two (2, 4, 8,…) are the octaves of the reference pitch.
Real sounds are rarely composed of the ideal harmonics of a reference pitch. So, the Spectrum Synth’s analysis does not restrict itself to ideal harmonics. Many of the Spectrum Synth’s tools, however, are designed to act on the ideal harmonic series. The room’s Reference Pitch is used by harmonically-sensitive tools to define their behavior. For instance, the Tune with Reference Pitch Harmonics tool (and its variants) can be used to tighten event harmonics and force them closer to the ideal series (this can help give pitch to a noisy sound). The tool uses the Reference Pitch to determine what the correct harmonics are. As a result, you can change the harmonics acted on by the tool by changing the Reference Pitch. As long as the Reference Pitch and Synthesis Pitch are changed together, there is no change to the sound’s pitch. The Reference Pitch is just a reference for the tools and for synthesizing a sample series for samplers.
Upper Tools
File Popup Menu
Open Spectrum Sequence… (o)
Open a spectrum sequence file.
Save Spectrum Sequence (s)
Save the current spectrum sequence file.
Save Spectrum Sequence as… ( S)
Rename and save the current spectrum sequence file.
Render to disk and save ($)
Echoes the render pop up Render & Save $ command.
Auto-Build Sequence (n)
Build a new spectrum sequence from the Sample Editor sound or selection. The number of events is determined by the room’s Beats and Measures settings. Auto-Build tries to determine the reference pitch and sets the Interpolation mode of all events to Slow. After a sequence is built, you can re-analyze the sound with the Replace Spectrum command which does not reset the interpolation modes of events or change the Reference Pitch.
Auto-Build Exp Sequence
Similar to previous but use a non linear event division with shorter events at the beginning. This is often needed for Attack sound where the spectrum changes rapidly at the sound beginning.
Save Instant Spectrum
Save an instant spectrum file for the first event in the sequence. An instant spectrum file contains the spectrum data of a single event. Usually, these files are used to create custom Tuning Space/Scales in the Image Synth or Image Filter Rooms. Instant spectra may also be inserted into a sequence using the Open Instant Spectrum command.
Tip! Build a library of intriguing timbres using the Save Instant Spectrum command. These spectrum files can
be inserted into any spectrum sequence or used to create custom tuning spaces.
Open Instant Spectrum
Insert an event based on an instant spectrum (see Save Instant Spectrum) after the insertion point.
Project’s Spectrum Sequences List
At the end of the File popup is a list of the sequences found in the current Project’s Spectrum folder. This list is dynamically built and allows fast reopening.
Edit Popup Menu
Undo (z)
Undo the last action.
Cut (x)
Cut the selected events to the clipboard and delete them from the sequence.
Copy (c)
Copy the selected events to the clipboard.
Paste & Insert (v)
Insert the clipboard contents and move events later to make room for the pasted events without removing any events.
Paste in place (b)
Paste the clipboard contents, replacing selected events with the clipboard contents.
Merge in place (m)
Mix the spectrum (FFT) data in the clipboard with the spectrum data in the selected sequence events. The merge command can merge multiple events if multiple events are selected and in the clipboard. The merge is a 50% blend of the clipboard data and the original event harmonics. The amplitudes of event harmonics are reduced in volume before blending.
Max in place (k)
Merge the clipboard and event data using a maximum amplitude algorithm. Unlike Merge in Place, there is no reduction of harmonic amplitudes. If there are coincident harmonics in the original and merged events, the strongest (maximum amplitude) is kept.
Clear
Delete the selected events. Shortcut: delete or backspace.
Select All (a)
Select all events in the sequence.
Deselect All (d) Deselect all events. Revert Time (t)
Reverse the order of the selected events
Repeat Twice (r)
Repeat the first part of the sequence twice (discarding the second half of the sequence). This command
applies to the entire sequence regardless of the selection.
Twice faster (<)
Scale the event durations by half and repeat. This command effectively doubles the tempo.
Twice Slower (>)
Double the event durations.
Randomize (y)
Randomly re-order the selected events. This has the same effect as clicking on the Randomize icon. Randomize is a great way to discover new timbres and grooves. Select just a few events and Randomize to make a subtle change.
Time Blur (=)
Blurs harmonics horizontally between adjacent events. This command can be useful when smoothing
transitions between some events.
Pitch Blur
Blur harmonics vertically.
Apply Transpose (&)
Transpose the data to match the resynthesis pitch (not the reference data). After choosing this command, the reference and resynthesis pitch will be the same. For example, if the reference pitch is C1 and the synthesis pitch is C2, all of the harmonics will be transposed one octave up and the reference pitch will be set to C2. This changes the actual data stored in the FFTs. Apply Transpose also makes all harmonic offsets permanent.
Fit Tempo (F)
Set the tempo so that the sequence duration matches the Sample Editor selection.
Stereo Spectrum
Make a mono spectrum sequence stereo. Sequences are mono if the Sample Editor was in mono mode when the sequence was built.
Auto-Build Sequence (n)
Create a new spectrum sequence from the Sample Editor selection. The new sequence is created by slicing the source sound into a number of equal slices (the number of measures * the number of beats) whose harmonic spectrum is analyzed. An FFT event is created for each slice with the slice’s harmonic content. If the harmonics in a slice change dramatically over the slice’s duration, the harmonics are weighted towards those at the beginning of the slice. The Interpolation Mode for all events is set to Slow (see Interpolation Mode later in this chapter), and the Reference Pitch and Synthesis Pitch are set to the pitch MetaSynth finds to be the dominant harmonic in the sequence. If the source sound is very noisy or has an ambiguous pitch, you can manually change the Reference Pitch and Synthesis Pitch. Auto-Build does not set the tempo. If the sequence duration is intended to match the source sound’s use the Edit popup’s Fit Tempo command (shortcut: f).
Replace Spectrum Region (i)
Analyze the Sample Editor selection and replace any selected spectrum events with the harmonic contents of the selection. Unlike Auto-Build, Replace Spectrum Region does not change the selected events’ Interpolation Mode, or the sequence’s Reference Pitch, or Synthesis Pitch. Use this command liberally when building and editing sequences.
Use Replace Spectrum Region to create hybrid sequences by opening a new sound after performing Auto- Build. Then, select a portion of the new sound and some events in the spectrum sequence. Use Replace Spectrum Region to replace the original events with events derived from the newly opened sound. This is a great way to create samples that have elements of different sources for MultiSampler instruments.
See the Spectrum Synth tutorial chapter for examples using this indispensible tool.
Randomize (y)
Randomize the order of the selected events.
Measures and Beats
The number of measures and “beats” of the spectrum sequence. The number of events created by Auto- Build is computed by multiplying measures by beats. There can be any number of events in a spectrum sequence. You often use a beats value based on the desired granularity of the auto-build analysis or on the timeline tick marks that you need–since MetaSynth draws a tick mark in the timeline to mark every beat.
It can be convenient, for example, when working with sequences that have 16th notes to set the beats to
16 even if there are four true beats in a measure.
Spectrum Size (1024 or 2048)
The number of harmonics analyzed and stored for each channel of an event. Using a large spectrum size increases the theoretical resolution but also decreases the rhythmic accuracy and increases the computation demands and required memory. Before using a large spectrum size, you may want to analyze and render the sample at a lower-resolution to see if a lower-resolution is adequate. In some cases, spectrum size makes a big difference in the quality of the rendered sound, but in other cases, there is no noticeable difference. It is generally a good idea not to change the spectrum size after performing an analysis, but in some cases the change in sound can be used to good effect.
Interpolation Mode
Interpolation mode determines how the transition is made between an event and the event that precedes it as well as the previous event’s amplitude envelope. The Slow, Medium and Fast interpolation modes crossfade an event’s harmonics with those of the event before . The pitches of close, but not identical, harmonics are also interpolated in these modes – so, there can be glissandi between some event harmonics. The Constant and Attack modes do not blend the harmonics of adjacent events.
Shortcut: Use the ‘+’ key to advance through the interpolation modes.
Slow. Start fading-in an event’s harmonics when about 1/4 of the previous event has played. Interpolate the pitches of close harmonics as the events crossfade.
Medium. Start fading-in an event’s harmonics when about 1/2 of the previous event has played. Interpolate the pitches of close harmonics as the events crossfade.
Fast. Start fading-in an event’s harmonics when about 3/4 of the previous event has played. Interpolate the pitches of close harmonics as the events crossfade.
Constant. Do not crossfade with the preceding event. Maintain constant volume during the event.
Attack S[low]. Do not crossfade with the preceding event. Slowly fade the preceding event out over the last half of its duration.
Attack M[edium]. Do not crossfade with the preceding event. Start fading the preceding event out starting about 1/4 of the through its duration.
Attack F[ast]. Do not crossfade with the preceding event. Start fading out the preceding event shortly after it starts with the fade completing about 3/4 of the way through the event.
Reference Pitch
The base pitch for the sequence, and the pitch used as the reference for the harmonic-sensitive tools and
processes (see the tutorial chapter for a detailed lesson). Click on the tuning fork icon to change the pitch
name. Click on the up/down arrows to change the Reference Pitch octave. Option-click on the arrows to change the pitch by a semitone. Hold down the shift-key to change the Synthesis Pitch as well. Changing the Reference Pitch and Synthesis Pitch together keeps the harmonics playing back at their true pitch (the pitch displayed in Tool Tips when you mouse over a harmonic). When the Reference Pitch and Synthesis Pitch are different, the resulting sound is transposed by the difference between the two.
Tip! Change the Reference Pitch when you want to change the harmonics acted on by the harmonically-sensitive tools. Lower reference pitches yield harmonics that are more closely spaced than higher pitches.
Synthesis Pitch
The pitch to use when synthesizing the sequence. If the Synthesis Pitch and Reference Pitch are different, the absolute event harmonics (displayed in Tool Tips when you mouse over them) are transposed by the difference between the Synthesis Pitch and Reference Pitch. For example, if the Reference Pitch is C1 and the Synthesis Pitch is C4, all of the harmonics will be transposed up by three octaves. The Sample Series 6 and Sample Series 3 commands use this technique to render the sequence at different pitches.
Switch Amplitude Color Table (icons to add)
The spectrum synth can use various color schemes to display harmonics : Direct, low Gamma, Spectrum fire and False Colors.
When sounds have a lot of low-level harmonics, they may be difficult to see. By switching to the False Colors or ( low Gamma ), the low-level harmonics become easier to see. Note that Direct mode and Low Gamma will also display panning information with the same convention as the image synth with Red and Green at the extremes and yellow in the middle.
 | The “Spectrum fire” color mode. |
 | The same spectrum sequence as seen with the False colors table. There are many harmonics too faint to be visible with the default color table. |
Left-hand Tools
The upper group of the Left-hand tools determines the drag mode—what happens when clicking and dragging in the content area. When the shift-key is held down (and if there is no selection), the drag action is applied to all events in the sequence for most of these modes (except Offset, Reorder, Select).
Offset
In Offset Mode, dragging an event moves its beginning. If the event’s beginning is moved past its end, it
switches places with the event after it.
Reorder
Reorder Mode lets you drag an event without changing its duration thus allowing events to be re- ordered.
Offset Harmonic
Offset Harmonic mode lets you drag events up or down directly to offset (not transpose) the event harmonics by a constant value. When harmonics are offset, they are shifted by a constant amount (rather than multiplied by a transposition amount) in the sequence without changing the FFT’s actual contents. Transposition, on the other hand, multiplies harmonics by a factor. Offsetting harmonics yields different- sounding results from transposing. Copy an event and offset one copy by an octave and transpose the other by an octave and compare the results. See more at Offset Spectrum Region.
Harmonic Scale Brush
Use this brush to increase the amplitude of harmonics or, when the option-key is held down, reduce the amplitude of harmonics. Use the Brush Size popup to change the size of the brush. Use the shift key to apply the brush to all of the events in the sequence. This brush only acts on harmonics already found in the event; it cannot add new harmonics.
Harmonic Brush
Draw in new harmonics. This brush can only draw harmonics clustered around “ideal harmonics” of the Reference Pitch. Ideal harmonics are whole number multiples (or divisors) of the reference pitch. Clusters of harmonics are drawn if the brush is more than a pixel high.
To draw harmonics that are not a part of the “real” Reference Pitch’s harmonic series, change the Reference Pitch. (Use the shift key to ensure that the Synthesis Pitch changes, if you don’t want to transpose the sequence’s pitch.) Because harmonics are multiples of the Reference Pitch, set the Reference Pitch low if you want to draw closely-spaced harmonics.
Use the shift-key to add harmonics to all events.
Harmonic Erase
Remove the harmonics found under the brush. This tool is sensitive to the Brush Size. Use the shift-key to
remove harmonics from all events.
Select Mode
In Select Mode, dragging selects a region to which the tools are applied. You can invoke Select Mode no matter what mode/tool is active by holding down the command key (or command and shift keys) and dragging. To select all frequencies for a slice/event, click under it in the timeline.
Brush Size popup
Choose the size of the brush used for the eraser and harmonic brushes. This tool only appears in the user interface when the edit mode makes use of the brush size.
Formant Filter popup
See the tutorial chapter for detailed information about formants. Formants filters are frequency-dependent amplitude maps that allow you to apply formants to the selected event(s). The formant filter/envelope imposes the characteristics of a resonant body/system upon events by selectively amplifying or attenuating certain frequencies the way that a guitar’s body emphasizes certain notes/harmonics. Formants are also used in human speech to create vowels.
You can use Formant Filters to impose speech-like characteristics upon an event or a series of events (as demonstrated in the tutorials) or to impose a resonant consistency between events derived from different sources. A formant envelope can be created from any event. We encourage you to create your own formant filter library by analyzing your favorite sounds. Create speech sound filters by recording yourself speaking continuous sounds such as: shh, zzzz, aaa, etc.
Define Formant Envelope
Create and save a Formant Envelope from the selected event. The envelope is based on a single event and preserves the relationship between frequency and amplitude of harmonics. For example, if the event has a very bright harmonic at A440 and a very weak harmonic at A220, applying the formant will emphasize harmonics around 440Hz and de-emphasize harmonics around 220 Hz.
Apply Formant Envelope
When this command is chosen, you are prompted to select a Formant Envelope created with the Define Formant Envelope. The formant envelope is applied as a filter to the harmonics of the sequence’s selected events.
Formants list
MetaSynth’s Application folder contains a folder called Formant Filter that contains the Formant Envelopes that are automatically loaded and listed here. Put your favorite formant envelopes in this folder to make them easily available.
Grid Settings
The Grid Toggle turns the grid on and off, and the Grid Interval popup sets the grid interval which is defined
in ticks where 240 ticks is one beat.
Lower Tools
The shift-key can be used with most of these tools to apply the action to all events.
Scroll View (h)
Click and drag to scroll the view vertically. Events generally have harmonics out of view vertically. Scroll directly by holding down the ‘h’ and dragging the content area up or down.
Reset Spectrum Offset
Reset any spectrum events that have been offset. Offsets are done without changing the events’ internal
FFT. Transpositions, on the other hand, change the internal data and so cannot be reset.
Reverse Time (t)
Reverse the order of the selected events.
Repeat Twice (r)
Repeat the first half of the sequence twice. (Applies to the entire sequence not just the selection).
Quantize (q)
Click on this tool to adjust event beginnings so that they line up with the grid.
Scale Time
Click and drag on this tool to scale event durations proportionally.
 Offset Spectrum Region / Transpose Spectrum / Transpose with Formant
Click and drag vertically to offset or transpose the event harmonics (as determined by the modifier keys). Use the shift key to apply this tool to all events in the sequence. The tool’s behavior is:
Offset Spectrum (no modifier key). Click and drag up and down to offset the harmonics non–destructively by a constant amount . Because the harmonics are shifted by a constant amount rather than multiplied, the results can be very different from transposing because the relative pitch of the event’s harmonics changes. (For example: if you have one harmonic at 220 Hz and one at 440 Hz, they are one octave apart. If you shift both harmonics by 500 Hz, the result is a harmonic at 720Hz and one at 940 Hz which is a difference
of about 4 semitones (rather than the original 12). Offsetting the pitch can create nicely clangorous or dissonant tones.
Offsets (unlike transpositions) are non-destructive and the original pitch can be restored by clicking on the Reset Spectrum Offset. To make an offset permanent, you can choose the Apply Transpose command from the Edit popup menu.
Transpose Spectrum content (option-key). Option—click and drag to transpose an event’s harmonics. Transposing moves all harmonics proportionally, preserving the relative pitch relationships of the harmonics. Transposing changes the actual FFT data; so, clicking Reset Spectrum Offset after transposing has no effect.
Transpose Spectrum Content with Formant Filter (option-control). Transposes the harmonic pitches but preserves the original event’s formants. This is essentially the same as transposing the event and then choosing Apply Formant Envelope to apply a formant envelope derived from the untransposed event.
This compensates for some of the unnaturalness that arises from harmonics without formant sensitivity. See the tutorials for more information about formants. Also, see the Formant Filters Menu documentation for more about formants.
Change Duration
Click and drag right to extend the duration of any selected events. The event lengths are made longer by the amount dragged rather than proportionately as Scale Time does.
 Increase Contrast & Filter Low Amp
Click and drag to increase the contrast between quiet and loud harmonics and to remove low level harmonics. Oftentimes, event FFTs contain many low-level harmonics that contribute noise but not much else, or the amplitudes of the event harmonics are not well differentiated. Applying this tool can clean things up.
Decrease Contrast
Click and drag to decrease the amount of contrast (the volume differences) between an event’s harmonics.
 Attenuate High Freqs / Filter High Freqs (option)
This tool can attenuate or remove unwanted high-frequencies. With no modifier key, click and drag to lower the loudness of high frequency harmonics. With the option-key, this tool filters the high harmonics more severely and can filter them out completely.
 Tune with Reference Pitch Harmonics / Filter & Tune / Filter Out Unrelated
This tool has three different (but related) modes depending on what modifier keys are held down. It is very
useful for tuning noisy events and other tasks. Perform the tutorials for a hands-on lesson on using the three modes of this tool.
Tune with Reference Pitch Harmonics (no modifier key). Fade the event’s harmonics towards the ideal harmonics. When applied in the extreme, all non-ideal harmonics are removed and replaced with the ideal harmonics. The ideal harmonics are those of the Reference Pitch. It is often useful to change the Reference Pitch setting (hold down the shift key to change the Synthesis Pitch as well to avoid transposing pitches). The lower the Reference Pitch, the closer together the harmonics are.
Filter and Tune with Reference Pitch Harmonics (option-key). This version of the tool progressively retunes non-ideal harmonics rather than simply filtering them out thus preserving the original sound’s richness. Harmonics that are far from the ideal harmonics are faded out. Use this when you want to tune a sound but want to retain the original’s richness.
Filter out unrelated harmonics (option-control). This version of the tool fades out harmonics that are slightly away from the ideal (without retuning them) and completely removes harmonics that are far away from the ideal. You can remove the notes of a chord by setting the reference pitch to the pitch that you want to keep. Remove the odd harmonics by setting the reference pitch one octave higher than the true pitch.
 Vibrato Amount / Vibrato Rate (option) / Vibrato Delay (control)
The Spectrum Synth can add vibrato when synthesizing the sequence. Click and drag to set the vibrato amount. Hold down the option-key, click and drag to change the vibrato speed. Hold down the control- key, click and drag to change the delay between the event start and when the vibrato reaches its maximum strength. When synthesizing samples for a MultiSampler instrument, realism can be added by judicious use of vibrato. See the Cello Vibrato spectrum sequence for an example use of vibrato.
Sometimes when performing spectrum analysis, natural vibrato needs to be removed as it can make events noisy. This is done using the Filter Harmonics tools discussed in the previous section. When this is necessary, using the Vibrato tools makes it possible to re-introduce the removed vibrato.
Nudge/Offset Spectrum Tools
Octave Up / Down
Offset the harmonics up by the Reference Pitch frequency. This offsets all harmonics by the same frequency offset (as when using the Offset Spectrum Region tool) and does not change the internal FFT data. (Use Apply Transpose in the Edit popup to make the offset permanent). See Offset Spectrum Region for more information about offsets and transposition.
Shortcut: page up/down
 Nudge Left / Right / Up / Down
Nudge the events.
Nudge Up/Down offsets the harmonics up/down by about 10 Hz. See Offset Spectrum Region for more
information about offsets and transposition.
Shortcut: up/down/left/right arrow
Velocity (Volume) Ramp Up
Create a volume increase of all harmonics from event to event in the selection.
Change Velocities (Volume)
Increase the volume of the event harmonics by clicking and dragging left or right.
 Velocities (Volume) Ramp Down
Create a volume decrease of all harmonics from event to event in the selection.
 Loop Options (Loop Sequence) Popup
The number of iterations (repeats) rendered to the Sample Editor. If the sequence is looped and the last event extends all the way to the sequence end, the last event will be interpolated with the first event of the next loop as determined by the event’s Interpolation Mode.
Render Sequence /Render to Memory (missing icon)
Render the sequence in memory at full resolution. The samples will be visible in Sample Editor. The entire spectrum sequence – including any silence at the end – is rendered. If the sequence is looped and the last event extends all the way to the sequence end, the last event will be interpolated with the first event of the next loop as determined by the event’s Interpolation Mode. Render to memory is useful when further processes are needed or to foolproof your sequence settings. When done use the $ key.
Shortcuts: Type the escape key to abort rendering. Hold down the control key when rendering to render only the selected event.
Option-click the render icon to pop up the render options pop up. Its commands are: Render to Memory, Render to Disk, Render to Disk As
Render to Disk as (^)
Render the spectrum sequence to disk in a asked location. Usually used to export a sound for use in other softwares..
Render to Disk and Save ($)
Saves the current spectrum sequence and renders it to disk within the Spectrum folder of the current project. The sequence is then immediately available in the montage room.
Note : use that command when the spectrum seq already exists on file and has a distinct name as it will overwrite without warning both the sound and the sequence.
Render list by 3…
Synthesize a series of audio files at different pitches from the current sequence. The pitches are spaced by three semitones. A folder needs to be selected to place the samples. Three files below the synthesis pitch are rendered, a file at the synthesis pitch, and three files above the synthesis pitch. The range of notes rendered covers a seventh
below the synthesis pitch to a sixth above it,
To render additional octaves, set the synthesis pitch as needed and choose the command again.
Render list by 6…
Synthesize a series of audio files at different pitches from the current sequence. The pitches are spaced by six semitones (two samples by octaves). Sample files are named with a convention that allows MultiSampler instruments to be built from them. The name is <sequence name><pitch><pitch octave> as in “my_series F0”. The range of pitches synthesized will be from about 2-1/2 octaves below the synthesis pitch (not the reference pitch) to two octaves above the synthesis pitch.
This command is generally used to build sample files for either MetaSynth’s MultiSampler or external samplers. If additional octaves are required, set the synthesis pitch as needed to continue the series. This command is essentially a time-saving macro for setting the synthesis pitch (not the reference pitch), rendering the sequence, and saving the rendered sound file with an appropriate note/pitch suffix.
Render list by octaves
Synthesize a series of audio files at different pitches from the current sequence. The pitches are spaced by 12 semitones (one sample by octaves).
Create MultiSampler
Synthesize a series of audio files at different pitches from the current sequence in order to create a MultiSampler Instrument. The pitches are spaced by two samples by octave and goes until C7 is reached.. The instrument is added in Instrument CTX/MultiSamplers/Spectrum Synths/ folder and is added to the list of current instruments (visible in IS or Sequencer)
Play Preview (space bar)
Preview the sequence. If previews tend to stutter, reduce the sample rate and quit other programs. Spectrum Synthesis is computationally very intensive and even a program as innocuous as a web browser can steal precious cycles needed to preview complex harmonics. Control-click an event to preview only the selected event.
Sequencer Room
About This Chapter
This chapter describes the user interface of the Sequencer Room.
About the Sequencer Room
The Sequencer Room is a single-track, non-MIDI piano-roll style sequencer where you can quickly compose motifs and phrases. It is not intended as a full-fledged sequencer but as a place to put quickly create melodies, motifs, or drum and bass parts with point-and-click techniques which can be imported into the Image Synth or used in a montage or rendered and exported as audio files.
If you find the Image Synth’s paint-like approach to composition cumbersome, you can compose your music in the Sequencer Room and import it into the Image Synth for further processing. The Image Synth’s envelope-shaping capabilities make it possible to add life and realism (or surrealism) to phrases created in the Sequencer Room.
The Sequencer Room’s set-up is simple. The content-area is a piano-roll style display of the sequence. Like the Spectrum Synth Room, the Sequencer Room creates sequences only one windowful wide, but the vertical range of the sequence may not be entirely visible without scrolling. Sequences can have any number of measures above and equal 2.
Notes outside the measures number field won’t be played nor rendered. The number of measure may growth automatically when editing but at times you may need to set it manually.
When adding notes to the sequence, they are confined to the selected key and scale. A broad-range of scales are built-in and you can create your own. All notes in the sequence are confined to the scale; as a result, changing scales will shift note pitches as required to accommodate the key and scale.
The Sequencer Room shares the Image Synth’s Instrument architecture. The Sequencer Room’s simplicity makes
it the ideal room for fine-tuning instruments.
User Interface
Content Area
The content area displays the notes of the sequence. Sequences play from left to right. The vertical axis determines pitch. When the cursor is in the canvas area, the Tool Tips area displays the associated pitch. Notes can be selected by either using the Selection Tool/Brush or by command-dragging (which invokes the Selection Tool in all of MetaSynth’s rooms). To de-select a note command-shift drag or, if the Selection Tool is active, shift-drag over the note(s) that you want to de-select.

At the left side of the content area is a keyboard display that makes the pitch easy to see. You can sound any pitch by clicking on the keyboard, or by control-clicking in the content area. Control-clicking also highlights the associated note on the keyboard. (Note: during playback this does not work). During preview, it is possible to paint or delete notes. If a MultiSampler instrument is in use, blue dots appear on the keyboard to indicate the samples that make up the MultiSampler.
Notes are displayed in orange and are normally displayed without velocity (volume) indicated. Even though it is not displayed, each note does have an associated velocity (volume). Press the Change Velocity (Volume) tool in the Lower Tools to see note volumes displayed. While the mouse button is held down, the display is changed so that note brightness indicates note volume.
Upper Tools
File popup menu
new empty sequence
Open Sequence (o) Open a sequence file. Save Sequence As (s)
Save the current sequence to its own file.
Render to Disk and Save ($)
Echoes the render pop up menu command.
Export Sequence in Image Synth
Adds a new preset in image synth derived from the current sequence.
Preset Basic pulse
Preset Basic 4:4
Preset Basic 6:4
A couple of default very simple presets to start with
[ sequences list]
At the end of the File popup is a list of the sequences found in the current Project’s Sequences folder. This list is dynamically built and allows fast reopening.
Edit popup menu
Undo (z)
Undo or redo last operation.
Cut (x)
Copy and delete selected notes.
Copy (c)
Copy selected notes.
Paste (v)
Paste previously copied notes to the sequence. Paste always adds the notes to the sequence without moving existing ones and will start at the insertion line. To insert a measure for example you would use shift nudge right to make room for the insertion by moving notes a measure at a time.
Clear (backspace)
Delete selected notes.
Select All (a)
Selects all notes.
Deselect All(d)
Deselects all selected notes. In general to be avoided when loop playing selection.
Invert (i)
Invert the pitches by flipping the content area vertically. The pivot point is usually the middle so you may need to transpose after this.
Reverse (t)
Reverse the selection in time.
Repeat Twice (r)
Copy the first half of the sequence into the second half. Applies to the entire sequence not the selection.
Twice Faster (<)
Scale the duration and time by 50% and repeat the phrase. This essentially doubles the tempo and
repeats the selection (or sequence).
Twice Slower (>)
Double the note durations and scale the time proportionately, making the first half of the selection (or sequence) fill the time twice as slow as originally.
Mode (Key and Scale)
The key and scale define the allowed notes. Choose Dodecaphonic (12 tone) if you want note placements to be unrestricted. The Sequencer confines all notes to the chosen key and scale. Choose a scale from the Scale popup menu or choose Custom Scale to create your own 4 to 12 note scale. The Sequencer Room can share custom scales (not custom tuning spaces) with the Image Synth.
It is recommended that a custom scale’s notes be entered in ascending order to avoid anomalies when transposing.
Measures and Beats
The number of measure in the sequence, and the number of beats per measure.
Choose Instrument Popup & Edit Instrument Button
This popup menu provides commands for choosing or creating the instrument (synthesizer) to be used when synthesizing the sequence. Choose an empty slot to load an instrument from disk. More conveniently use the Browse Synth or Browse Samplers item to browse the entire instrument library.
Any instruments you open will appear in the popup during your session. When a preset is selected, the name of the instrument used by the preset is displayed in the menu. The Choose Instrument popup’s icon indicates the type of instrument currently in use and, thus, changes when the instrument changes.
Note : Instrument variations are saved with the sequence, so you can freely adjust release, modulation or many other instrument parameters for each sequence.
Click on the Edit Instrument icon to open the instrument editing window. See the Instruments tutorial and reference manual chapter for more information about instruments and instrument editing.
Click on this icon to pop-up the instrument editing window. See the Instruments tutorial, the Image Synth
reference and the Instruments chapter of this menu for more information about instruments. Show Octaves On/Off
Toggle note octave display. When the option is on, all octaves of the sequence’s notes are displayed in
blue.
Left-Side Tools
The upper tools select the editing mode/tool used in the content area.
Selection Tool
Click on this icon to make the Selection Tool the active tool in the content area. No matter what tool is in use, you can always invoke the selection mode by command-dragging in the content area. To de-select a note or notes, shift-drag around the note (not just shift click the note) to toggle its selection. When another tool is active, you can command-shift-drag around a note to de-select it.
Eraser
Click on this icon to activate the Eraser brush.
Pencil
When the Pencil Tool is active, clicking places a note. When the grid is on, the note’s duration is the grid interval. Click and drag when entering notes to customize the duration.
Triad
When the Triad Tool is active, clicking places a triad in the current scale.
Pulse/Rhythm Tool
The pulse tool is used to create a steady rhythmic pulse with some dynamic variation that keeps it from sounding robotic. When this tool is active, clicking (without the grid) draws a note 30 ticks long every sixteenth-note (every 60 ticks). When the grid is on, notes are placed at twice the grid interval with the same duration as the grid interval. For example, when the grid is set to 240 ticks (quarter notes), quarter notes are placed every other beat.
Grid Toggle and Interval Popup
Use the icon to turn the grid on and off. Use the Grid Interval popup to set the grid interval in ticks. 240 ticks is one beat.
Lower Tools
Scroll View (h)
Click and drag up or down to scroll the content area up or down. Hold down the h key
Reverse Time (t)
Reverse the sequence.
Invert Pitch (i)
Invert the pitches by flip the content area vertically.
Repeat Twice (r)
Copy the first half of the sequence into the second half. Applies to the entire sequence not the selection.
Quantize (q)
Adjust events to start on grid locations.
Scale Time
Click and drag left or right to scale the time and duration of all selected notes.
Scale Pitch
Click and drag up or down to scale the distance pitch relationships of the selected notes.
Make chord
Add notes to form a triad with the selected note as the root.
Change Duration
Add to the duration of all the selected notes without moving the start positions.
Octave Transpose Tools
Transpose the notes up or down. Shortcut: Page Up/Page Down
Nudge Left / Right
Nudge notes left or right. When the grid is on, nudging moves by the grid interval. When the grid is off, shift-nudging will move by the grid interval. Shortcut: left/right arrow
Nudge Up / Down
Nudge notes up or down one step in the current scale. Shortcuts: use the shift key to move by octave, shift-page up/down to move up/down by fifths (within the context of the current scale).
Velocity Ramp Up
Click and drag to create a velocity (volume) ramp for the selected notes. While the mouse is held down,
note volume is indicated by colors ranging from blue to red for quietest through loudest.
Change Velocity
Click and drag left/right to change the volume of the selected notes. While the mouse is held down, note
volume is indicated by colors ranging from blue to red for quietest through loudest.
Velocity Ramp Down
Click and drag to create a downward volume ramp. While the mouse is held down, note volume is indicated
by colors ranging from blue to red for quietest through loudest.
Tempo
The sequence tempo in beats-per-minutes.
Loop Options
Select a number of iterations of the sequence to render when rendering the sequence. When playing back with looping the looping is infinite. This setting changes the number of iterated loops in rendering only.
Render /Render to Memory
Render button is a shortcut to Render to Memory (@), see below
Render popup. (icon missing)
Render to Memory (@) Render the sequence to the Sample Editor. The sound is rendered to memory and loaded in the Sample Editor for further processing or verifications.
Render to Disk
Render the sequence to disk within the Sequences folder.
Render to Disk as (^)
Render the sequence to disk in a asked location. Usually used to export a sound for use in other softwares..
Render to Disk and Save ($)
Saves the current sequence and renders it to disk within the Sequences folder of the current project. The sequence is then immediately available for use in the montage room.
Note : use that command when the sequence already exists on file and has a distinct name as it will overwrite without warning both the sound and the sequence.
Play
Play the entire sequence including the extra measure.
 Play Selection (option spacebar)
Play and loop the selected notes. The selection can be changed while playing by all methods, including bar selection. Loop points will be adjusted dynamically and quantised to a 240 tick grid
Loop Play (spacebar)
Loop playback of the sequence. Only the “official” measures are looped. The extra measure is not
played. Loop playback happens independently of selected notes.
Instruments
About This Chapter
This chapter provides basic information about MetaSynth Instruments and the Instruments Editor. See the Instruments tutorial chapter for information about using and creating instruments.
EW: I’m in favor of removing all references to tutorials, I would suppress this section
Instruments CTX Folder
MetaSynth uses a special folder for favorite synth settings and for the samples used by Sampler and MultiSampler instruments. The folder is called Instruments CTX and should be kept in the same folder as MetaSynth Application. It is recommended that you store all your MetaSynth instruments and the files they require in this folder.
Browse Synths Popup
The Browse Synths popup available from the Choose Instrument popup in the Image Synth and Sequencer rooms gives quick access to your MetaSynth instrument library. For instruments to be available from the Browse Instruments popup, they must be stored in the correct folder within the Instruments CTX folder. For speed, the Browse popup only lists instruments actually found in the Instruments CTX folder or one of its subfolders. If the instruments folder contains aliases to instruments or instrument folders, their instruments will not be listed in the browse popup.
Here are some tips for keeping your Instruments CTX folder organized so that the Browse Synths popup will be able to access your instruments:
- Synths (MultiWave and WaveTable synths) Save MultiWave and WaveTable synth instruments into a category folder in the Synths folder. You can add your own category folder at the top level of the Synths folder. The Browse Instruments popup will display the categories at the top-level of the browse popup
- Category Folders The top level of both the Synths and MultiSamplers folders are treated as category folders which are represented in the popup. All instruments inside the category folders (or subfolders thereof) are displayed as part of the category. Instruments found in subfolders of the category folders are displayed but the subfolder hierarchy is not represented.
Browse Samplers Popup
- Samplers Save Sampler instruments into the Instruments CTX > Samplers folder. You can create folders inside of the Samplers folder and the sampler instruments will appear in the popup. The folder is searched a few levels deep, but all found instruments are presented at the same level in the Browse Synths popup.
New Multisampler
New Multisampler is rarely needed as build multisampler will do all work automatically and is much easier.
“New Multisampler” is practical when you want to gather samples from various folders or disks. Samples will be copied automatically into the new multisampler folder automatically created in the location chosen by the invoked dialog which default to Instruments CTX/MultiSamplers/ directory.
Build Multisampler
The instrument is created in the folder where the list of samples is located. So if you want to create a multisampler the simplest is to gather all sounds you want for it in a folder (in project or Instrument) and use build multisampler.
build multisampler will assign key for each sample automatically :
-using the note/key name if present and all files have the same name. Valid key names are Cn to Bn and C#n, D#n, F#n etc.
-using the note index if present and all files have the same name
-by file order using a division of 7 octaves by the files number if none of the above.
Note that both New MultiSampler and Build MultiSampler don’t make it the current instrument (hence its not changing current IS of Sequence instrument). They just add the new one to the list of active instruments. It is thus possible to create a bunch of MultiSamplers before actually using them.
Instruments Editor
The Instrument Editor is a floating window (and not a dialog box) that is opened when the Edit Instrument icon is clicked in either the Image Synth or the Sequencer Room. The appearance and available options varies with the instrument being edited.
All MetaSynth instruments have global settings for overall volume, attack time, release time, and output effect.
Output Effect. The output effect is an effect applied at the synth’s output stage — it is applied globally to the output rather than to each note individually. The available effects include: stereo echo, reverb, distortion, chorus, filter sweeps, and more. See the Effects (Montage and Instruments) chapter for more information about the individual effects.
Attack Mode filter. Most MetaSynth instruments have an attack mode filter option. The attack mode filter provides a filter envelope that can be used to shape sounds. The filter is applied independently to each note. The pictures provide a visualization of the filter contours. They are spectrographic analyses (performed in the Filter Room) of the attack mode filters applied to white noise. A filter time slider appears for all but the “constant” attack modes to provide control for the filter onset time.
| Constant (no filter) | |||
| Sharper Attacks. Emphasize note attacks by lowering the volume after the attack time | Exp decay. Gradually roll off the highs and then fade out all frequencies | ||
| HF filter hard. Quickly roll off the high frequencies | Gated hard. Similar to cubic hard with slightly different envelope. | ||
| HF Filter soft. Roll of the highs less abruptly than HF Filter hard. | Sine filter hard. Use a sine wave to roll in and out the highs. | ||
| Slanted Bell. Roll in then roll out the highs using a slanted bell envelope | Sine filter soft. Like sine filter hard but allowing more of the highs to pass through | ||
| Bell curve. Roll in then roll out the highs using a bell- curve envelope | Constant hard. Narrowbandpass filter | ||
| Soft Saw. Roll in and the highs with a saw wave envelope. | Constant soft. Bandpass filter that is less narrow than constant hard. | ||
| Cubic Hard. Quickly rollout the highs and mids. | Cubic Soft. Like cubic hard but allows more highs and mids to pass through. |
Wavetable editor. MetaSynth instruments fall into two basic categories: sample-based synths and wavetable- based synths. At the heart of the wavetable-based synths is one or more wavetables that define the waveforms used by the synth. You can draw your own wavetables or import them.
Move the mouse over any tool in the editor and you will see a tool tip at the bottom of the editor window. Click and drag in the waveform to manipulate the shape directly, or click on drag on any of the waveshapes to morph the waveform towards the displayed curve.
Special clicks:
- Control-click and drag to modulate the displayed waveform.
- Option-click and drag to multiply against the displayed waveform.
- Option-click and drag on the scale frequencies tool to squeeze the waveform — which shifts harmonics higher.
- Edit popup menu:
- Copy. Shortcut: c. Copy wavetable to clipboard
- Paste. Shortcut: v. Paste clipboard. Only applies if a wavetable has been copied.
- Balance. Adjust the waveform so that it is vertically well-balanced with respect to 0. (Wavetable values range
of -1 to +1).
- Reverse. Flip the waveform horizontally.
- Ramp. Shortcut: r. Create a ramp from -1 to +1. This is especially useful for the WaveShaper instruments.
- Low Pass. Shortcut: l. Filter out high frequencies
- High Pass. Filter out low frequencies
- Normalize. Shortcut: n. Re-scale all values to fill the range from -1 to 1.
Blend with Clipboard. To use this tool, copy a wavetable to the clipboard then click and drag on the tool while working with another waveform. Hold down the control key and drag to modulate the waveform with the clipboard waveform. Hold down the option key and drag to multiply the clipboard waveform against the waveform.
Instrument Descriptions
WaveSynth
This is a single oscillator wavetable synth.
Granular Synth (GrainSynth)
The GrainSynth is complicated to explain but easy to use and capable of creating a great variety of sounds. The GrainSynth architecture is especially great for creating sounds with intriguing sounds reminiscent of filter sweeps.
The Granular Synth generates waveforms by multiplying a grain (a small pre-defined waveshape) against the wavetable visible in the editor. In a way, this synth convolves the waveshape with the selected grain shape. The Mode popup gives you a choice of grain shape. Different grain shapes result in different harmonics. The interaction of the parameters, grain shape and the wavetable can be unpredictable. We recommend trying different modes with the same settings to get a sense of the difference between the different modes. The grain bandwidth determines the size of the grain. In Hanning, Sine and Cubic modes, high frequencies are brought out when the attack time is set low. When the value is 15, the grain is symmetrical.
Grainsynth Modes
| Balanced/Unbalanced – Formerly, Balanced was the only mode used by the Grain Synth. In the Balanced mode, every other grain is inverted to avoid DC offset. Unbalanced repeats the grains without inversion. The result with a well-balanced waveform is often preferable to the balanced grain but care must be taken to avoid DC offset by using a well-balanced waveform. | |
| Hanning Balanced/Unbalanced | |
| Sine Balanced/Unbalanced | |
| Cubic – There is only one form of this mode which is balanced. |
The unbalanced modes are often more pleasing to the ear than the balanced modes but there is the risk of DC Offset. When using an Unbalanced mode, it is advisable to use a well-balanced waveform (one that has as much energy above the 0 line as below it) since DC offset can cause problems when mixing or applying Effects even if the raw sound does not have any obvious artifacts. The new Balance command in the Wave Table popup (also new) can be used to ensure that the waveform is balanced.
 | You can see the grain shape by rendering a sound where the wavetable is a constant 1 (the maximum value) and the bandwidth set to a low value. |
 | The grain shape is revealed in the rendered sound (in the Sample Editor). Note the severe DC Offset since we are using an unbalanced waveform and an unbalanced synth mode. |
Grain Synth Controls
Due to the unusual nature of this synth, the meaning of the controls is best understood by experimenting with them. See the Instruments chapter of the Tutorials document for some helpful experiments. One simple experiment is to set the waveform to something simple, like a square wave and explore one control at a time to hear how it influences the sound.
Formant Position. This sets the frequency of the grain in relation to the wavetable. Setting it to a high frequency
tends to emphasize high harmonics.
Static<->Follow Pitch. This determines whether the grain frequency changes with the note being played or is kept constant regardless of the note frequency.
Grain Attack Time. The time that it takes the grain to have its full influence. The influence of this parameter depends a lot on the other settings. Try setting Formant Position and Statis<->Follow Pitch to their maximum settings. Then, set the Grain Attack Time to the minimum. Then, try it at the maximum.
Grain Bandwidth. This influences the richness of the sound.
Note Sweep (ms). When Sweep Amount is greater than 0, this is the time that it takes to complete the note
sweep.
Sweep Amount. Set this to a value greater than 0 to sweep the grain frequency. This is great for creating filter
sweep effects.
MultiWaveSynth
 | The MultiWaves synth is the most versatile of the built-in synthesizers. MultiWaves synths have three oscillators, but there are several different modes. The Mode determines whether this synth behaves like a subtractive wavetable synth or an FM Synth.The three oscillators can be crossfaded to create complex timbres that change over time. MultiWaves uses oscillator-crossfading rather than complex filter envelopes to create rich tones. This architecture provides a balance of rich tones with low CPU- overhead which is necessary to accommodate the hundreds of voices sometimes required in the Image Synth. |
The MultiWaves instrument is a collection of three-oscillator synthesizers that includes subtractive wavetable synths, FM synths, Pulse Width Modulation-based synths and more. Because Image Synth sound pictures can have hundreds of simultaneous voices, the MWS (MultiSaveSynth) has been optimized to provided a wide variety of timbres without overtaxing the computer. In many of the MWS synths, two of the oscillators can be crossfaded across the attack and release portions of a note to create complex evolving timbres. Some MWS synths also allow modulators (such as an LFO or ramp wave) to control synth parameters. The mode popup menu is used to select a
particular MWS synth type. The “A”, “B”, and “C” used in some of the mode names refer to the first, second and third oscillators (wavetables) and indicate what portion of the timbre the oscillators provide. For example AB Attack C Sustain means that oscillators A and B provide the attack timbre and that oscillator C provides the sustain/ release timbre.
Modulation Options. Some MWS modes provide modulation options that allow one or more parameters to be controlled by either a simple envelope or an LFO (low frequency oscillator). The modulation options are available from a popup menu that appears next to the parameter to which they apply.
The modulation options are:
- Constant. The parameter value is constant.
- Decrease by Attack. The parameter’s value decreases as the attack increases. When this option is selected an
Attack to sustain time slider will appear that defines the duration of the Decrease By Attack ramp.
- Increase by Attack. The parameter’s value increases as the attack increases. When this option is selected an
Attack to sustain time slider will appear that defines the duration of the Increase By Attack ramp.
- Sweep by LFO. Use an LFO (low frequency oscillator to modulate the parameter. When this option is selected, an LFO Period slider appears to determine the rate at which the LFO cycles. The slider’s value is the LFO’s period (the time it takes to play one cycle) in milliseconds.
- Sweep by inverse LFO. This option is similar to Sweep by LFO but uses the inverse of the LFO. (For example,
when the LFO is at 1, the inverse is -1). Use the LFO for one parameter and the inverse for another parameter
for dramatic effects.
- Half-sweep by lfo. This is like a sine sweep at half amplitude (range 0.5 to 1 rather than 0 to 1).
- Slanted Bell. A bell curve where the down slope is 10 times slower than the up slope.
- Bell. A symmetrical bell curve.
- Decrease to half. Like decrease but stops at 0.5.
Velocity mapping. A new popup menu is available above the Attack Mode filter popup. It allows you to map velocity (which is normally mapped to volume) to another synth parameter such as Modulation amount. The available options are: Modulation Amount *, Modulation Frequency *, FM Feedback *, Mod Attack +, Mod Attack
-, Randomize Modulation Amount & FM Feedback. *, + and – indicate the operation used to modify the existing parameter (multiply, add to or subtract from).
MultiWaveSynth Modes: Basic 3-oscillator Synths AB Attack C sustain
AB Attack C constant C Attack AB sustain C Attack AB constant Parallel
Fuzzy
- FM Synths
FM C
FM C lfo FM AB
FM AB lfo FM Sweep FM Cascade
- WaveShaper Synths
WaveShaper
WaveShaper LFO DualWaveShaper Sweep WaveShaper FM
Other Synths Parallel Sweep Phase Distorted PW Modulated PW Mix
Basic 3-oscillator Wavetable Synths
These are basic wavetable synths. “A”, “B” and “C” in the synth name describe the roll of the three oscillators. For example, AB Attack C Sustain indicates that oscillators A and B are used together during a note’s attack phase and that oscillator C provides the timbre during the note’s sustain portion. Parallel and Fuzzy use all three oscillators together in parallel and allow detuning of the oscillators to create rich sounds.
Fuzzy differs from Parallel in that it allows more control of the detuning and allows some of its parameters to be controlled by envelopes. Fuzzy’s parameters: Detuning %, Randomize%. Detuning and Randomize can be controlled by envelopes. Use small values of Detuning and Randomize to create rich sounds.
FM synths
These are FM (Frequency Modulation) synths. FM synthesis uses one or more oscillators as modulators that act on the carrier waveform. FM Synthesis is capable of creating rich overtones from the sonorous to the clangorous. The FM synths have a few standard parameters: Attack to Sustain time determines the duration from the attack to the sustain phase and is used to crossfade the attack wavetables with the release wavetables. Modulation Frequency parameter defines the frequency relationship between the modulator and the carrier. The setting is the ratio (expressed as a percentage) of the carrier pitch to the modulator pitch. 50% sets the modulator one octave lower than the carrier. 100% sets the carrier and modulator to the same pitch. 200% sets the modulator one octave higher than the carrier (doubling a frequency makes it one octave higher). Different ratios result in different timbres. Even multiples (100, 200, 400) and odd multiples (300, 500) have distinctly different characteristics. Values that are not simple multiples (or divisions) tend to create noisy and/or clangorous tones with lots of sidebands.
Below is a summary of the FM synths:
- FM C. Oscillators A and B are the carriers for the attack and sustain portion of the wave respectively. Oscillator C is the modulator. Attack to Sustain time is the time to crossfade from oscillator A to B.
- FM C lfo. Waves A and B are carriers and C is the modulator. Waves and B are crossfaded with an lfo that cycles freely (i.e. the LFO is not re-triggered with each note attack).
- FM AB. Wave A is the modulator during the attack portion of a note, wave B is the modulator during the sustain portion, and wave C is carrier waveform.
- FM AB lfo. Wave A and wave B are modulators crossfaded using an LFO, and wave C is the carrier waveform.
- FM Sweep. Wave A is the modulator. Waves B and C are carriers crossfaded using an LFO. Wave A is
“squeezed” (using the technique described in the section on the Pulse Width Modulated Synths) using the Modulation frequency control. At 200%, the wave is squeezed so that it is half the normal width which essentially raises the harmonics by one octave without changing the base frequency.
- FM Cascade. Wavetable A modulates Wavetable B and the result modulates the carrier (wavetable C).
Waveshaper synths
These synths use wavetable C (and in some cases an additional wavetable) to remap the waveform defined in the other wavetables. Waveshaping can create rich warm waveforms and nicely distorted sounds. Waveshaping tends to create high harmonics. The remapping is done the same way as in the Effects Room’s WaveShaper Effect. The waveshaper wavetable’s x-axis represents the original wavetable’s amplitude value (the height) and the y-axis represents the value to which it will be mapped. A ramp wave has no effect since the x and y values are the same. A straight line with a gentle slope reduces the amplitude of the reshaped waveform. Waveshaping curves with steep slopes introduce clipping and distortion. Other waveshapes can have very interesting effects that depend on the wavetables being remapped. The best way to become familiar with this new synthesis mode is to experiment.
- Waveshaper
This synth crossfades between Wave A and Wave B and uses Wave C to remap (waveshape) the result. Attack to Sustain Time determines the time taken to fade from Wave A to Wave B
- Wavetables. A – attack waveform; B – sustain waveform; C – waveshaper
- Parameters.
Shaping Amount, Modulation Frequency. The modulation options are available for both parameters.
Shaping Amount determines the mix of waveshaped and unwaveshaped signal. When the Shaping amount is 100, only the waveshaped signal is heard. Modulation Frequency determines the frequency of the waveshaping wavetable relative to the Waves being reshaped. When the Modulation Frequency is 100%, one cycle of the waveshaper is the same duration as one cycle of waves A and B. When the Modulation Frequency is 200%. One cycle of waves A and B are mapped against 2 cycles of the waveshaping wavetable. When the frequency is greater than 100%, even a ramp wave (which has no effect when the frequency is 100%) will introduce high-order harmonics.
- Waveshaper LFO
This mode is essentially the same as Waveshaper but with an LFO controlling the crossfade from wave A to wave B.
- Dual WaveShaper Sweep
This synth uses one carrier wavetable (A) and crossfades between two different waveshaping curves. Wave B performs waveshaping during the attack phase and Wave C performs waveshaping during the sustain phase. Attack to Sustain Time determines the time taken to fade from Wave A to Wave B
- Wavetables. A – carrier waveform; B – attack phase waveshaper; C – sustain phase waveshaper.
- Parameters. Shaping Amount, Modulation Frequency. See the Waveshaper description above for a description of the parameters.
- WaveShaper FM
This is a Waveshaper synth with wave B acting as an LFO to modulate the pitch of wave A. Wave C performs waveshaping on the resulting waveform.
- Wavetables. A – carrier; B – pitch modulation LFO; C – waveshaper. Wavetable B’s influence is +/- 1 octave. The time that it takes to play wave B is determined by both the PitchModTime setting and the Modulation Frequency #.
- Parameters. Shaping Amount, Modulation Frequency. See the Waveshaper description above for a description of the parameters. The Attack to Sustain time controls how long it takes for the pitch modulation to be faded out which allows you to have pitch modulation during the attack only.
Other Multiwavesynth Modes
Parallel sweep. The three oscillators play in parallel and are modulated. The input frequency is scaled by the
modulation frequency before the wave table loop and allows for improved control of the final timbre.
Phase Distorted
Phase distortion synthesis, like FM synthesis, uses one modulator waveform to transform the carrier waveform. The modulator is used to shift the phase of the carrier wave. PD synthesis allows the creation of fat sounds that have filter sweep-like effects with only a couple of oscillators. The modulation signal is composed of waves A and B blended using the LFO. Waveform C is the carrier wave. PD synthesis was used in early Casio synthesizers and is capable of some very surprising sounds. For more information on PD synthesis, do a Google search. The page http://www.analoguesque.com/modsynthesis.htm has some excellent information about PD synthesis.
| About The Pulse Width Modulated Synths | |
| The pulse width modulated synths “squeeze” the width of one or more of the wavetables. This squeezing shifts the harmonics up in pitch while leaving the fundamental unchanged. You can explore the results of squeezing waveforms by using a simple waveform in a wavetable and option-click dragging on the scale frequencies icon | |
 |  |
| SIne wave | Sine wave squeezed |
Pulse Width Modulated (PW Modulated)
Wave A is the Attack wavetable and Wave B is the Sustain wavetable. The amount of pulse width modulation (squeezing) is set by the PW Modulation Amount slider. Wavetable C is squeezed using the modulation frequency slider and is used to modulate waves A and B — to create a hybrid pulse width/fm synth.
Pulse Width Mix (Pw Mix)
Waves A and B are pulse width modulated (squeezed) independently and crossfaded with the LFO and have
independent pulse width modulation amounts. Wave C performs low frequency pitch modulation.
Sampler
 | Sampler is a single sample, sample- based synth. It can be useful both for music and for sound-processing/ mangling. During playback, the samples are pitch-shifted according to the note being played. |
Sampler features:
- Mode (loop) Options. The loop options are: Normal (no loop), Crossfaded Loop, Natural Loop. When Crossfaded Loop is chosen, MetaSynth crossfades the beginning and end of the sound so that it will loop smoothly. This is best for sounds such as pads that don’t have a distinct attack (since the attack is lost as part of the crossfading process). Natural Loop’s behavior depends on the sample file. If the sound file has embedded loop points, these loop points are used for looping. If the sound file does not have embedded loop points, the sound plays from the beginning and loops when it gets to the end. Note that if the sound does not start and end at a zero-crossing, a click may occur when the sound is looped. Note that as of OS X.5, loop points are not supported for .wav files due to limitations of CoreAudio. IMPORTANT NOTE: If you have loaded a sound that has internal loop points and change the mode to Crossfaded Loop, the old embedded loop points will not be exported if you choose Save Instrument and Sample.
- Base Pitch. Set the base pitch to the pitch of the sample. Pitch-shifting of the sample is relative to the base-
pitch. When MetaSynth plays the Sampler at the base-pitch, it is played with no pitch-shifting. If the sound file’s name ends with a note name (which must be capitalize), the sound will automatically be assigned the appropriate base pitch. The automatic assignment can be manually over-ridden
- Sample Start Options. These options let you playback the sample from a point other than the sample file’s start. These options are very powerful and should be explored. See the Instruments tutorial chapter for guided
experimentation.
- Fixed offset. The sample start time is offset by a fixed amount.
- Cycle. The start point is cycled evenly until the offset specified by Offset Amplitude is reached. The first time the instrument is triggered it will start at the beginning and will cycle to later and later offsets up until the value set with the offset amplitude parameter.
- Randomized. The start point is chosen at random each time the sampler is triggered. Offset amplitude (which is a percentage of the duration) determines the randomization range. The left and right channels are randomized independently.
- Random Cycle 8 / 16. Random Cycle 8 and Random Cycle 16 cycle through a table of random offsets when notes are triggered. When these options are selected, the random table is displayed and a button labeled New Random Table appears. Click on the button to generate a new set of randomized offsets. These are great for creating rhythmic effects.
- Randomized Offset. This option modulates the sample start time by a constant offset (the offset amplitude) + a random value ranging from +-1/8 the sample length). EX 50.presets 66 to 68 demonstrate this option. The left and right channels are randomized independently.
- Global Time. The sample start time is a function of the offset value (expressed as a percentage of the duration) and the “global time” (the time relative to the preset’s start time). Technically, the sample start time is a function of the modulo of the global time and the chose offset. This is great for samples that change over time and preserves the sample evolution over the course of the preset. Offset amplitude should usually be close to 100% (but below 100% unless the sample is looped). EXAMPLE: If you have an 18-second long preset and a 9-second long sample file and have set the offset to 100%, then a note that starts playing back at 3 seconds will start 3 seconds into the source sample. A note that starts 12 seconds into the preset will have an offset 3 seconds into the source.
- Get From MetaSynth Button. This is a handy macro function that performs the following actions: saves the sound loaded into MetaSynth’s sample editor into a file named Sampler Sound (that will be located in the same folder as the Sampler Instrument itself), loads the newly-created file into the sampler instrument. This will save over whatever sound was originally in the file named Sampler Sound. You should only use this function if you do not intend to permanently use the same source sound. In general, it is preferable to manually save the Sample Editor sound to its own file and load that file into the sampler using the Open Sample button.
- Open Sample. Choose the sound file to use for the sampler. If the sound file’s name ends with a note name
(which must be capitalize), the sound will automatically be assigned the appropriate base pitch.
- Reload. Reload the sampler’s sound file from disk.
❑ Edit Sound Button. Load the sampler’s sound file into MetaSynth’s sample editor.
- Save Instrument And Sample Button. This exports the Sample Instrument and its sample file into the selected directory.
NOTE! It is important for a Sampler instrument and its sample file to be in MetaSynth’s Instruments CTX folder or in one of the folders included in the search paths explained in the MultiSampler section. They can also be put in the current project but it is recommended only for samplers specific to a particular project that have no generic usage.
For portability the safest way is to put the sampler next (or in a folder) where the instrument resides. This sample will always be loaded first, even if other folders in the search paths have the same named sample.
MultiSampler
The MultiSampler synth is a multisample version of the Sampler instrument. Multisamplers can have up to 32 different samples that are mapped to note ranges. See the description of the Sampler instrument above for a description of the basic functions. MultiSamplers can have more samples than can be viewed on a single screen.
Eight sample assignments at a time are displayed in the editor. Use the previous and next buttons to see the additional pages of samples used by the instrument.
 | MultiSamplers are nearly identical to Samplers with the additional capability of mapping different samples to different ranges. |
MultiSampler Editor Features. The MultiSampler editor is nearly identical to the Sampler editor. There are a few
differences:
- Remove button. This removes the selected item from the instrument.
- Previous/Next buttons. Displays the previous/next page of samples. A sampler can have up to 32 sample files in it, but the editor displays eight lines per page.
- Auto Ranges Button. If the imported samples do not have note names assigned, this will automatically distribute
the note ranges.
Building MultiSamplers. If you have a collection of samples whose names are of the format <sample name> <note name>, you can use the Image Synth’s Build MultiSampler command to have MetaSynth build the instrument. see Build Multisampler link
Tech note: Sampler/MultiSampler Search path
To find samples MetaSynth looks in several folders or locations in a specific order. if samples are found at any step other steps are skipped.
-1 in the directory where the instrument is saved (best portability as you can move the parent folder anywhere)
-2 in the directory stored inside the instrument file the last time it was saved. (This allows to maintain a hard reference outside the usual paths, but it has a low portability and if a folder name changes you sample may get lost)
-3 in the complete Instrument CTX directory (this will always work)
-4 in the current project directory
-5 in the Sounds folder of MetaSynth Application directory. (This is not recommended as it is mostly there to provide examples by U&I, Apple discourage the use of Application folder to store files)
Knowing this search order will allow you to understand what is happening in case of problems.
So, as a general rule, place your instruments in the Instrument CTX folder in the proper sub category. However if an instrument is only meaningful for a project you can create an instrument folder inside the project as well and put it and its samples there. Variations will still be saved in the sequence folder along the sequences and inside the .presets bundle along with an ImageSynth preset
Montage Room
Montage Room Basics
The Montage Room provides a streamlined easy-to-use interface for mixing MetaSynth elements and sound files and for multi-track recording. It can be used for quick and dirty sound layering or for creating full-length mixes. It provides 24 tracks, can mix mono and stereo audio files (even on the same track), and unrendered MetaSynth elements to be added to tracks and hot-linking to MetaSynth elements for efficient workflow. The montage works in the sample rate defined when creating a project. Sounds can be of any MetaSynth core format (aif,caf,wav) and in any depth. Best quality would be achieved with caf 32 bit float.
Events : unlike classical DAWS the events in MetaSynth’s montage can reference abstract entities that generate sound as well as direct sound. An event is basically a position in time and a duration, with a reference to a source (sound or a Metasynth entity) and some additional data like fades/volume gain. They can overlap on the same track to facilitate handling of releases and seamless looping. Many tools are there to edit their length, duration etc. When an event uses an Image Synth preset, a sequence or a spectrum synth sequence, the actual sound can be regenerated automatically and modified at any time in the corresponding room. Thus it is easy to do a quick layout of a piece and then refine each element little by little. Using the $ command will ensure changes are saved and the correct sound is used by the montage at any time.
In general you can cut and resize events and the cut will place the starting point at the cut except for Image Synth presets that always start at zero. Thus cutting an image synth preset event will produce two instances of the event.
Note : IS presets and sequences events will default to the new sound file length when the source is re-rendered . This is to ensure for example that if you change the loop number or the release and re-render it will automatically be updated in the montage. As a matter of fact you should rather create a new preset variant when significantly modifying the preset ‘s event length rather than changing the event length.
Basic workflow. A montage file is always available within a metasynth project and the main montage file has the same name as the project. Additional montages can be added for alternate mixes. The project folder contains the montage (audio sequence) file, one or more MetaSynth preset library, and folders for the montage’s other elements (such as Spectrum Synth sequences, Sequencer Room sequences and other audio files). You add items to tracks by clicking where you want them to appear and selecting them from the appropriate library popup. Each track has its own volume and pan setting and track effect. You can also apply fade (volume) envelopes to events in the montage. A fade envelope can be a constant line so each event can have its own volume.
There are three library popups from which you pick elements to insert into the sequence:
- Insert Preset Menu. This popup displays the presets in the Montage’s IS preset library.
- Insert Sound. Insert a sound file from the library. You can add sounds to the library (Sounds folder) by drag and dropping sound files in the finder or by saving them into the Sounds folder from the Sample editor. In MetaSynth CTX the available sounds are dynamically updated from whatever is in the folder each time you go back to the montage room. Recorded sounds will also be saved in that folder.
- Insert Sequence. This popup displays the sequences and spectrum sequences found in the project’s Sequences and Spectrums folders. Any items in these folders are automatically available in the library. The Render to disk and Save ($) command can be used to save a Sequencer Room sequence or Spectrum Synth sequence along with its rendered sound directly to the montage’s library.
 | A typical montage project folder and its required elements:Effects & Resources: store effects settings and other resources here. IS Sounds: rendered Image Synth sounds are automatically put here. Sequences. Sequencer Room files for the montage.Sounds. Recommended location for audio files that don’t correspond to Image Synth presets, Sequencer Room or Spectrum Synth files.Spectrums. Spectrum Synth files used by the montage. |
Image Synth Presets file. A montage uses one Image Synth preset library. When you create a project, MetaSynth automatically creates a preset library with the project’s name. You can substitute another preset library by moving it into the montage project folder and removing the default library that was initially created. If there is only one preset library in the project folder, MetaSynth uses it for the montage. Unlike MetaSynth 4, MetaSynth 5 and higher can only use presets from a single library. You can import presets from other libraries using the “load from previous lib” feature by cmd -click on the preset library icon in Image Synth.
When a preset is added to the tracks it will use the render sound length if already rendered or a “logical length” computed as number of loops * preset length. An event can be made shorter inside the montage but will default to its disk length if the sound is modified by another app or is re-rendered.
Recording. To record, simply record-enable a track and press the Record button. The File popup provides a Record Input Setup command for setting your recording preferences. The illustration below shows a record-enabled track.

| Click here to enable/disable | ||
| recording for a track | ||
Requirements
All events in a montage should have the same sample rate, but if not : the sound will just be played at the project sample rate and will be pitched up or down. Different sound format, bit-depths and channels can be mixed in the same project. Supported formats are
.aif 16,24,32
.wave 16 & 24,
.caf 16 & 24,
.caf 32 bit (floating point)
.sd2f should still work for compatibility, but we advise not using them.
Organization
Most of the time you will use the $ command to not have to worry about where to place files. The project folder organisation is implicitly known by the montage room and when things are placed in the right folder all is simple and easy.
It cannot be stressed enough that you should keep all of a montage’s elements in the folder that contains the montage file or a subfolder thereof, or MetaSynth may have trouble finding the audio when you re-open the montage. If you rename the project you need to rename also its main montage file and preset file to the same name before extension.
Samples used by a project Samplers or MultiSamplers instruments should be kept in MetaSynth’s Instruments CTX folder or in a folder (along with the Instrument itself) in the project.
Tips
Use the tab key to move the insertion point to the end of the current selection.
Events can overlap and be layered on a single track. Be careful though, since you will only see the topmost
event.
Global level changes. To make a change to all tracks, hold down the shift-key and adjust the volume slider. Global changes are relative. (For example, if you hold down the shift key and adjust the volume level of a track that is at 80% and move the slider to 100%, tracks whose volumes were less than 80% will be increased but not all the way to 100%).
Tools & User Interface
Upper Tools
File popup
New Project (n)
This command creates a new Metasynth project and echoes the command found in the main file menu.
Open Project
This command loads an existing Metasynth project and echoes the command found in the main file menu.
Open Montage (o)
Open a previously created montage. If the montage belongs to another project it will load the entire project.
Save Montage (s)
Save the current montage file to disk.
Save Montage As
Save the current montage file with a new name.
Edit/Load Source (e)
Load the selected element into the room where it was created. For example, when an Image Synth event is selected, its preset is loaded in the Image Synth Room so that you can edit it. After editing an item, use the Render and Save command (by pressing F12 or by choosing it from the main File menu ) to render
the sound and save the new version of the preset or sequence. The Edit Source button performs the same function.
Edit/Load Sound (f)
Load the sound file associated with the selected montage event into the Sample Editor. The Edit Sound
File button performs the same function.
Mix Selection to Memory
Mix the selected events to memory and load the result into the Sample Editor. This command is a handy way to bounce multiple events down to one event. Option-select this menu item to mix the intersection of the selected events and the selected time range.
Mix Measures to Memory (m)
Mix all tracks in the selected measure range (shown in blue in the bar grid at the bottom) to memory and load the result into the Sample Editor. Hold down the command key when selecting this item to mix only the selected events in the time range.
Mix to Disk as (^)
Mix the montage to disk under any name or location.
Mix and Save ($)
Mix the montage to disk and save the montage file. That makes the $ key universal to all rooms.
Cleanup libraries
This command provides some important clean-up operations. Unused sound files are moved to the Unused folder. Loose file references (no longer used or no longer existing) are removed from the library. Furthermore the various pop up contents is updated with whatever has been added in the folders.
Record Input Setup
Bring up the window for selecting recording setup options.
Recording requirements. MetaSynth can record using any audio driver that can record and playback simultaneously (full-duplex drivers).
Recent Montage List
At the end of the File popup is a list of the recently opened montage.
Edit popup
Undo (z) – Undo the most recent change.
Cut (x) – Cut the selected events to the clipboard.
Copy (c) – Copy the selected events to the clipboard
Paste Insert (i) – Insert the clipboard’s events into the montage at the time where the insertion point is found and move all later events to make room for the inserted events. The events are inserted onto their original tracks. (The track where the insertion point is found has no influence on the tracks onto which the events are placed).
Paste Merge (v) – merge the clipboard events with the events in the sequence without inserting time. The track where the insertion point is located determines the track on which the paste is made. If the selection contains events from multiple tracks, the data is pasted on to multiple tracks relative to the track where the insertion point is found.
Clear (backspace) – Delete the selected events.
Select All (a) – Select all the montage events.
Deselect All (d) – Deselect all events.
Quantize (q) – Quantize all selected events to start on a grid boundary.
Twice Faster (<) – (Twice as Fast) Doubles the effective tempo by halving the event durations and the space between the selected events. Does not change the actual sound file playback speed. This is a ‘power- user’ feature that is rarely used.
Twice Slower (>) – (Twice as Slow) Halves the ‘effective’ tempo by doubling the event duration and time
between the selected events. This is a ‘power-user’ feature that is rarely used.
Apply Current Effect – This applies the current Effects Room effect/filter to the selected event’s sound files. When you select this command, MetaSynth CTX will process and save the existing audio files directly. Use this command cautiously only when really sure about what you are doing. Make sure the current effect/filter is set to the one you wish to use. The event’s length will be reset to the sound file length after application, in case the effect changes the file length.
Scroll in Play ON/OFF – This option determines whether the Montage window autoscrolls during playback.
Insert Preset popup
Choose an Image Synth preset from this popup to insert it in the montage at the insertion point. The popup displays the montage’s preset library. A montage can only use one preset library (which should be at the top level of the montage project folder). You can import presets from other libraries using the Import Presets command. The montage uses whatever preset library is found at the top level of the montage project folder. After you first create a montage project, you can replace the empty preset library created by New Project with any preset library you would like by dragging your preferred library into the folder. You should not replace the preset library if you have already inserted Image Synth presets into the montage.
Insert Sound
Choose an audio file from this popup to insert it in the montage at the insertion point. Audio files can be added to the project’s library by a number of methods: by dragging and dropping audio files on the MetaSynth icon in the dock, choosing Render and Save in the Effects or Image Filter Rooms, or by choosing an empty slot from the popup (which will invoke the Choose File dialog). It is strongly recommended that you put all sounds that you want to use into the project’s Sounds folder.
Putting files in the Sounds library and adding them to the library. MetaSynth has a couple of useful commands for adding open sound files to a montage’s library. Move Sound to Montage (in the File menu) will move an open audio file to the montage folder (if it isn’t already there) and add it to the library. Save Sound to Montage (also in the File menu) will save the contents of the Sample Editor buffer to a file in the Sounds folder. This command should be used with caution — as it does no duplicate name checking and overwrites a pre-existing file if it has the same name. A good practice is to use the File Menu’s Save As command to save a sound to the project’s Sounds folder. You can then safely use Move Sound to Montage (shortcut: command-@) to add the sound to the library.
Insert Sequence
Choose a Sequencer or Spectrum Synth sequence from this popup to insert it in the sequence at the insertion point. This popup is built dynamically from the contents of the projects Spectrums and Sequences folders. Any items found in those folders will be automatically added to the library.
Load Sound File (f)
Load the audio file associated with the selected event. If the event has been trimmed, the region corresponding to the event will be selected when the file is loaded.
 Edit Source Preset or Sequence (e)
Load the source sequence or preset associated with the selected event and go to the appropriate room. After making your edit, use the Render and Save menu command (shortcut: F12) to update the sequence or preset as well as the associated sound file.
Edit Fades
Open the fade (envelope) editor to edit the volume envelope for the selected events. Choose an envelope shape from the Shapes popup. The envelope is displayed at the right. The envelope’s parameters which may include start level, end level, in slope, out slot, (maximum) level appear at the bottom of the window. The particular parameters available depend on the fade shape. Click on the Reverse button to reverse the envelope.
Display Mode Toggle
Toggle between the Montage Room’s two display modes: icon+text and graphic mode. The Montage Room’s display mode determines how event are displayed. Icon+Text mode displays a graphic icon and event name for each montage event; audio event displays are not re-calculated when events are split in this mode. Graphic mode displays an accurate (but coarse) representation of audio events; in this mode, an audio event’s graphic representation is recalculated when the event is split or its duration is changed. Each event type (MetaSynth Preset, Spectrum Sequence, Sequencer Sequence, Sound file) has a distinct appearance to make them easy to distinguish. See the tutorial chapter for more information.
Left-hand Tools
Below the Upper Tools is the Montage Room’s content area, the Track Area. At the left-edge of each track is a cluster of controls for the track. 16 tracks are available but they may not all be visible unless your monitor is large.
Record Enable/Disable Track
Click in the area to the left of the Mute Toggle to enable/disable recording on the track. MetaSynth can
record to only one track at a time.
Mute Toggle
Click on the ear icon to turn muting on or off for the track.
Select Track
Click on this icon to select all the events on the track.
Effect
Click on this text button to open the Track’s Audio Effect. See the chapter Track and Instrument Effects for more information about track effects.
Grid On/Off
Toggle the grid state. When the grid is on, the insertion point is restricted to grid positions and dragging events drags them by increments of the grid interval while preserving any offset from the grid. If you want to grid-align an event that is not already aligned to a grid interval, choose Quantize from the Edit popup menu or click on the Quantize selection icon.
Grid Spacing Popup
Choose the grid interval from this popup menu. 240 clicks equals one beat. The popup menu is organized by beat division: even divisions of the measure/beat (i.e. 30, 60, 120, and so on which represent 32nd notes, 16th notes, 8th notes, and so on), triplet divisions (40, 80, 160, 320) and divisions that correspond to dotted notes (90, 180, 360).
Lower Tools
Beats/Measure
Set the number of beats per measure in this field. This determines the piece metrics and bar lines displayed in the user
interface.
Tempo
Set the tempo in beats-per-minute in this field. The tempo is a floating point number. You can type in the tempo (followed by return key to complete the entry) or use the mouse. You rarely want to change the tempo here as it is decided at project creation and most content of the montage may already be rendered at a given tempo.
Note that changing the tempo won’t change the placement of events in term of metrics but changes the rate at which the montage is played back.
Start Measure/Time Scroller
The Start Measure numerical field is found next to the tempo number. Playback and recording commences from the Start Measure which is also controlled by the main timeine slider. You can change the start measure directly in the Start Measure field or with the timeine slider. The time slider has a 240 ticks precision (which is usually a beat) while the Start Measure is quantized by measures.
Zoom Out View (Shift-A) / Zoom In View (Shift-Z)
Click on the appropriate part of the tool to zoom in or out.
Scroll View (h)
Click and drag on this icon to scroll the view horizontally and/or vertically. You can also hold down the ‘h’
key and drag in the montage editor’s content region to scroll the view directly.
Delete Selection
Delete the selected events without deleting any time.
Quantize Selection (q)
Align the selected events to start on the nearest grid interval.
Delete Measure
Delete the selected time range including the events that start in the range.
Adjust Event In Time
Click and drag left/right to adjust the start time of the audio event. Use this tool to fine-tune audio event start positions. Dragging to the right trims the event and dragging to the left adjusts the start time to be earlier. This is especially useful for adjusting crossfades of events trimmed from the same audio file.
 Reset Duration From File
Reset the duration of an event to match its source file.
Adjust Event Out Time
Adjust the end time of an audio event. Use this tool to fine tune the duration or end point of audio
events.
 Cut Event (command-option-click)
Click in this tool to split the event into two at the insertion point. You can also command-option click directly at the point where you would like to split the event. After splitting an event you can fine-tune the start and end points with the Adjust Event In Time and Adjust Event Out Time tools.
Insert Time
Click and drag to the right to insert time on all tracks (starting where the insertion point is positioned).
Click and drag to the left to delete time. If the grid is on, time is added or deleted in increments of the grid
interval.
Scale Duration
Click and drag to proportionally scale the duration of all selected events. This command is mostly used to
extend the duration of events after reverb or echo has been added to the event source files.
 Offset File Start Time (coarse) / Offset File Start Time (fine) [with option key]
Click and drag left or right to offset where in the source audio file the event begins. When you use this tool, the event’s position and size does not change, but the relationship with the source audio changes. This tool is mostly used with audio events that have been cut from larger events using the Cut Event tool. Hold down the option-key and drag to make very fine adjustments. The event appearance will change when in Graphic Display mode; otherwise, the event will appear unchanged.
Fade In Slope
Click and drag to adjust the in-slope of the selected events’ fade envelope. If the events have no fade envelope, an envelope is added.
Fade Level
Click and drag to adjust the max level for the selected events. A fade envelope is added if needed.
Fade Out Slope
Click and drag to adjust the out-slope of the selected events’ fade envelope. If the events have no fade envelope, an envelope is added.
Choose Fade Shape Popup
Click to pop up a menu of the Fade Envelope shapes. For more information about Fade Envelopes, see the Montage Room tutorial chapter.
Track Volume
Click to set the volume for the track in which the insertion point appears. To change the volume of all tracks, shift-click when moving any volume slider. When shift-click is used, track volumes are adjusted relative to the change made by adding (or subtracting) the amount by which the fader was adjusted thus preserving the same relative track volumes.
Track Pan
Click in the pan (balance) slider to set the pan of the track in which the insertion point appears.
 Mix Sequence (return)
Mix the entire montage to disk as a Sound Designer II file. Currently, MetaSynth always uses Sound Designer II format when mixing a montage to disk. To mix a selection, use the File popup’s mix commands.
Move to Start
Scroll to the montage’s beginning.
Play/Stop (space)
Click this button (or press the spacebar) to start/stop playback.
 Play Event Selection (command-space)
Click this button (or hold down the command key and press the spacebar) to play the selected events. Command-click this button to loop play the selected events. Play Event Selection plays the selected events not the selected time range.
 Play and Loop Measure Bar Selection
Click this button to loop play the selected time range. Command-click this button to play only the selected events in the time range.
Record
Click begin recording. A track must be record enabled for this to have an effect.
Move to End
Scroll to the montage end.
Track and Instrument Effects
This chapter describes the effects available for instruments and montage tracks. Since most of these effects are fairly self-explanatory or based on effects that most are familiar with, the chapter primarily focuses on features that are likely to be unfamiliar.
These effects are available as both track effects in the Montage Room and output effects in the Instruments Editor.
Filter Options
Some of the effects have a filter options popup menu that allows you to choose the type of filtering applied to the signal before it is passed on to the actual effect. Changing the filter option can have a dramatic effect on the effect’s output. The filter’s themselves have preset settings. Not all of these options are available for all effects. For those effects that do not provide a filter frequency parameter, the filter is set at 10 kHz. Filters that may be available are:
- Bandpass Filter.
- FIR Filter. Finite Impulse Response.
- HPF Filter. High-Pass Filter. Attenuates frequencies below the target frequency.
- LPF Filter. Low-Pass Filter. Attenuates frequencies above the target frequency.
- Notch Filter. Attenuates frequencies surrounding the target frequency..
- Peak Filter. Boosts frequencies surrounding the target frequency.
- Peak Sweep. A peak filter whose peak frequency is modulated with an LFO.
- Reso Filter. A resonant filter centered at the target frequency.
Interesting information about filters can be found at: http://ccrma-www.stanford.edu/~jos/filters/
Effects List
Chorus
A simple chorus effect.
Distortion
Distortion plus stereo echo.
Early Reflections
A nice-sounding Early Reflections effect with adjustable room size that is useful for simulating a room.
Filter & Feedback
Adjustable filter plus stereo delay with selectable filter type.
MetaSynth 5: New Features Guide
High Pass Filter Low Pass Filter LR Echo Parametric EQ
8 band parametric EQ. This EQ uses either a bank of bandpass filters or a bank of peak filters. The bands’
center frequencies are spaced at octaves relative to the base frequency parameter. So at 110 Hz, there are
peaks at 110 220 440 880 1760 3520 7040 14080
PingPong Echo
Simple delay that provides a different delay time for the first and subsequent echoes. The same delay is
applied to the left and right channels alternatively.
Resonant Filter Reso Sweep Reverb
A nice lightweight reverb. The filter options can have a vast impact on the reverb sound. This reverb is best suited for individual tracks and instruments. It is less CPU-intensive than the reverb effect available in the Effects Rom.
Vox Enhancer
The Vox Enhancer effect combines distortion, a coloring high-pass filter, and echo with feedback. It is useful for adding additional life/warmth/vibrancy to sounds. When the first delay is set to more than 50 ms and the feedback is set high, the result is a pleasing stereo chorus effect.
WS Distortion & EQ
Distortion using wave shaping. The distortion freq parameter controls the Waveshaping signal frequency. The 4-band EQ is post-distortion. Set drive to zero for only EQ & feedback. This effect includes a stereo delay line and feedback parameter to control the delay’s decay time.
Native Menu Bar
Metasynth CTX 1.x Menu
About MetaSynth
Opens a dialog that will list the version number of the application and the name of the registered user.
Preferences (⌘,)
Open the Preferences dialog box. See the Preferences section for information about MetaSynth’s preferences.
Services
This is the standard menu item provided by macOS. MetaSynth does not install any additional items into this menu.
Hide MetaSynth (⌘H)
This is the standard menu item provided by macOS. Functions as in any other macOS application.
Hide Others (⌘-Shift-H)
This is the standard menu item provided by macOS. Functions as in any other macOS application.
Quit (⌘Q)
Functions as in any other macOS application with the exception that it will not prompt you to save any edited data.
Show All
This is the standard menu item provided by macOS. It is dimmed if no application windows have been hidden.
File Menu
New Project (⌘N)
Opens a dialog with fields for the new file name and its location. Like many text entry fields in MetaSynth, press Enter or Return after typing the song name to validate the title and then you can use the other controls in the dialog window. You can specify the song’s BPM and beats per measure to preconfigure the grid. Finally, you can specify the directory where you want this new project’s folder structure to go.
After choosing this command, the New Project dialog appears. When you click OK, a folder selection dialog appears, allowing you to choose where the project folder should be created.
Warning: When opening a new Project window, you will not be asked to save unsaved changes from the currently-open Project. the window will simply close, replaced by a window for the new Project.
Open Project… (⌘I)
Opens a previously saved Project. Direct it to the top level folder for the project. Without selecting any of the Project’s subfolders, click the Open button. Opening a project from one of its subfolders is not supported.
Warning: When opening a different Project window, you will not be asked to save unsaved changes from the currently-open Project. the window will simply close, replaced by a window for the new Project.
Open Sound… (⌘O)
Opens a sound file. MetaSynth will offer to resample the sound data to match the sample rate set in the Preferences dialog, if there is a mismatch. If you choose to convert the sample rate, a new file will be created on disk with _RS added to its name to indicate that it was resampled.
MetaSynth can natively open AIFF, wav, caf, and mp3 files, and can save AIFF and WAV.
Note: Some versions of the operating system may allow you to select other sound file types and automatically convert them. Note that MetaSynth will not be performing any of the audio processing required to convert to other formats in such cases.
Open Recent
This submenu is maintained by the OS and will include any of the most recently-opened sound, sequences or spectrums files. It does not list MetaSynth Projects as a project is not a file.
Save Sound… (⌘S)
Main menu access to Sample Editor File menu
Save the sound currently loaded in the Sample Editor. See Sample Editor chapter
Save Sound As… (⌘-Shift-S)
Main menu access to Sample Editor File menu
Save the currently loaded sound into a new file. By default, the file is saved with the default file type set in the Preferences dialog. See Sample Editor chapter
Revert to Saved
Restores the most recently-saved version of the sound in the Sample Editor.
Edit Menu
Undo (⌘Z)
Global menu undo is a macro that calls current room editor Undo. Use the Undo functions in the Edit menu buttons specific to each room editor instead. It cannot be used to undo sampler editor changes.
Cut (⌘X)
Global menu Cut is a macro that calls current room editor Cut. Use the equivalent Edit menu buttons specific to each room editor instead. It cannot be used to edit in the sampler editor.
Copy (⌘C)
Global menu Cut is a macro that calls current room editor Copy. Use the equivalent Edit menu buttons specific to each room editor instead. It cannot be used to edit in the sampler editor.
Paste (⌘V)
Global menu Paste is a macro that calls current room editor Paste. Use the equivalent Edit menu buttons specific to each room editor instead. It cannot be used to edit in the sampler editor.
Window Menu
This menu is common to all applications; its contents are handled entirely by macOS.
Preferences
MetaSynth’s preferences are all set in the Preferences dialog. To open the preferences dialog, choose Preferences
from the MetaSynth CTX 1.x menu.
Preferences panel group
Preferred File Format
This is the default file type used when saving sounds. The file format does not affect the
internal processing or buffers. You can override the default setting in the Save As dialog.
Depth
This is the default bit-depth used when saving sounds. The file format does not affect the
internal processing or buffers. You can override the default setting in the Save As dialog.
Output Device
This determines the audio interface to use during playback.
Sample Rate
The sample rate used when sounds are rendered to the sample editor and when playing back audio. Generally, the sample rate must match the sample rate of your output hardware. Click on the Set Hardware Sample Rate button to ensure that MetaSynth and the output device are using the same sample rate.
Set Hardware Sample Rate button
Click on this button to set the audio output hardware to MetaSynth’s sample rate. You should press this button any time that you change your output device or sample rate setting.
Append “flt” when processed
This setting determines whether MetaSynth appends “_flt” to a sound file’s name after rendering a sound from the Effects Room, whether to the Sample Editor or to disk. Enabling this may leave the Instruments or the Montage room referencing the original file rather than the new version, so for best results leave this OFF and allow rendering to replace the original file. If you would like to preserve your original file, make a backup copy in the Finder before rendering.
Image Synth/Synthesis panel group
Overflow handler (continuous ceil / min ceil)
MetaSynth features an internal compressor that lets you easily maximize volume without worrying about clipping (distortion). This overflow handler is applied when previewing and rendering sounds to the Sample Editor. The options are Continuous Ceil(ing) and Min Ceil(ing).
When Continuous Ceil is selected, MetaSynth applies its internal compressor/limiter when previewing and rendering. This maximizes volume without having to worry about clipping/distortion. When this option is selected, the level meters will indicate red when the compressor is triggered. In this case, red does not indicate clipping.
When Min Ceil is selected, no processing is done and red meter lights (when LED Sensitivity is 100%)
indicate clipping/distortion.
Phase Randomization
This setting determines what type (if any) of phase randomization the Image Synth applies when rendering. There are two basic types of phase randomization Mono and Stereo. In mono mode, the left and right channels of any note are kept in phase but the phase of different pitches (notes) are randomized in order to avoid unwanted phase artifacts such as distortion that occur when performing additive synthesis of pitches that have harmonics in common. (If all notes in the Image Synth were in phase regardless of pitch then one could have severe clipping due to coincident peaks.) Mono phase randomization has no audible effect other than minimizing the likelihood of phase-related distortion. Stereo phase randomization makes sounds richer-sounding. In general, one should at least use Small or Large Mono phase randomization.
In mono mode, there is no noticeable thickening of sounds since the left and right channels of individual notes are kept in phase. Mono mode avoids the anomalies that can occur when all the harmonics of a dense picture are in phase. Stereo mode randomizes the phases of the left and right channels of the notes (as well as of different notes). Since the left and right channels (of any note) are not in phase, you get a thickening of the sound that can be very satisfying. Stereo Mode is especially handy when trying to create really “fat” waveforms for MultiSampler instruments
None – No phase randomization is performed at all. Small or Large Mono is generally a better choice as phase alignment may create burst in volume at start of rendering when many voices are involved.
Small Mono – Slightly randomize the phase of notes on different lines but keep the left and right channel of
any given note in phase. Earlier versions of MetaSynth always used this mode.
Small Stereo – Slightly randomize the phase of all notes and of the left and right channel of any given note. Creates a richer lusher sound than without phase randomization.
Large Mono – Similar to Small Mono but with a greater range of phase randomization.
Large Stereo – Similar to Small Stereo but with an increased randomization range which results in an even
lusher sound.
Load Instrument When Playing (Compatible Instruments Only)
When this option is on, MetaSynth will try to load instruments when switching between Image Synth presets in real-time while playing back. You can turn the option OFF to force all presets to use the same instrument when switching live.
Show comments in main window (Image Synth only)
This used to be an option but is now the global default. Each comment has the option to not be shown.
Odds & Ends
This section covers a variety of topics that don’t fit into any other section.
MetaSynth’s Files and Folders
The MetaSynth folder has a particular structure that is created when the software is installed. Most of the MetaSynth folder’s sub-folders that are created on install are required by MetaSynth and should not be moved or renamed.
The Application Folder Structure
The Finder list view of the MetaSynth folder will look something like the folder below.
In addition to the files and folders listed below, there may be additional files or folders such as temp files or informational files provided with the software. The folders and their significance:
- Custom Scales This folder contains a collection of custom tunings that you may find useful. It is a convenient place to store tunings, but you can store your tuning files anywhere. When you save an Image Synth preset, it saves a copy of any custom tuning in the preset library itself.
- Effects Examples. These are examples of effects settings available for the Effects Room.
- Filters (Required folder). Preset libraries useful as graphic filters or in the Image Filter Room. This folder also contains useful displacement maps. The libraries in this folder are available from the Image Filter Room’s File popup menu for easy access.
- Formant filters (Required folder). This folder holds global presets formant filters to be used by the spectrum synth room.
- Instruments CTX (Required folder). MetaSynth searches this folder for instruments and the samples used by Samplers and MultiSamplers. It is recommended that you store all your MetaSynth instruments and the files they require in this folder. You can also move this global instrument library to the Document folder but you will have to tell MetaSynth at launch where it is.
- MetaSynth CTX 1.x This is the MetaSynth application bundle. (In OS X, most applications and some other items that appear as if they are files in the Finder are actually special kinds of folders called bundles or packages.) There are a few folders of interest inside the application bundle that you may find useful to customize (with extreme care). To access these folders, control-click on the MetaSynth application icon in the Finder and choose Show Package Contents from the popup menu.
- Presets Examples. This folder Examples of preset banks available for quick access from the Image Synth File popup menu. You can put aliases to your favorite libraries in this folder to make them accessible with a single click.
- Sequences Examples This contains examples of Sequencer Room files
- Sounds This contains some useful sounds that are used in various examples.
- Spectrums Examples This contains examples of Spectrum Synth sequences.
The following is a diagram illustrating how the items in a MetaSynth project folder are used by the various components of MetaSynth.
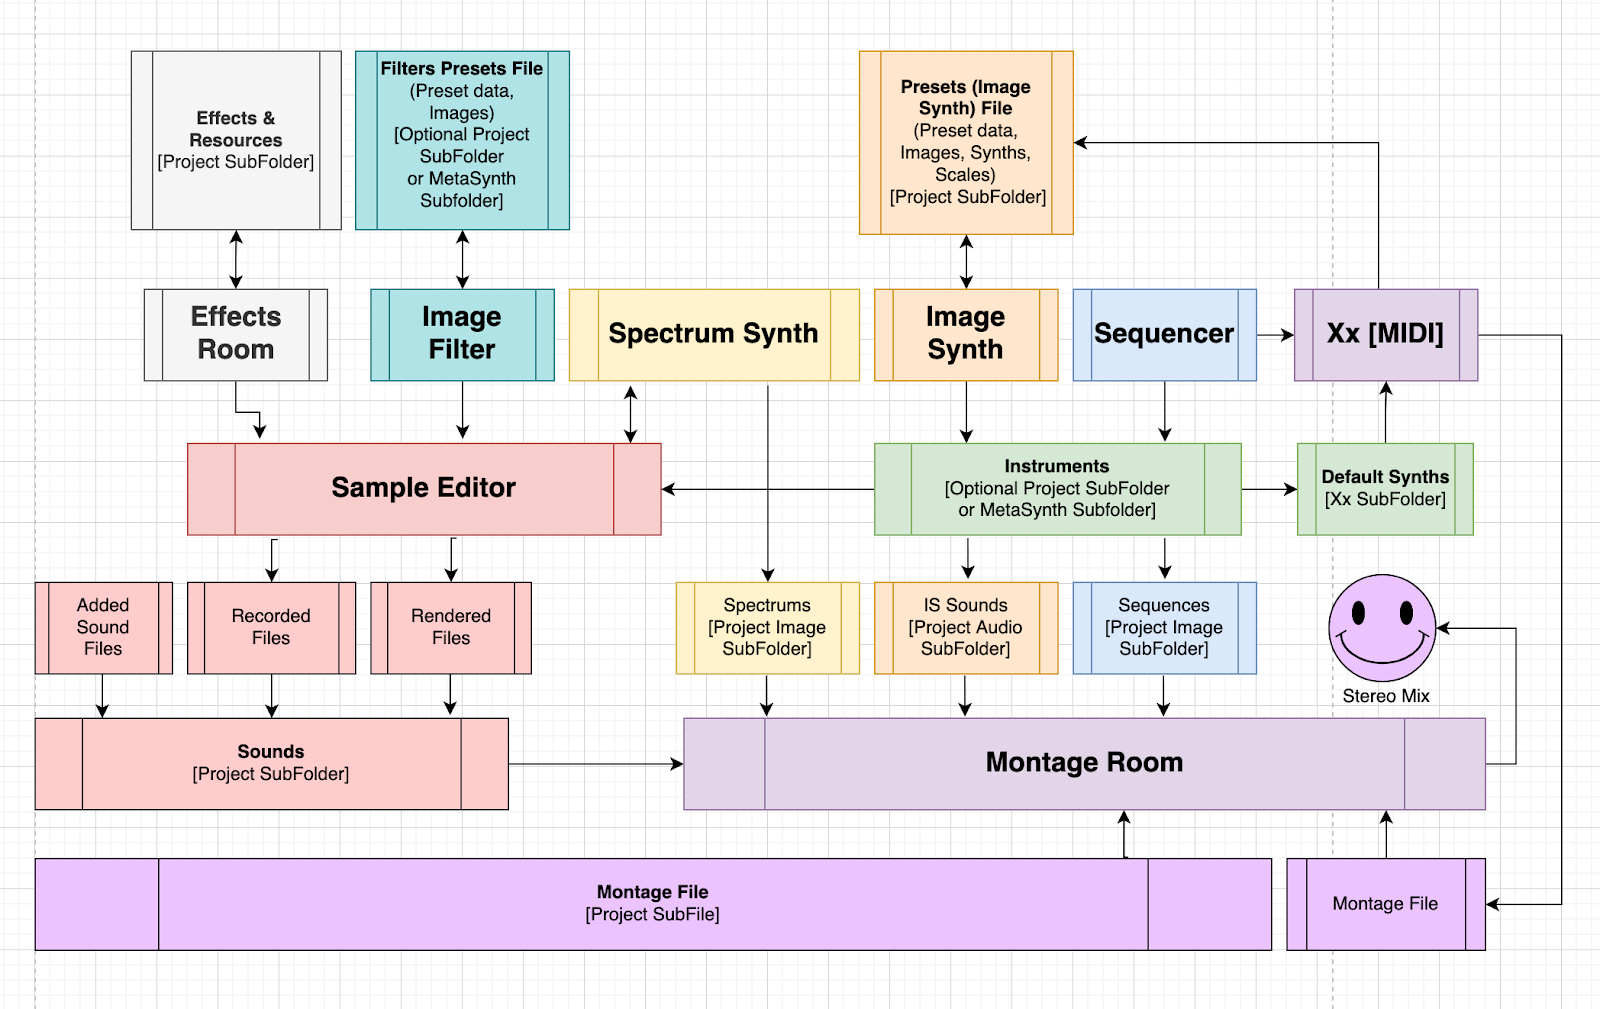
Specifications
Bit Depth
All processing is done with 64-bit floating point math for maximum audio quality. Internal sound buffers are 32-bit
per channel.
Envelopes
Envelope tables consist of 512 values. Instrument wavetables consist of 2048 floating point (double/float64) values with a range of -1 to +1. The wavetable represents one cycle of the waveform.
Multi-processing
MetaSynth is multi-threaded and will perform some operations significantly faster when running on a multiprocessor-equipped computer than when running on a single-processor computer. Not all operations are multi-threaded. Image Synth synthesis, for example, is single-threaded for stability.
Appendix 1: Custom Tunings
Custom Tuning Dialog Items
Tuning Name. The name of the Custom Scale is displayed here. This field is not directly editable. The name displayed is either the name stored in the scale file or an algorithmically generated name.
Divisions per octave. The number of steps that make up an octave or scale cycle (in cases where the scale spans more than an octave). This number can be any value from 1 to 1024. Though only the first 64 steps are editable within the dialog. Scales can be exported and edited with any text editing application.
Frequency ratios (scale steps) This set of editable text fields defines the ratios that make up the tuning. The value for a particular scale step is multiplied by the pitch of the octave’s base pitch to determine the note pitch. The first text field determines the pitch of the first step of the tuning’s “octave”. It should be one. Only the first 64 steps are editable from within the dialog. The scale steps may actually span more than an octave. The dialog box restricts typing to floating point values. However, you can use a text editor to create tunings defined by fractional steps (such as 5/3 or 5.12/3.34) or cents. There are some restrictions on the order of the scale steps. Unlike version 2.7 and earlier, scale steps must be in order. So, MetaSynth will not allow you to type a value for any step that is higher than the value that follows it. So, to increase the value of some steps, you may need to work backwards by setting the values for the last steps first.
Generate ratios. The following buttons algorithmically fill in the scale steps:
Linear Subdivision. The octave is divided into equal steps with the same distance between all scale steps. These divisions can be interesting as they often have perfect fourths and/or fifths (unlike equal temperament), depending on the number of steps per octave. The formula for determining a particular
r = 1 + n
step’s frequency ratio is divisions where r is the frequency ratio and n the scale step.
Exponential. The difference between the scale steps is scaled exponentially with the steps separated by
n log(2 )
increasingly large intervals. The formula for determining a particular step’s frequency ratio is r = exp( divisions)
where r is the frequency ratio and n the scale step. This is the formula for the temperate scale when divisions(notes per octave) is 12. It can also be written 2^(n/12) : clearly when n==12 you get 2^1 which is 2, the octave ratio !
Harmonic Series. Generate the standard harmonic series (whole number ratios).
Randomize Ratios. Randomize the values of the steps. This is especially useful when using ‘double-tunings’ where adjacent scale steps have the same value. This allows for the creation of chorusing effects. To create really fat-sounding waveforms, create a scale of all ones slightly randomized using the Randomize Ratios button.
Build from spectrum… Build a tuning from a spectrum file. This option allows custom scales to be built from an Instant Spectrum file created in the Spectrum Synth room. This option makes it possible to create tunings derived from the harmonics of a sample.
Import Tuning. Display the Open File dialog for you to choose a custom scale stored in a text file. A large number of tunings are provided in the Tunings folder of MetaSynth’s home folder. This dialog contains a preview area that displays the first several lines of any selected scale file.
Export Tuning. Export the current scale as a text file which can be reused in other presets.
See the appendices for more information about custom tunings.
Non-Linear Scales/Scale Wraparound
Custom scales are typically defined with ratios given in increasing order between 1. 0 (the fundamental) and 2.0 (the first octave). The new implementation allows more flexibility.
Ratios do not have to be constrained to an octave. When values greater than 2 (the octave) are used, the Image Synth’s frequency space will not be linear and will exhibit wrap around where moving up can actually cause a downward frequency jump. Transposition in the picture domain will modify the harmonic content of the sound. With such scales, a diagonal line going up will not play a simple ascending scale, a property which can be used to create some very interesting sounds and effects. Try it!
Open the Custom Tuning dialog. Set Divisions per octave to 16. Click Harmonic Series. Click the OK icon button. Draw an upward diagonal line across the canvas. Preview the sound. Note how every sixteen pixels the pitch jumps back down to the next “octave” of the tuning.
Tip! To see the pitch which is played by a particular pixel, move the mouse over the location and read the Tips Display in the lower right-hand corner of the window. You will see the pixel’s pitch displayed as a note and octave (i.e. A2), a degree of pitch shifting, and the absolute frequency in Hertz.
Working With Large Tuning Spaces
Custom tunings of up to 1024 divisions are allowed though only the first 64 divisions are editable from within MetaSynth. The algorithmic scale generation (activated by pressing the Compute Ratios button) will work regardless of the number of scale steps. If you need to edit these scales, you can open them with a text editor to edit the values. This feature was added to allow MetaSynth to import large scale files generated by other applications.
Custom Scale File Format
Custom Scales are plain text files with a simple format that lets you specify scales in terms of cents, fractions, or floating point numbers. The file must have the .scl extension. We suggest examining the scales that are provided with MetaSynth in the folder MetaSynth CTX/Custom Scales. Open any of the supplied files in a text editor and examine them. (Currently, MetaSynth expects Macintosh (not unix or pc) line endings).
The custom scale will look something like this:
| ! eboy.scale!Test Scale from Eboy 7! Line 5 ignored0.00 cents166.000 cents332.000 cents664.000 cents779.000 cents899.000 cents949.000 cents | Line 1 provides the scale name and begins with ‘!’ Line 2 begins with ‘!’ and is ignoredLine 3 is ignoredLine 4 is the number of steps in the scale and must be an integer. It corresponds to the Divisions Per Octave setting.The rest of the lines define the scale steps. The steps can be defined in terms of cents (100 cents is a semitone), fractions, or floating point numbers. When using cents, the word ‘cents’ must appear; otherwise, the value will be interpreted as a multiplier (ratio) of the scale step to the fundamental. Fractions may contain integer or floating point numerators and denominators (i.e. both 5/3 and 5.12/2,9 are allowed. |
Scales must have either the fundamental defined as the first step or the true octave as the last step but not both. For example, a scale in cents must either have 0.0 cents as the first step or 1200.00 cents as the last step. Scales defined as ratios must either start with 1 or end with 2. In general floating point ratios values should start at 1 and be between 1 (the fundamental) and 2( the octave) and can have up to 7 floating point digits.
MetaSynth does no (or very little) error checking. If your custom scale is not working or loading correctly, examine the file to make sure that it matches the rules mentioned above.
Scale steps should appear in increasing order. In MetaSynth 2.x, it was possible to have steps out of order. Starting with MetaSynth 4 such scales MAY work but are no longer officially supported.
Keyboard Shortcuts
Shortcuts and Special Clicks
MetaSynth provides two types of keyboard shortcuts: command-key shortcuts which are linked to main menu (where the command key and another key are held down) and simple shortcuts (where a single key is held down — such as the ‘s’ key — by itself) which are specific rooms or editors commands. The single key shortcuts are case-sensitive unlike the command key shortcuts handled by the OS menus. There are a few shortcuts (such as spacebar, or open (o), save (s)) that can apply to either the upper or lower pane. The pane that has the keyboard “focus” will receive the shortcut. In general you don’t have to worry about the focus as it is set automatically as soon as you click in the upper or lower area. But if you are working in the IS for example and want to save the current Sound in Sample Editor you will need to click on it before being able to use the ’s’ command of the Sample Editor.
Shortcuts are usually visible in the UI either next to the command name in pop ups or inside the tool tip for iconic buttons and some text button tooltips. So don’t worry if you forgot it, they are quite easy to recover.
Some icon tools have modifiers . When it is the case you can see alternate functionalities by hovering the mouse over the icon and pressing modifier keys in the tool tips.
Cmd stands for the Command key (⌘)
Universal
The following keyboard shortcuts apply in all (or most) of MetaSynth’s rooms.
| * | multiply by 2 in numerical fields | |
| / | divide by 2 in numerical fields | |
| < | twice faster | |
| > | twice slower | |
| a | select all | |
| c | copy | |
| d | deselect all | |
| enter/return | complete entry when entering valuein a numerical field | |
| escape | abort render |
| h | hand (scroll) tool | |
| m | paste merge | |
| o | open file | |
| r | repeat twice | |
| s/S | save/Save as | Saves whatever sort of file the room opens and saves |
| spacebar | play | |
| t | invert time | |
| v | paste | |
| x | cut | NOT universal (symmetry in Effects Envelop edition) |
| z | undo | |
| ^ | render to disk as | For export sounds to another environment |
| $ | render to disk and save | For use (or updates) in montage room, all names and location are automatic. Use this when editing a IS preset used in the Montage. |
| @ | render to memory | For proofing and further processing |
Special Clicks
| command-drag | select | Hold down the command key and drag to make a selection. Applies to the content area of all rooms. |
| option-space | play selection | Hold down the option key and press the spacebar. You can also use command+spacebar if Apple’s Spotlight is reassigned to a different key combination. |
| option-drag | duplicate | Hold down the option key and then commence dragging to duplicate the selection in the content area of most rooms. |
… add control for pop ups commands
Sample Editor
| cmd- drag waveform | select |
| shift-cmd-drag waveform | extend/reduce selection |
| option-drag | zoom in/out |
| drag | scroll |
| b | paste insert |
| d | deselect all |
| g | crop |
| p | invert phases |
| i | swap left & right |
| + | transpose up |
| – | transpose down |
| ; | silence |
| < | fade in |
| > | fade out |
| j | fade in & out |
| Universals | o, s, S, c, a ,d, p, m |
Main Menu Shortcuts
Application Menu
| cmd , | preferences | |
| cmd h | hide MetaSynth | |
| cmd H | hide others | |
| cmd q | quit |
File Menu
| cmd o | open sound file | |
| cmd n | new project | |
| cmd s | save sound file | |
| cmd S | save sound as | |
| cmd i | Open project |
Edit Menu
| cmd z | undo |
| cmd x | cut |
| cmd c | copy |
| cmd v | paste into |
Window Menu
| cmd m | minimize window |
Online Help Menu
| cmd f | launch online docs |
Effects Room
| < | twice faster | |
| > | twice slower | |
| a | select all | |
| c | copy envelope | |
| d | deselect all | |
| @ | render to memory | |
| ^ | render to disk as | |
| $ | render to disk & Save | |
| i | invert | |
| n | normalize | |
| o | open effect setting | |
| q | quantize | |
| r | repeat twice | |
| s | save effect setting | S for save as |
| space | play/stop | |
| t | reverse time | |
| x | symmetry (mirror) |
| z | undo |
Envelope Tool Special Clicks/Keys
The following table shows modifier key combinations that influence the behavior of the envelope tools:
| cmd-drag-envelope shape | fade in with envelope | applies to envelope shape tools. shift inverses the envelop |
| option-drag-envelope shape | multiply with envelope | applies to envelope shape tools. shift inverses the envelop |
| option+cmd-drag envelope shape | modulate with envelope | applies to envelope shape tools. shift inverses the envelop |
| shift-drag envelope shape | blend with inverted shape | applies to envelope shape tools. shift inverses the envelop |
| option | discrete envelope repeat | |
| option | scale freq. from center | |
| option | move envelope horizontally | |
| shift + lower tools | apply to all envelopes | hold down the shift key when applying most lower toolbar tools to apply the transform to all envelopes in use. |
EW : There is a mess with icons here i don’t know how to fix !
Image Synth Room and Image Filter Room
| [ ] | maps to ( ) | |
| < > | previous/next preset | |
| ( ) | previous/next preset | |
| control+option-click | preview note at chosen pixel | |
| control-click in canvas | Invoke tool palette | |
| option | selection tool : to leave a copy | |
| control+option | ||
| cmd-option-click | hand tool short cut | when applicable |
| cmd-drag | select | |
| shift+brush | constrain stroke horizontally |


Spectrum Synth
| o | open | |
| s | save | (not save as) |
| n | auto-build sequence | |
| i | replace instant spectrum | |
| + | cycle interpolation mode | |
| x | cut | |
| c | copy | |
| v | paste & insert | |
| b | paste in place | |
| m | merge in place | |
| y | randomize | |
| & | apply transpose | |
| f | fit tempo |
Specials
| control-option click | preview single event |
| option+ vibrato tool | vibrato rate |
| option+shift + vibrato tool | vibrato delay |
Sequencer Room
| o | open sequence |
| s | save sequence |
| z | undo |
| x | cut |
| c | copy |
| v | paste |
| i | invert |
| t | reverse |
| r | repeat twice |
| < | twice faster |
| > | twice slower |
| control-click | play note |
Montage Room
| = | remove fade | |
| f | load sound file | |
| e | edit source | preset or sequence |
| Control-option click | Scissor tool | snip event in two |
| $ | MIX and SAVE |
| n | new project | |
| o | open montage | |
| s | save | |
| m | mix measures to memory | |
| x | cut | |
| c | copy | |
| v | paste merge | |
| i | paste insert | |
| a | select all | |
| d | deselect all | |
| q | quantize | |
| < | twice faster | |
| > | twice slower | |
| shift-volume slider | apply to all | |
| shift-pan | apply to all |
Troubleshooting
About This Chapter
This chapter provides tips and ideas for cases where MetaSynth seems to be mis-behaving. If you have not performed the tutorials, start by performing them. Over the years we have found that the vast majority of questions we are asked are covered in the tutorials. If you cannot find the answer in the tutorials, search the reference manual. Both the Adobe Acrobat Reader and the OS X Preview application allow you to search the manual.
If this chapter and the rest of the documentation does not solve your problem, visit the support section of the U&I Software web site:
http://www.uisoftware.com/SUPPORT
Common Issues
- Pressing spacebar plays a different sound than I expected.
Make sure that the appropriate pane (upper or lower) has the focus. When you press the spacebar, the shortcut is directed to whichever pane has the focus.
- MetaSynth’s audio output is not audible.
Choose your desired output device in the Preferences dialog. Press the Set Hardware Sample Rate button in the Preferences window to make sure that the sample rates match and to force resetting of the connection. If you still don’t hear any sound, make sure that you are not running another application that is interfering with the output. All applications accessing the output device need to be running at the same sample rate.
- The waveform display is not visible in the Instrument Edit window.
Make sure that your display is set to display millions of colors. The waveform display is not visible with some color depths on some monitors.
- Image Synth or Spectrum Synth playback stutters.
In some cases, you may create an Image Synth preset or Spectrum Sequence with so many voices that your computer can’t compute a realtime preview at the current sample rate. If you are running at a very high sample rate, reduce the sample rate and the stuttering is likely to go away. Keep in mind that when running at 96 kHz it requires more than twice as many calculations per second than when running at 44.1 kHz. In the Image Synth, you can also select only a part of the image and use Preview Selection to hear only the selected part of the picture – which will reduce the CPU load if the selection has fewer notes at once than the whole picture itself. Ultimately using a true rendering (@) may be the only solution.
- When there is a long note panned dead center in the Image Synth, it doesn’t sound like it is coming from
the center; it has a broad stereo field.
In the Preferences dialog is a setting that controls phase randomization. When stereo phase randomization is on, the left and right channels of a note will be out of phase. This creates a pleasant expansive sound. To turn it off, choose Small Mono or Large Mono phase randomization from the popup.
- Recording from a MacBook’s internal microphone doesn’t work in the Montage Room.
To record in the Montage Room, MetaSynth requires that the audio driver be able to both record and play back. (Such drivers are called full-duplex.) MacBooks have half-duplex audio drivers. A different audio driver is used for playback and recording. Most third-party audio interfaces are full-duplex. There is a workaround if you only have a half-duplex device. You can open the macOS Audio MIDI Setup utility and create an aggregate device by choosing the File→Open Aggregate Editor. If you use an aggregate device, there may be a delay between when you press record and before recording and playback actually start.